> ## Documentation Index
> Fetch the complete documentation index at: https://docs.twenty.com/llms.txt
> Use this file to discover all available pages before exploring further.
# 1. 데이터 모델
> 문서와 템플릿을 객체, 필드, 관계로 모델링합니다.
우리 앱에는 두 개의 커스텀 객체가 필요합니다: **document templates**(무엇을 쓸지)와
**documents**(생성된 결과)입니다. 이들을 정의해 보겠습니다.
각 엔티티 파일을 CLI로 스캐폴딩하세요 — 그러면 유효한 UUID와 올바른
폴더가 자동으로 생성됩니다:
```bash filename="Terminal" theme={null}
yarn twenty dev:add object
```
아래에 완성된 파일들을 보여 줍니다.
모든 `*_UNIVERSAL_IDENTIFIER` 상수는
`src/constants/universal-identifiers.ts`에 있으며, 사용하는 곳에서 import됩니다. 아래 코드 조각에서는 설명을 위해 해당 import를 생략했지만 — 실제 파일에서는 반드시 포함해야 합니다.
## 템플릿 객체
템플릿에는 `name`, `{{placeholders}}`가 포함된 `body`, 그리고 Person 또는 Company 중
어느 쪽을 대상으로 작성되었는지 나타내는 `target`이 있습니다. `body`는
`RICH_TEXT` 필드이므로, Twenty는 여기에 완전한 리치 텍스트 에디터를 제공합니다.
```ts filename="src/objects/document-template.object.ts" theme={null}
import { defineObject, FieldType } from 'twenty-sdk/define';
export default defineObject({
universalIdentifier: DOCUMENT_TEMPLATE_OBJECT_UNIVERSAL_IDENTIFIER,
nameSingular: 'documentTemplate',
namePlural: 'documentTemplates',
labelSingular: 'Document template',
labelPlural: 'Document templates',
icon: 'IconFileText',
labelIdentifierFieldMetadataUniversalIdentifier:
TEMPLATE_NAME_FIELD_UNIVERSAL_IDENTIFIER,
fields: [
{ universalIdentifier: TEMPLATE_NAME_FIELD_UNIVERSAL_IDENTIFIER,
type: FieldType.TEXT, name: 'name', label: 'Name', icon: 'IconAbc' },
{ universalIdentifier: TEMPLATE_BODY_FIELD_UNIVERSAL_IDENTIFIER,
type: FieldType.RICH_TEXT, name: 'body', label: 'Body', icon: 'IconFileText',
description: 'Use {{placeholders}} like {{name.firstName}} or {{jobTitle}}.' },
{ universalIdentifier: TEMPLATE_TARGET_FIELD_UNIVERSAL_IDENTIFIER,
type: FieldType.SELECT, name: 'target', label: 'Target', icon: 'IconTarget',
defaultValue: `'PERSON'`,
options: [
{ id: TEMPLATE_TARGET_OPTION_PERSON_UNIVERSAL_IDENTIFIER,
value: 'PERSON', label: 'Person', color: 'blue', position: 0 },
{ id: TEMPLATE_TARGET_OPTION_COMPANY_UNIVERSAL_IDENTIFIER,
value: 'COMPANY', label: 'Company', color: 'green', position: 1 },
] },
],
});
```
`SELECT` 옵션 **values**는 반드시 `UPPER_CASE`(`person`이 아니라 `PERSON`)여야 하며,
`defaultValue`는 따옴표로 한 번 더 감싸야 합니다: `` `'PERSON'` ``. `label`은
사용자에게 표시되는 값입니다.
## 문서 객체
생성된 문서는 렌더링된 `content`와 `status`를 저장합니다. `status`가 `DRAFT` / `GENERATED`인 `select` 필드로
같은 방식으로 정의합니다. 전체 파일:
[`document.object.ts`](https://github.com/twentyhq/twenty/blob/main/packages/twenty-apps/examples/document-generator/src/objects/document.object.ts).
## 관계를 사용해 둘을 연결하기
각 문서는 자신이 생성된 템플릿을 가리켜야 합니다. 관계는
항상 **양방향**이며, 각 필드 파일에서 각각 한쪽씩 정의합니다.
```ts filename="src/fields/document-template-relation.field.ts" theme={null}
import { defineField, FieldType, OnDeleteAction, RelationType } from 'twenty-sdk/define';
// The "many" side: each document belongs to one template.
export default defineField({
universalIdentifier: DOCUMENT_TEMPLATE_FIELD_UNIVERSAL_IDENTIFIER,
objectUniversalIdentifier: DOCUMENT_OBJECT_UNIVERSAL_IDENTIFIER,
type: FieldType.RELATION,
name: 'template',
label: 'Template',
relationTargetObjectMetadataUniversalIdentifier:
DOCUMENT_TEMPLATE_OBJECT_UNIVERSAL_IDENTIFIER,
relationTargetFieldMetadataUniversalIdentifier:
TEMPLATE_DOCUMENTS_FIELD_UNIVERSAL_IDENTIFIER,
universalSettings: {
relationType: RelationType.MANY_TO_ONE,
onDelete: OnDeleteAction.SET_NULL,
joinColumnName: 'templateId',
},
});
```
반대편(`template-documents-relation.field.ts`)은
반대 방향을 가리키는 `documents`라는 이름의 `RelationType.ONE_TO_MANY` 필드입니다.
전체 패턴은 [Relations](/l/ko/developers/extend/apps/data/relations)를 참조하세요.
## Twenty에서 확인하기
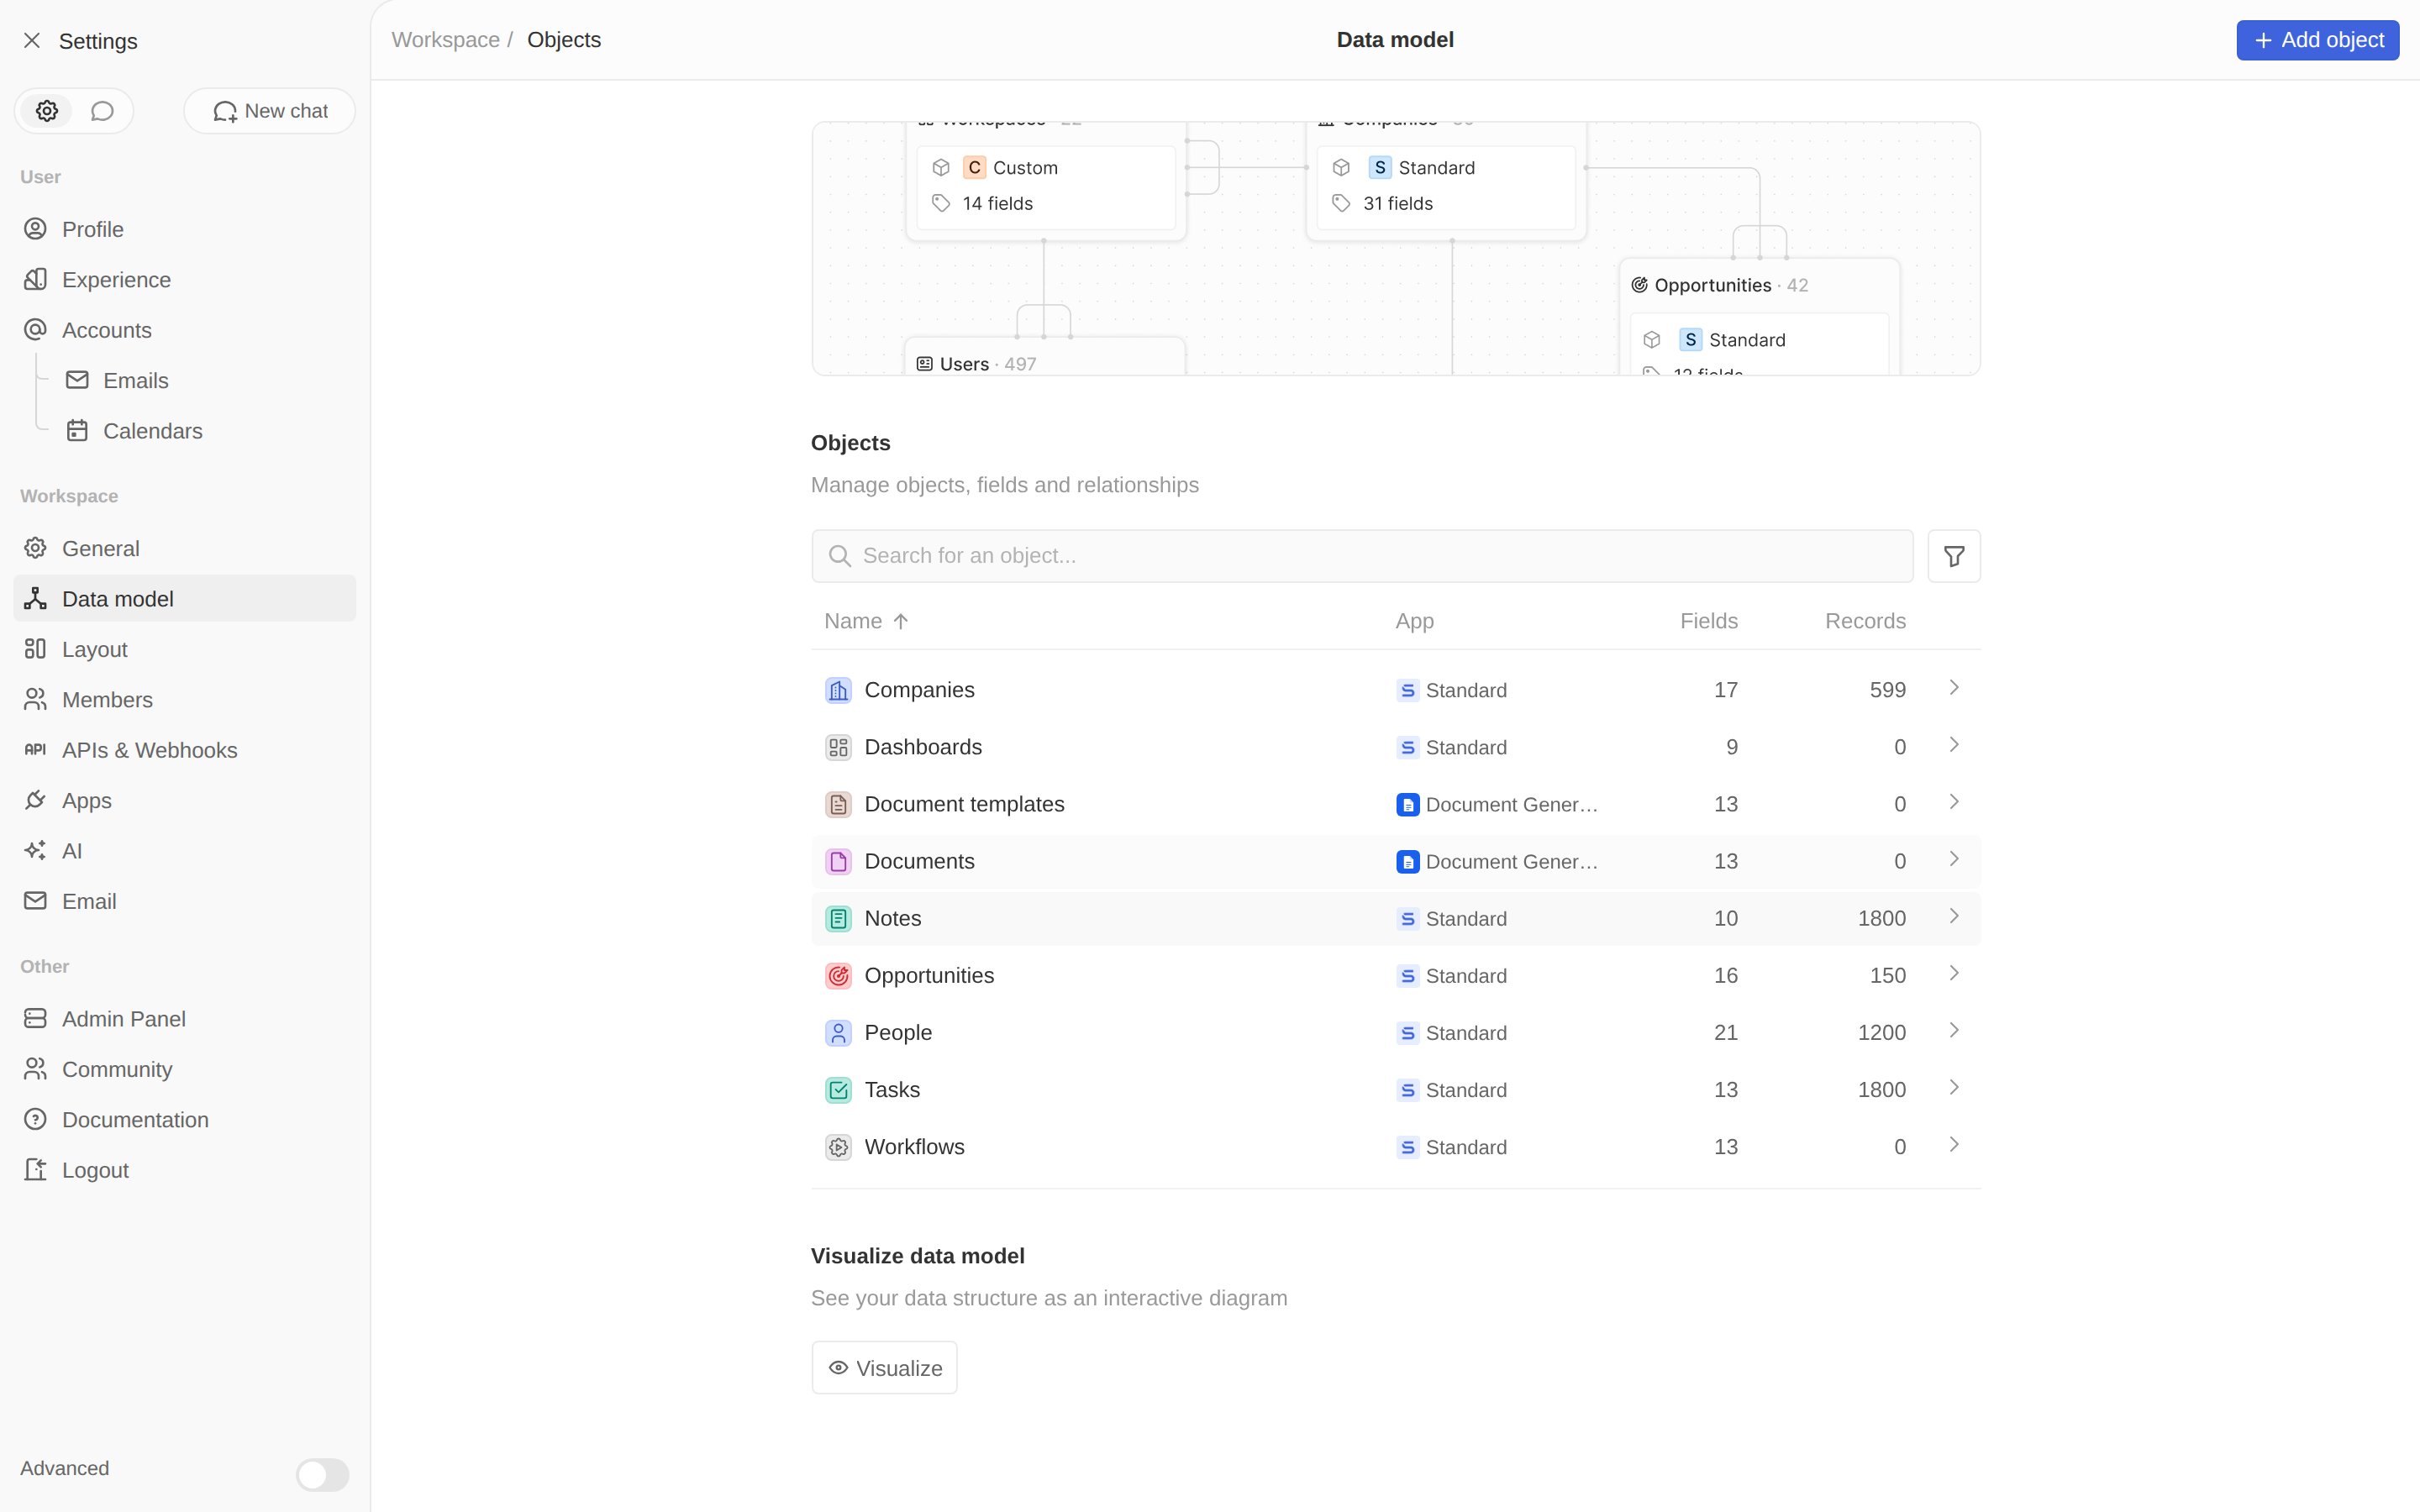
`yarn twenty dev`를 실행한 상태에서 **Settings → Data model**을 엽니다. 두 객체가
모두 표시되며, 여러분의 앱으로 태깅되어 있습니다.
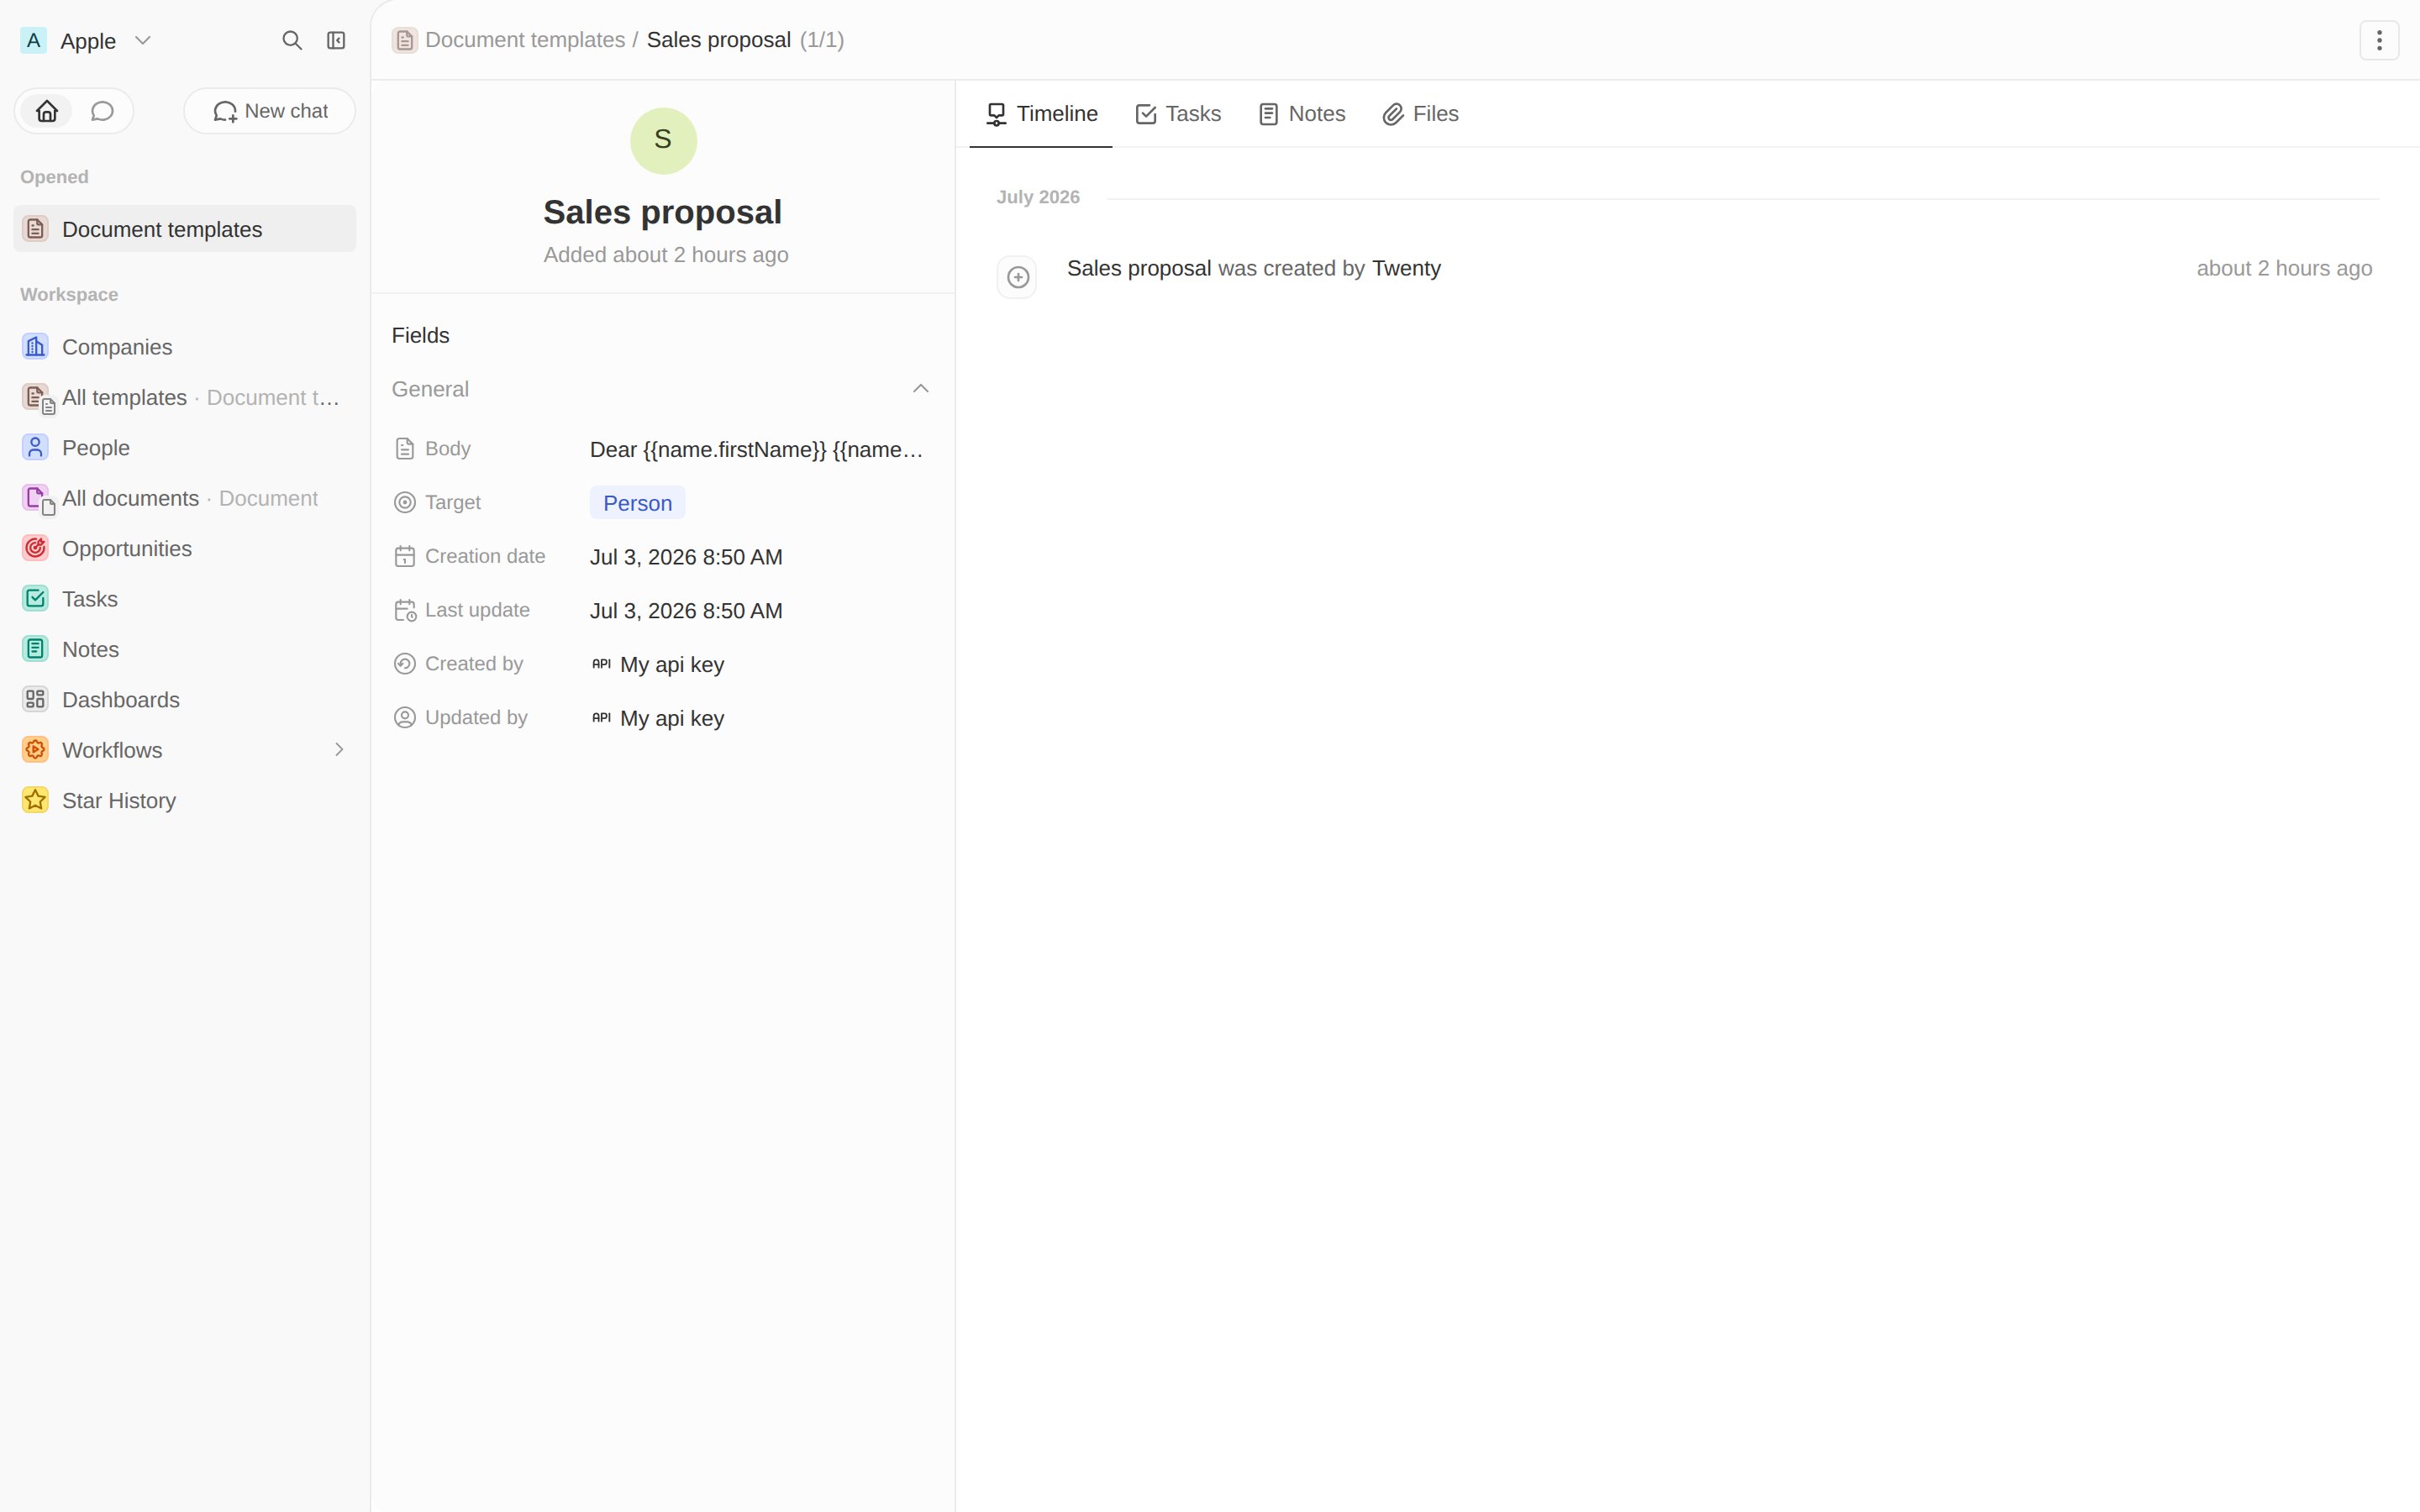
 테스트용으로 템플릿 하나를 생성하세요 — 이름을 *Sales proposal*로 지정하고, **Target**을
*Person*으로 설정한 뒤, placeholder 몇 개가 포함된 body를 붙여넣습니다:
```text theme={null}
Dear {{name.firstName}} {{name.lastName}},
As {{jobTitle}} at {{company.name}}, we think you'll love our product.
Best,
The Team
```
테스트용으로 템플릿 하나를 생성하세요 — 이름을 *Sales proposal*로 지정하고, **Target**을
*Person*으로 설정한 뒤, placeholder 몇 개가 포함된 body를 붙여넣습니다:
```text theme={null}
Dear {{name.firstName}} {{name.lastName}},
As {{jobTitle}} at {{company.name}}, we think you'll love our product.
Best,
The Team
```
 **이 단계를 마치면:** relation으로 연결된 `documentTemplate` 및 `document` 객체가 있고,
생성을 위한 템플릿이 하나 준비된 상태입니다. 다음은 이를 채워 넣는 로직입니다.
템플릿을 채우는 로직 함수를 작성합니다.
**이 단계를 마치면:** relation으로 연결된 `documentTemplate` 및 `document` 객체가 있고,
생성을 위한 템플릿이 하나 준비된 상태입니다. 다음은 이를 채워 넣는 로직입니다.
템플릿을 채우는 로직 함수를 작성합니다.