> ## Documentation Index
> Fetch the complete documentation index at: https://docs.twenty.com/llms.txt
> Use this file to discover all available pages before exploring further.
# 수신 이메일 자동 회신
> AI를 사용해 수신 이메일을 분류하고 스레드형 답장을 자동으로 보내는 워크플로를 구축하세요.
수신 이메일에 몇 시간이 아니라 몇 초 만에 응답하세요. 이 워크플로는 AI 에이전트를 사용해 잡음(뉴스레터, 스팸, 자동 회신)을 거르고 실제 메시지에는 개인화된 응답 초안을 작성한 다음, 원본 대화 내에서 스레드형 답장으로 전송합니다.
## 이메일 스레드 작동 방식
모든 이메일에는 숨겨진 `Message-ID` 헤더가 있으며, 이는 발신자의 메일 서버가 부여하는 고유한 식별자입니다. 이메일에 회신할 때, 메일 클라이언트는 해당 지문을 참조하는 `In-Reply-To` 헤더를 설정합니다. Gmail, Outlook 및 기타 모든 클라이언트가 메시지를 스레드로 묶는 방식입니다.
Twenty에서는 그 지문이 Message 객체의 `headerMessageId`로 저장됩니다. 워크플로우가 이를 가져와 Send Email 작업의 In-Reply-To 필드에 전달합니다.
## 워크플로우 구성
### 1단계: 새 워크플로우 생성
**설정 -> 워크플로우**로 이동한 다음 **+ 새 워크플로우**를 클릭하세요.
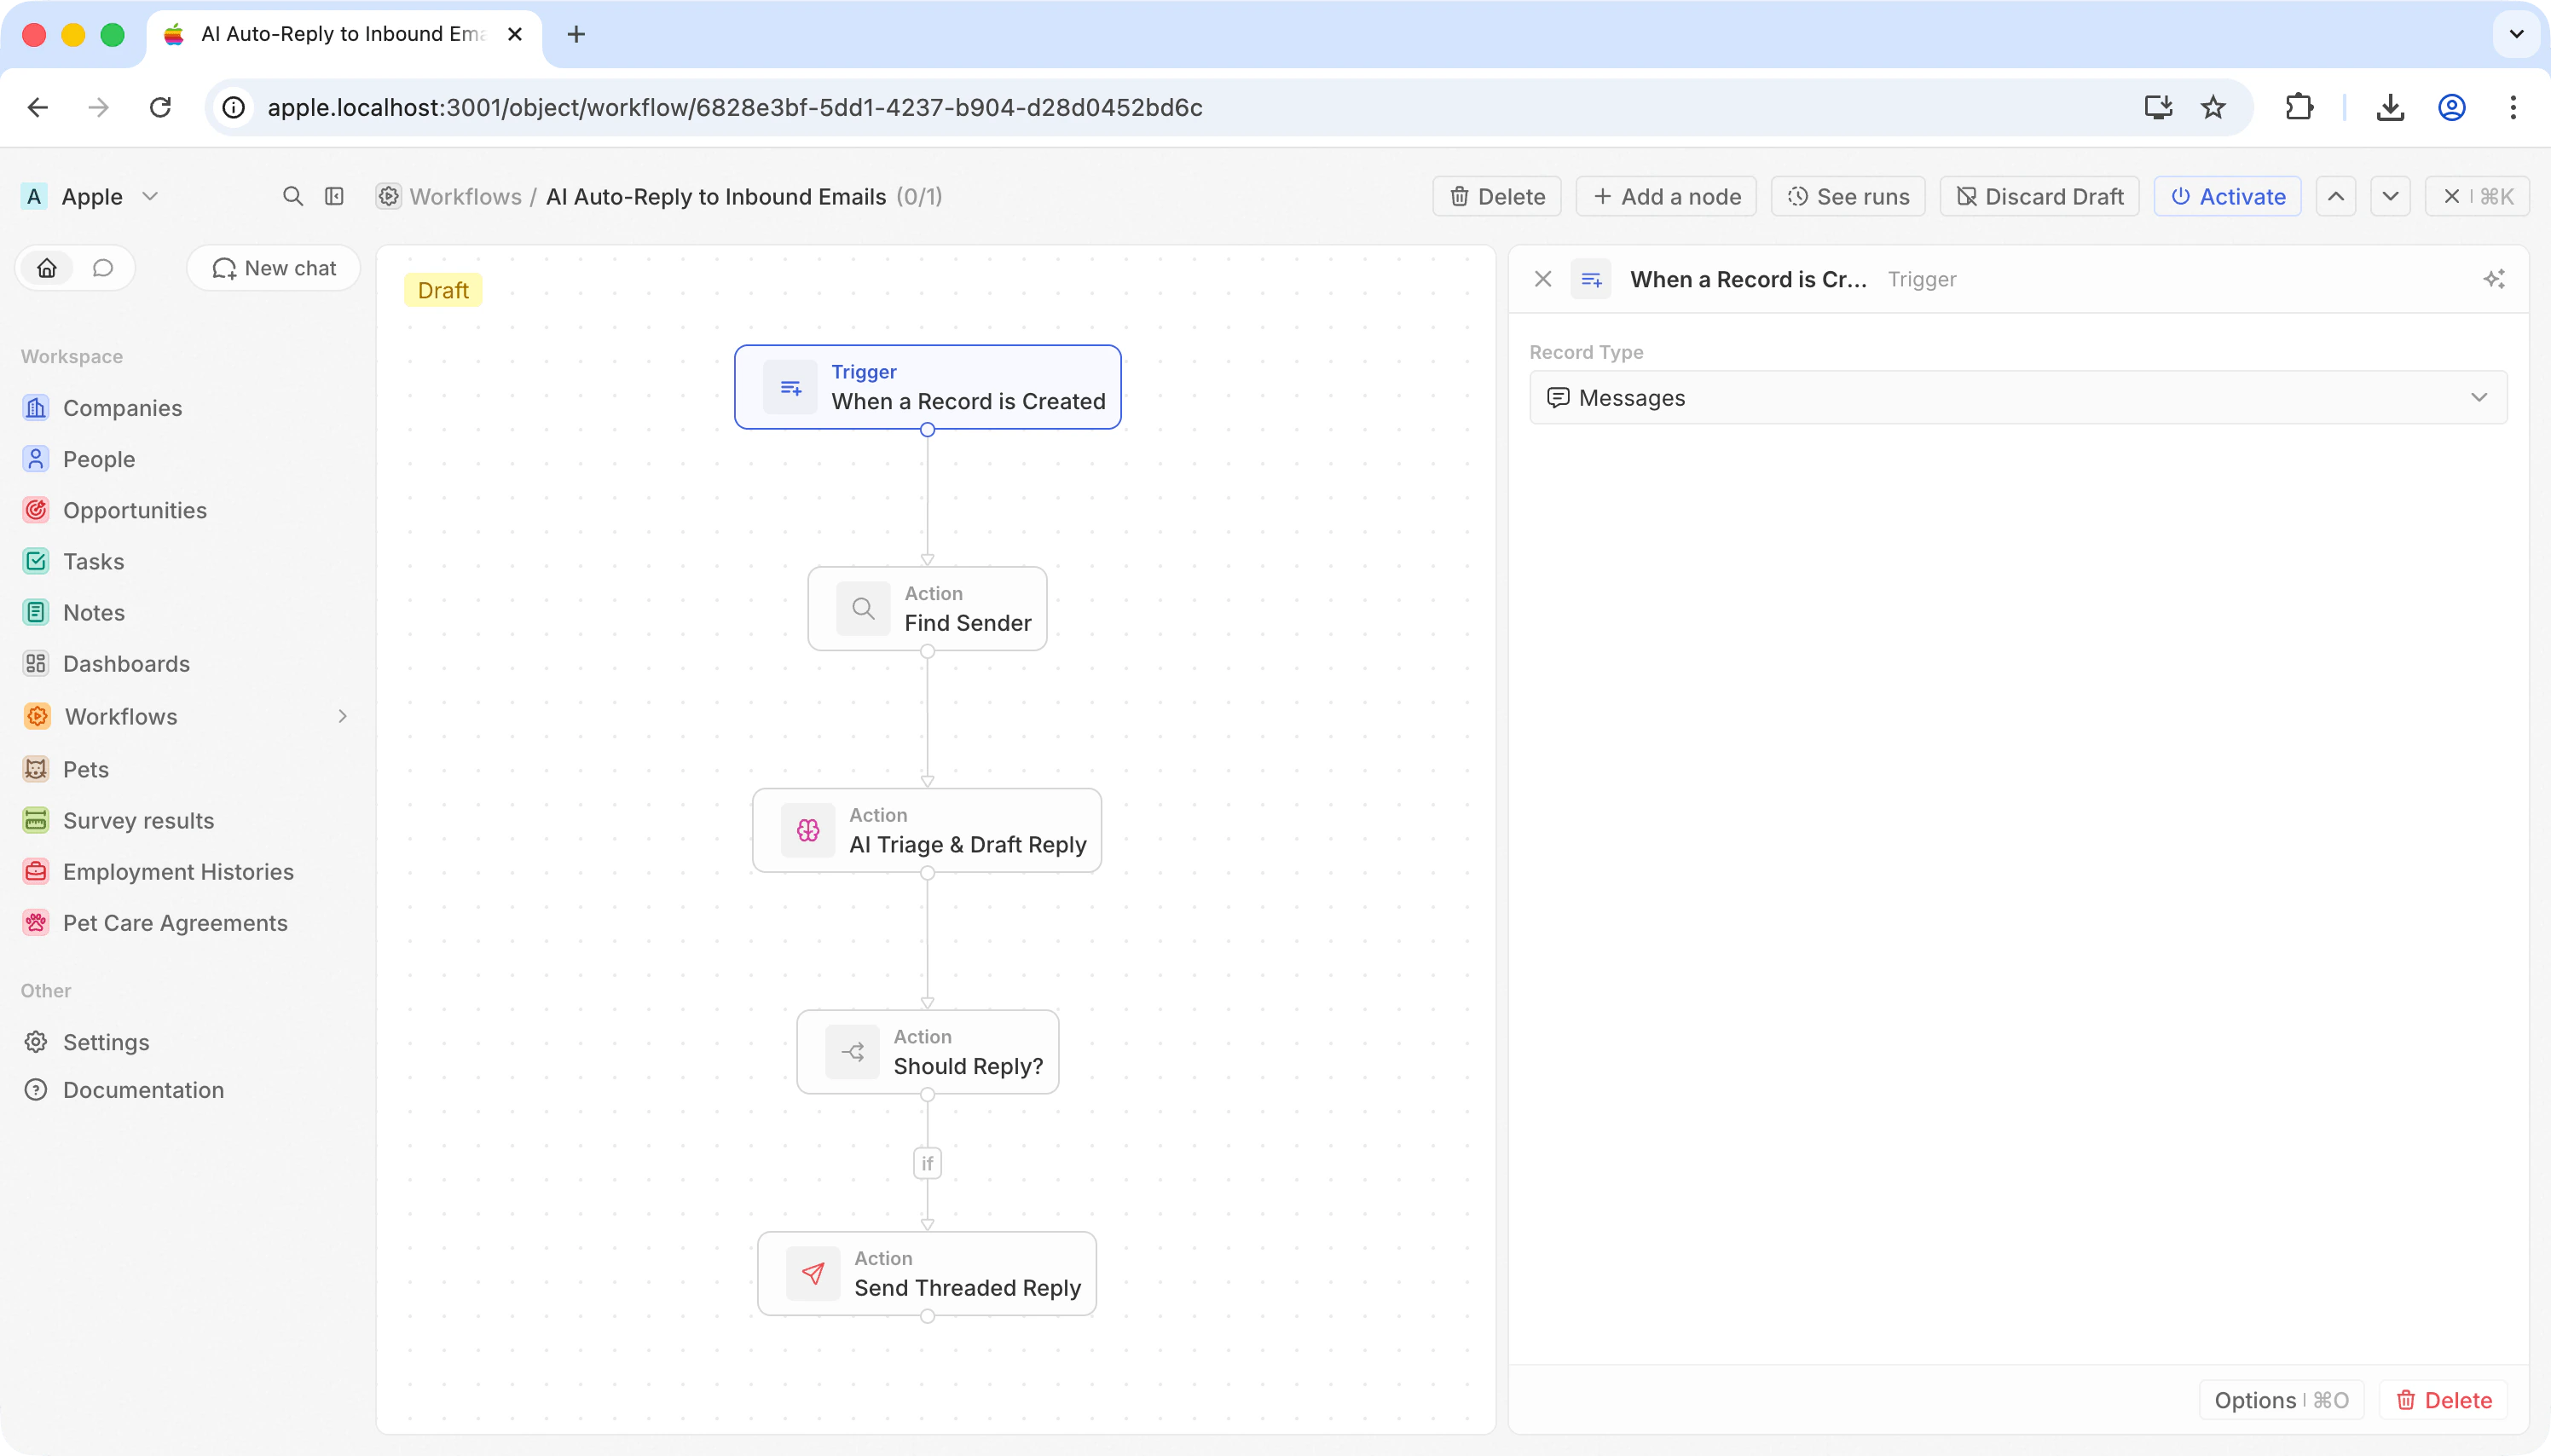
### 2단계: 수신 메시지에 트리거 설정
**When a Record is Created**를 선택하고 **Messages**를 선택하세요.
이메일이 Twenty에 도착할 때마다 이 트리거가 실행됩니다.
 ### 3단계: 발신자 찾기
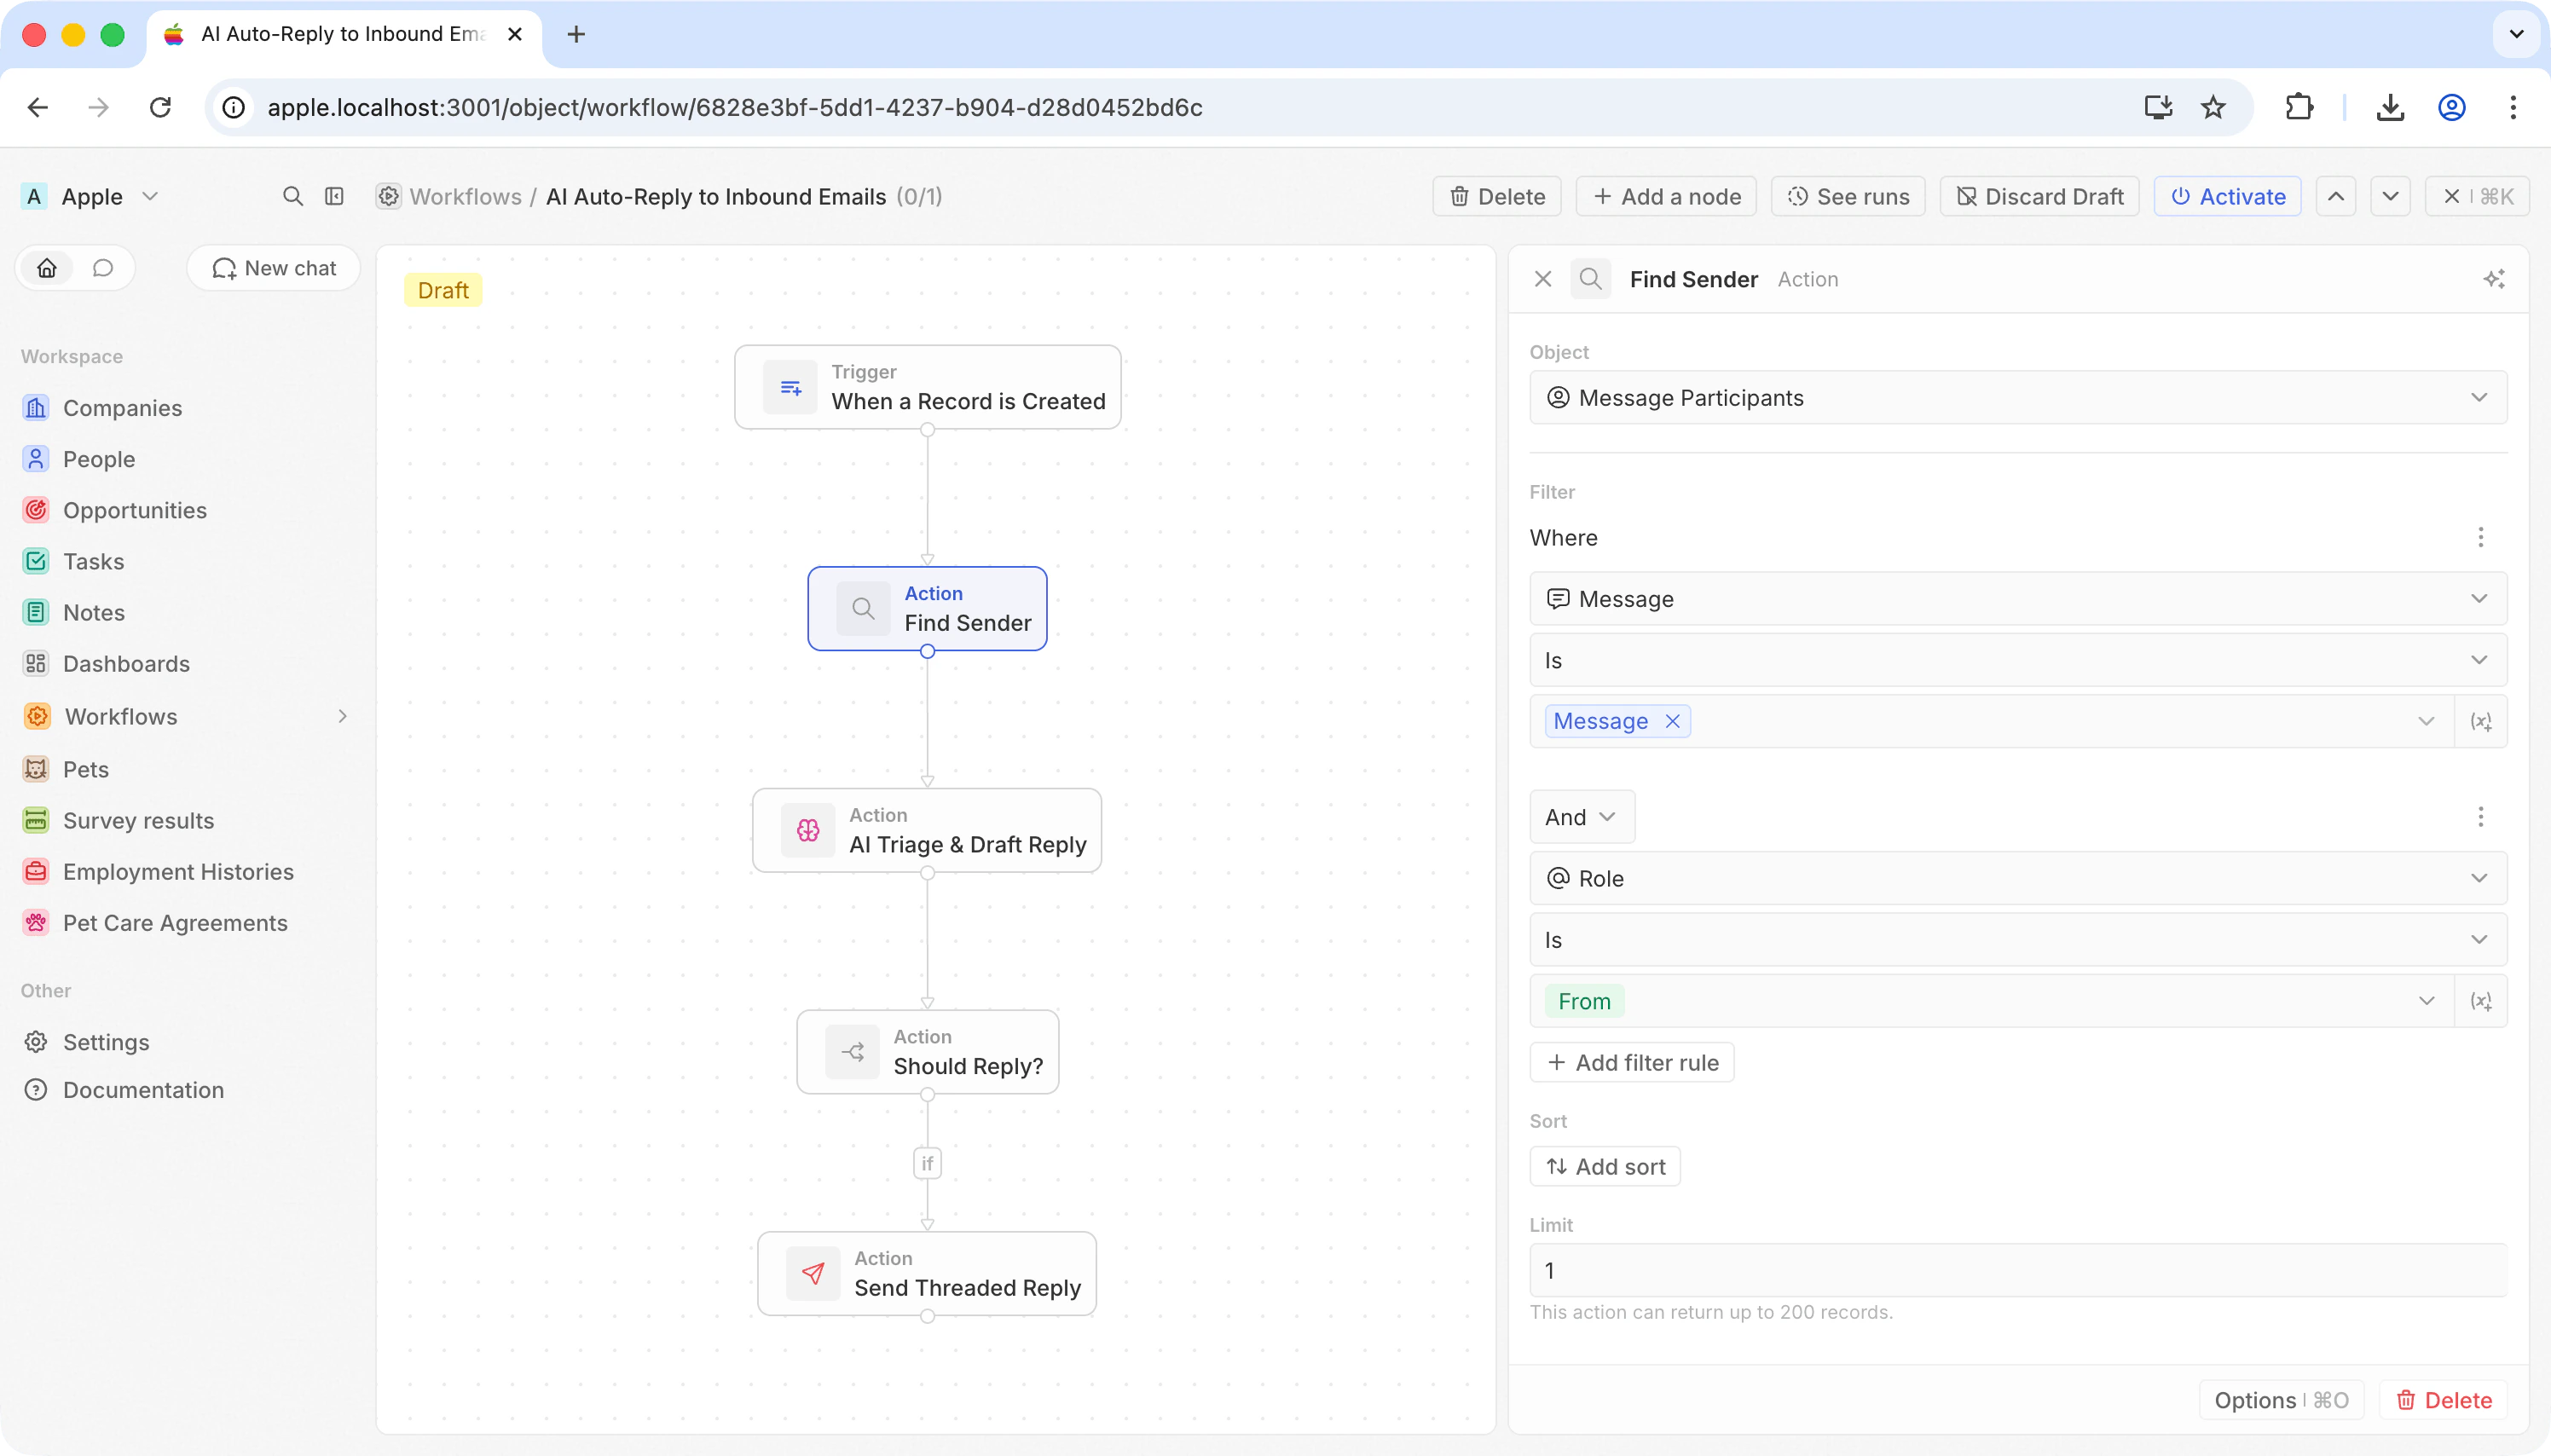
**Search Records** 작업을 추가합니다.
발신자 주소는 메시지 자체에 있지 않고 — 연결된 Message Participant 레코드에 있습니다.
| 필드 | 값 |
| ------ | ------------------------------- |
| **객체** | 메시지 참가자 |
| **필터** | Message **값이** `{{trigger.id}}` |
| **필터** | Role **값이** From |
| **제한** | 1 |
이렇게 하면 발신자의 이메일은 `handle`에, 이름은 `displayName`에 담깁니다.
### 3단계: 발신자 찾기
**Search Records** 작업을 추가합니다.
발신자 주소는 메시지 자체에 있지 않고 — 연결된 Message Participant 레코드에 있습니다.
| 필드 | 값 |
| ------ | ------------------------------- |
| **객체** | 메시지 참가자 |
| **필터** | Message **값이** `{{trigger.id}}` |
| **필터** | Role **값이** From |
| **제한** | 1 |
이렇게 하면 발신자의 이메일은 `handle`에, 이름은 `displayName`에 담깁니다.
 ### 4단계: AI 분류 및 회신 초안 작성
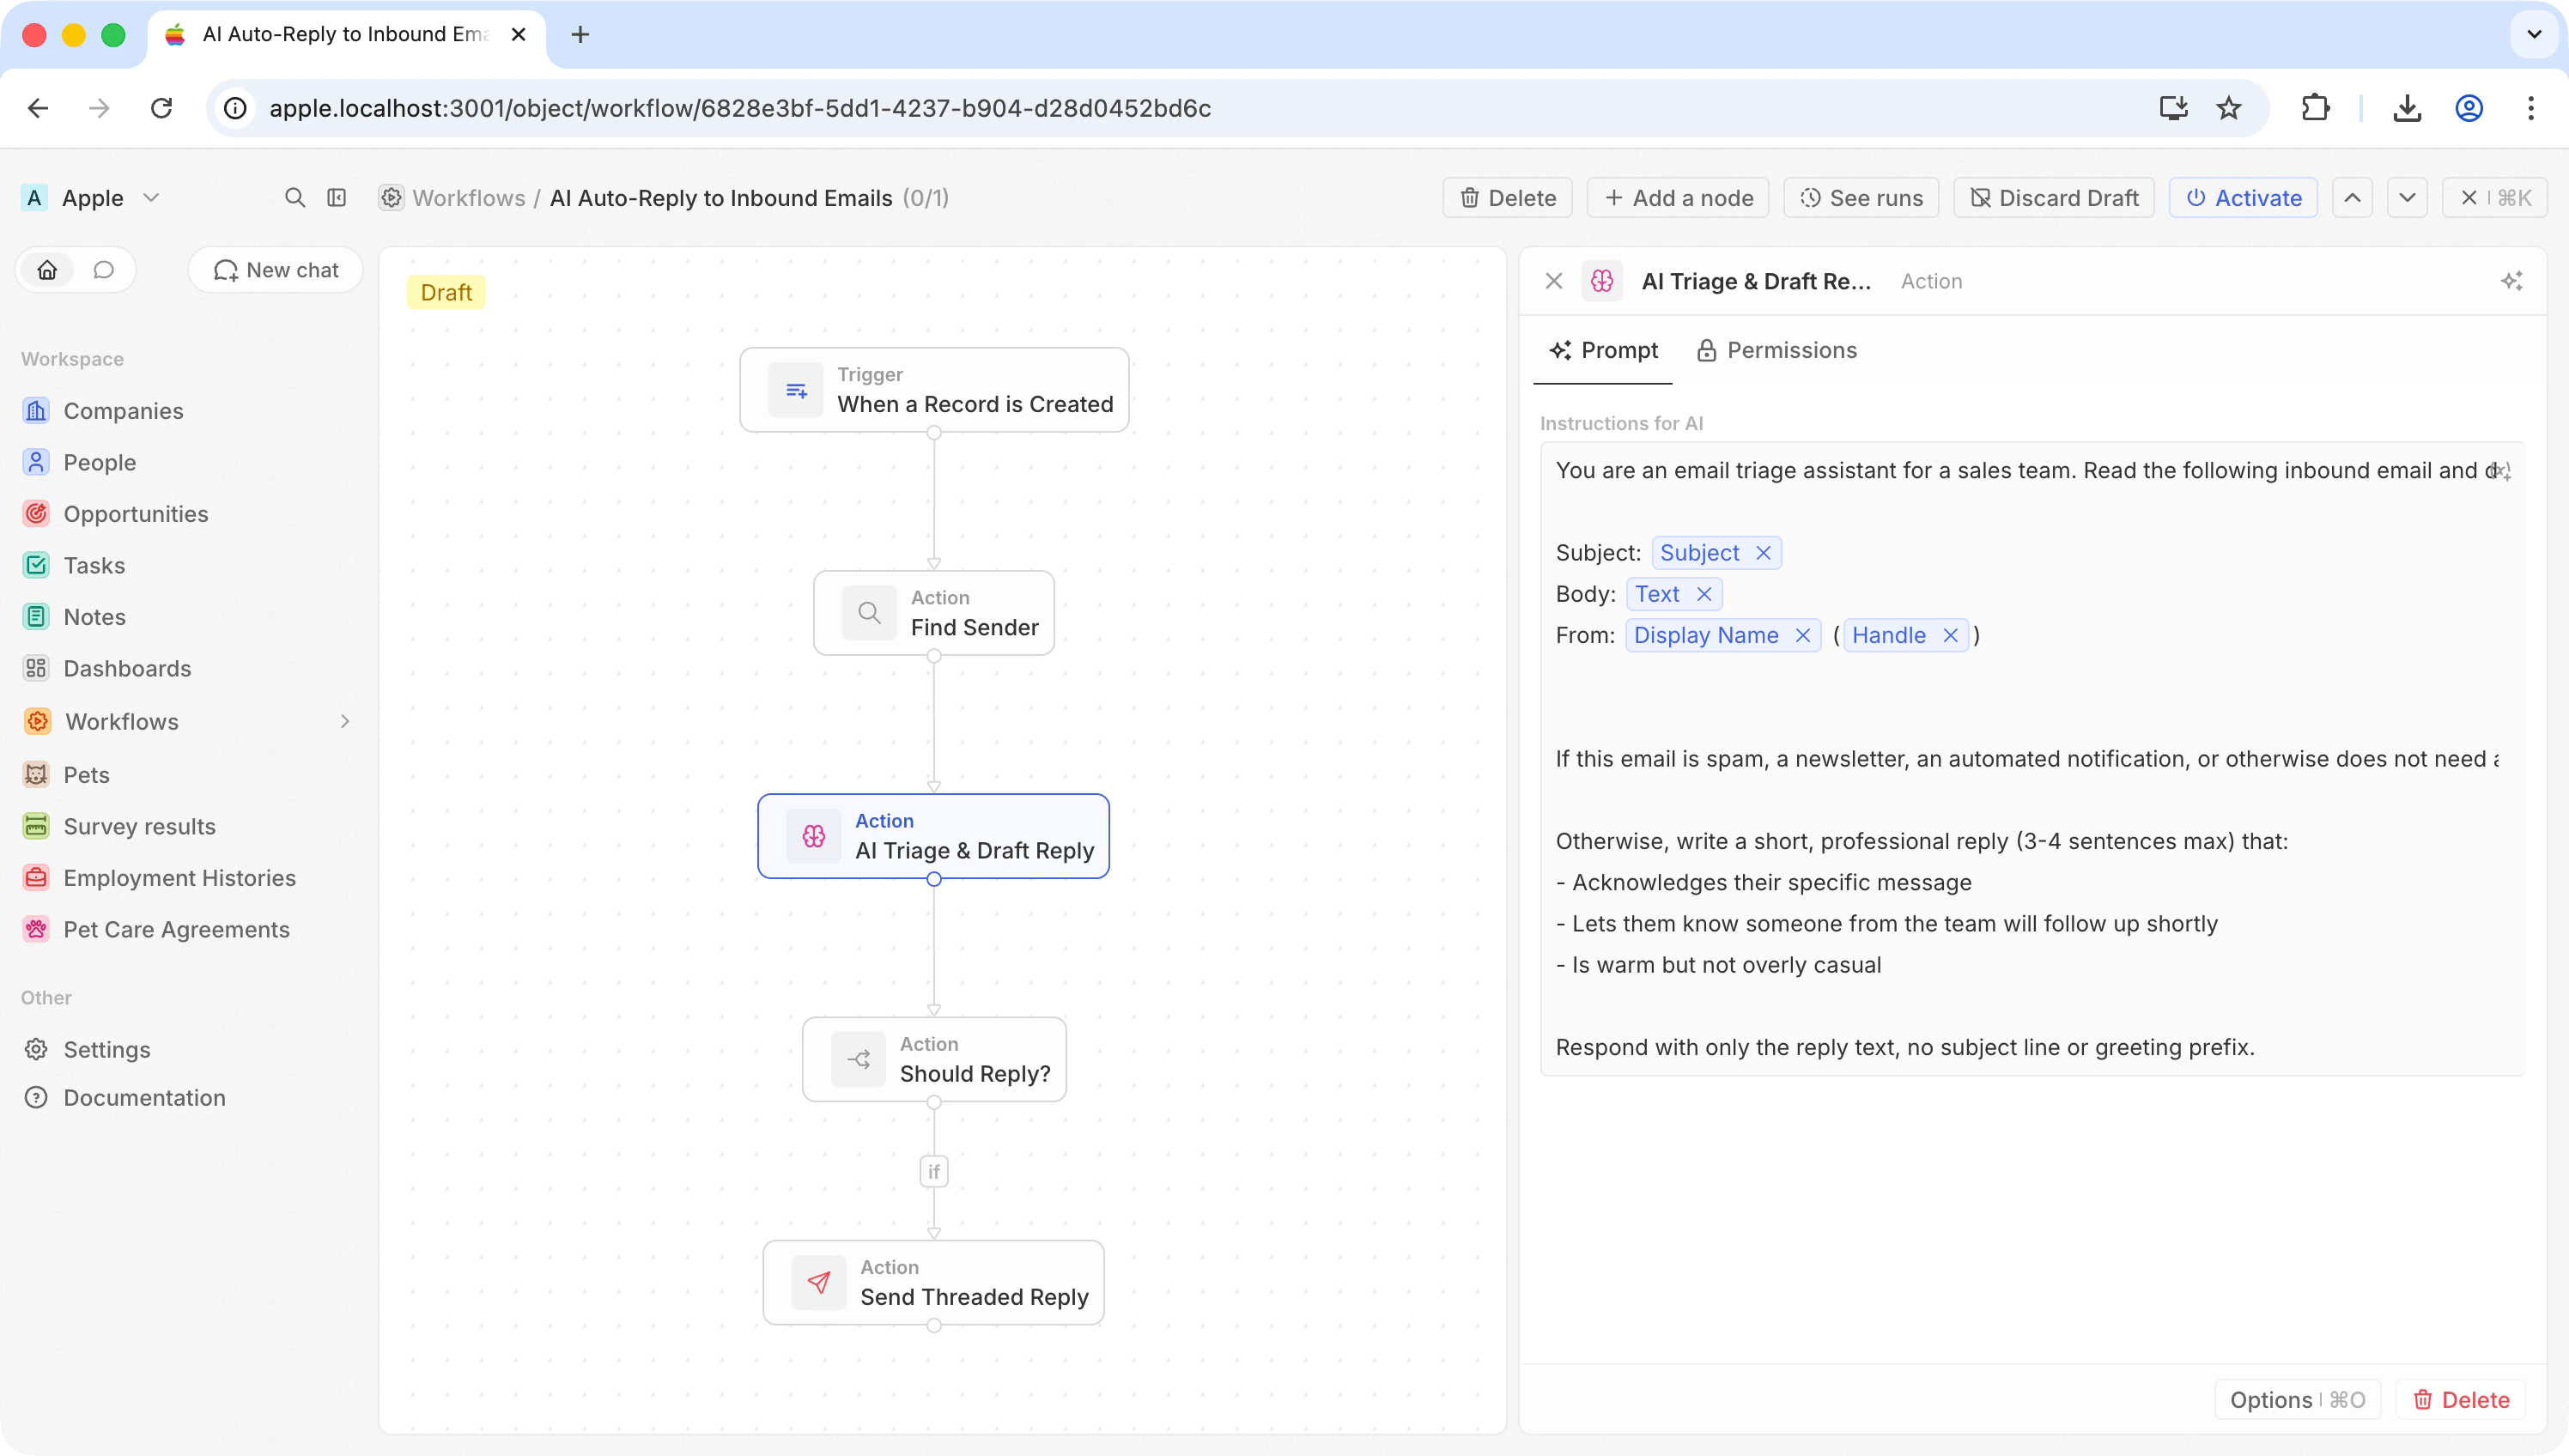
**AI Agent** 작업을 추가합니다. 이 단일 단계는 두 가지를 수행합니다: 이메일에 회신할지 여부를 결정하고, 필요하다면 회신 내용을 작성합니다.
다음과 같은 프롬프트를 사용하세요:
```
You are an email triage assistant for a sales team. Read the following
inbound email and decide if it deserves a reply.
Subject: {{trigger.subject}}
Body: {{trigger.text}}
From: {{Find Sender.first.displayName}} ({{Find Sender.first.handle}})
If this email is spam, a newsletter, an automated notification, or
otherwise does not need a human reply, respond with exactly: SKIP
Otherwise, write a short, professional reply (3-4 sentences max) that:
- Acknowledges their specific message
- Lets them know someone from the team will follow up shortly
- Is warm but not overly casual
Respond with only the reply text, no subject line or greeting prefix.
```
AI Agent는 다음 단계에서 참조할 수 있도록 `response` 필드에 응답을 출력합니다.
### 4단계: AI 분류 및 회신 초안 작성
**AI Agent** 작업을 추가합니다. 이 단일 단계는 두 가지를 수행합니다: 이메일에 회신할지 여부를 결정하고, 필요하다면 회신 내용을 작성합니다.
다음과 같은 프롬프트를 사용하세요:
```
You are an email triage assistant for a sales team. Read the following
inbound email and decide if it deserves a reply.
Subject: {{trigger.subject}}
Body: {{trigger.text}}
From: {{Find Sender.first.displayName}} ({{Find Sender.first.handle}})
If this email is spam, a newsletter, an automated notification, or
otherwise does not need a human reply, respond with exactly: SKIP
Otherwise, write a short, professional reply (3-4 sentences max) that:
- Acknowledges their specific message
- Lets them know someone from the team will follow up shortly
- Is warm but not overly casual
Respond with only the reply text, no subject line or greeting prefix.
```
AI Agent는 다음 단계에서 참조할 수 있도록 `response` 필드에 응답을 출력합니다.
 ### 5단계: AI 결정에 따라 분기
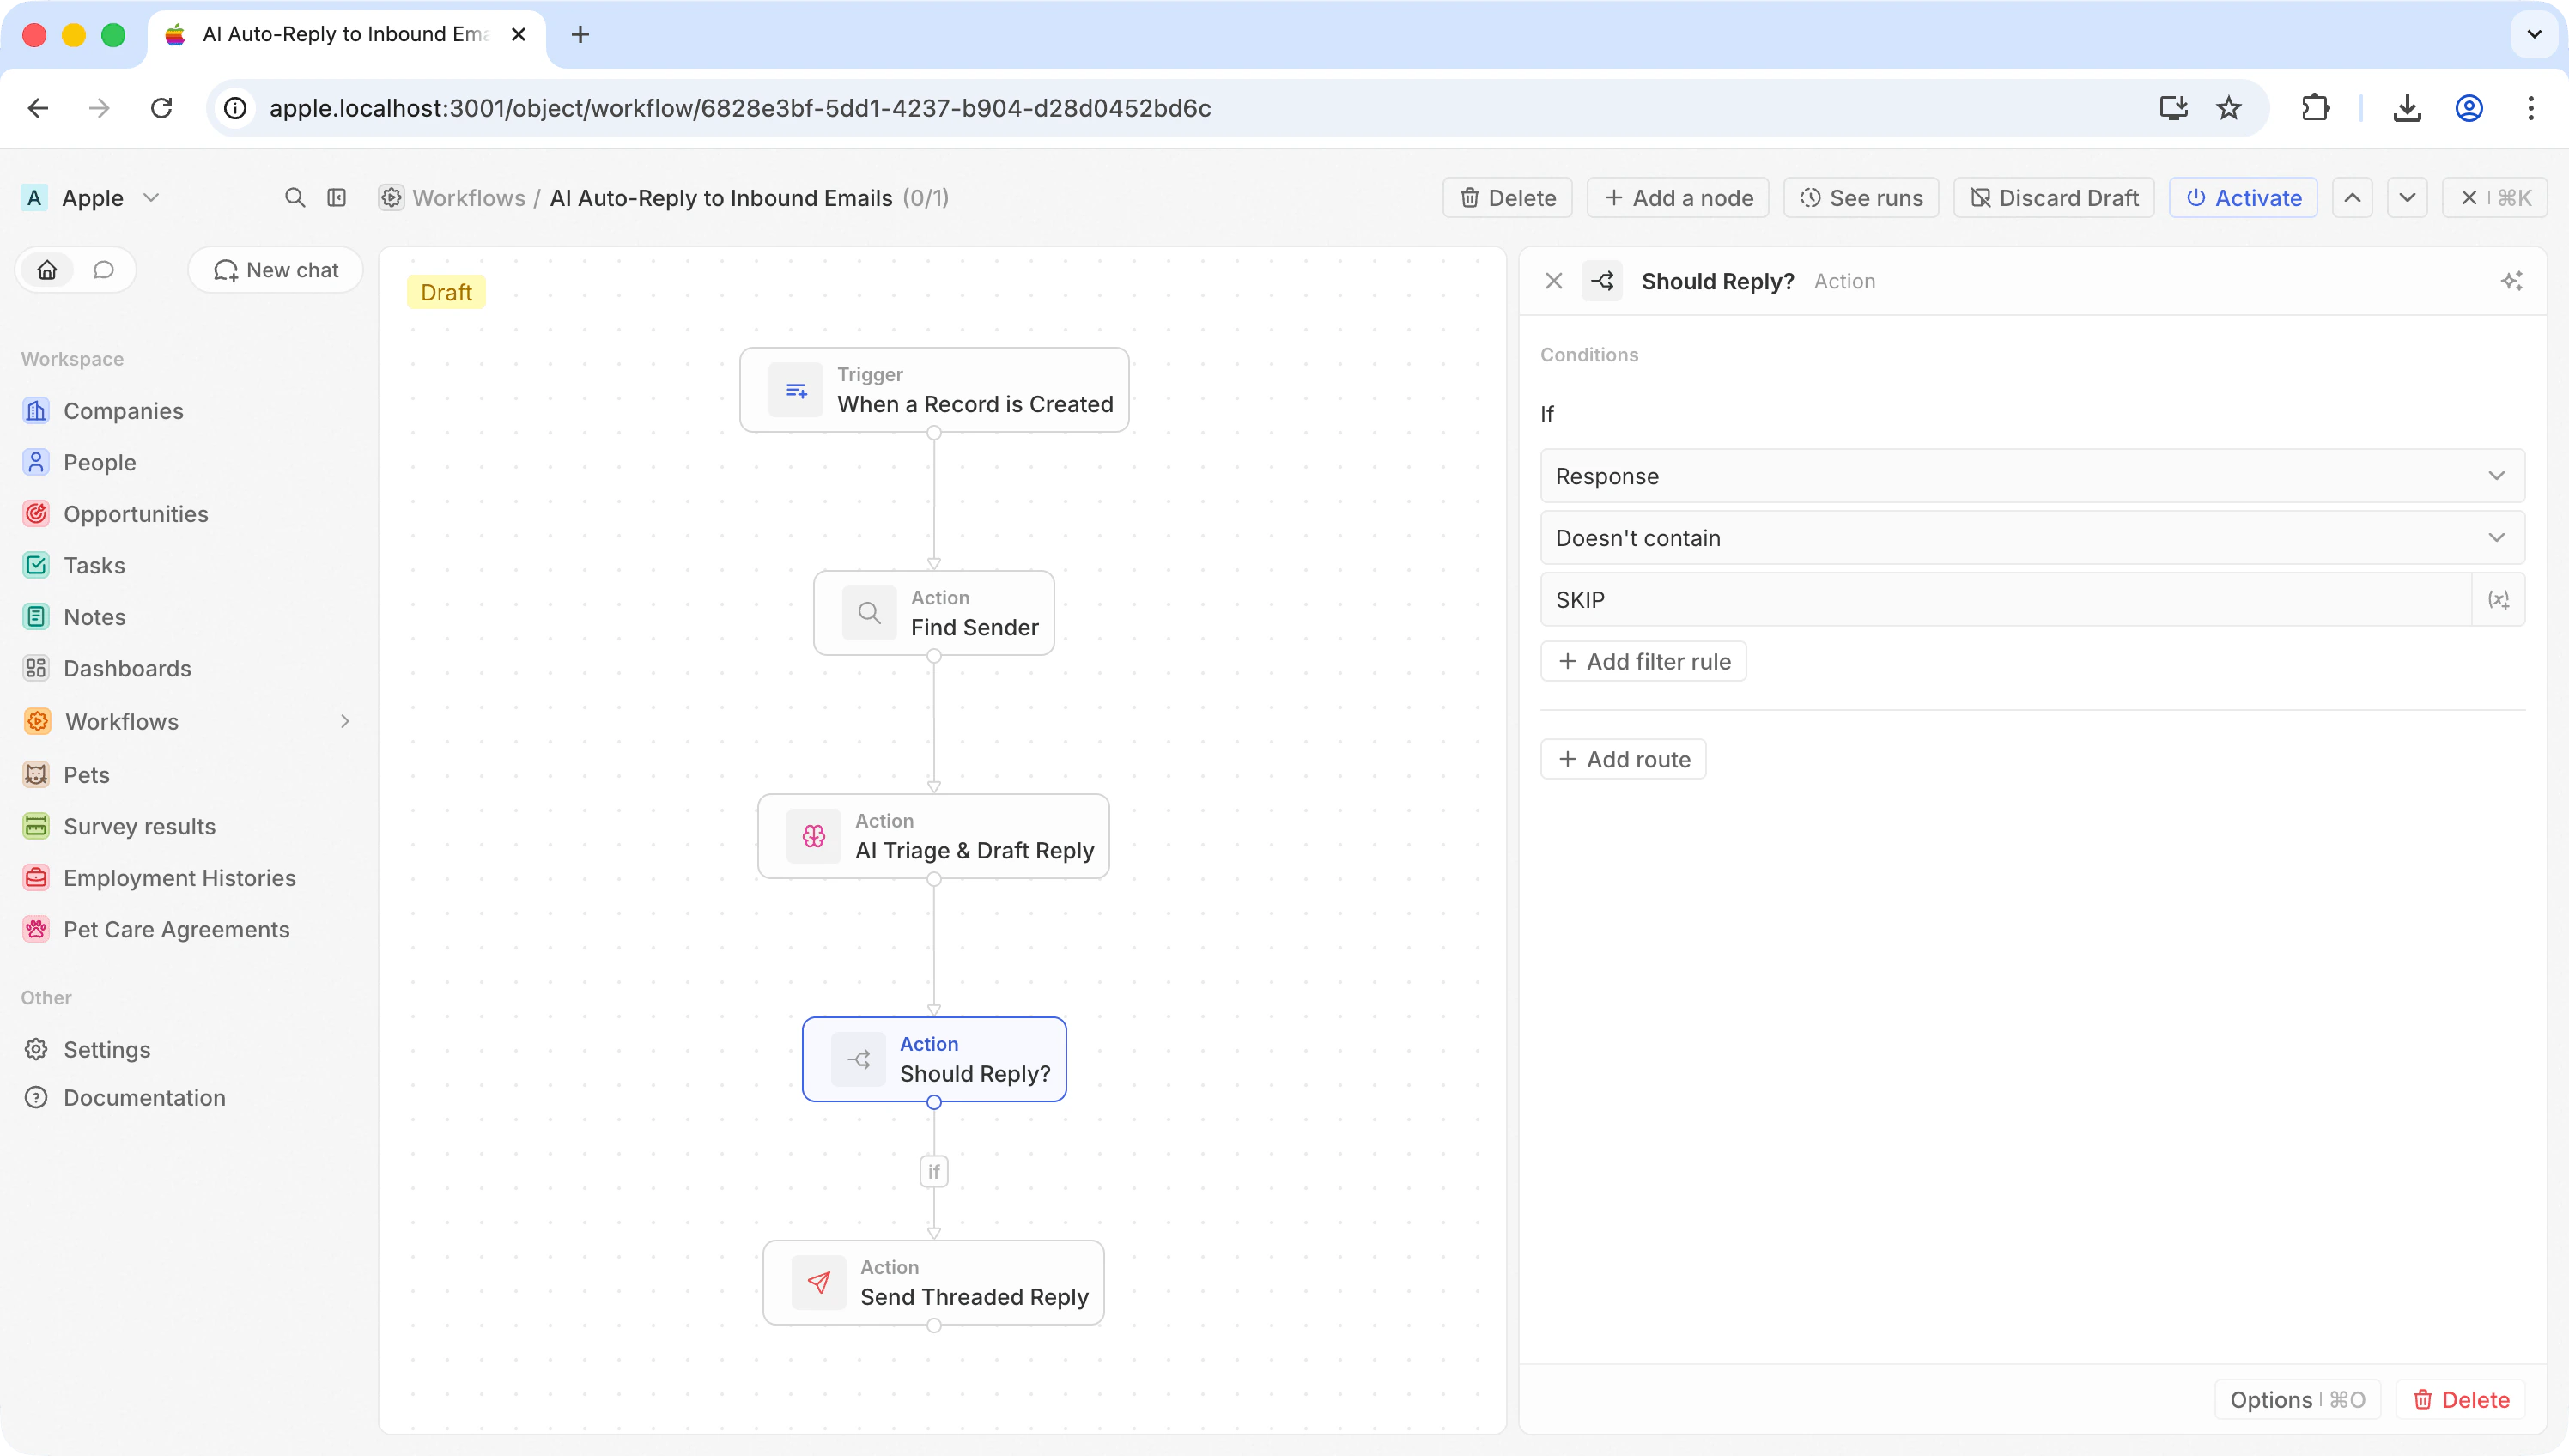
**If/Else** 작업을 추가하여 AI가 회신할지 건너뛸지를 확인합니다.
| 필드 | 값 |
| ----------- | ---------------------------------------- |
| **조건** | AI Agent `response`에 `SKIP`이 **포함되지 않음** |
| **참인 경우** | Send Email로 계속 |
| **그렇지 않으면** | 아무것도 하지 않음(워크플로우 종료) |
스팸, 뉴스레터, 자동 생성된 메시지는 제외됩니다. 그 외 모든 항목은 다음 단계로 이동합니다.
### 5단계: AI 결정에 따라 분기
**If/Else** 작업을 추가하여 AI가 회신할지 건너뛸지를 확인합니다.
| 필드 | 값 |
| ----------- | ---------------------------------------- |
| **조건** | AI Agent `response`에 `SKIP`이 **포함되지 않음** |
| **참인 경우** | Send Email로 계속 |
| **그렇지 않으면** | 아무것도 하지 않음(워크플로우 종료) |
스팸, 뉴스레터, 자동 생성된 메시지는 제외됩니다. 그 외 모든 항목은 다음 단계로 이동합니다.
 ### 6단계: 스레드형 회신 보내기
"if true" 분기에서 **Send Email** 작업을 추가합니다. **Advanced options**를 클릭한 다음 **Add In-Reply-To**를 클릭합니다.
| 필드 | 값 |
| --------------- | -------------------------------------- |
| **받는 사람** | `{{Find Sender.first.handle}}` |
| **제목** | `Re: {{trigger.subject}}` |
| **Body** | `{{AI Triage & Draft Reply.response}}` |
| **In-Reply-To** | `{{trigger.headerMessageId}}` |
In-Reply-To 필드는 이 메시지를 새 대화가 아닌 회신으로 인식하게 합니다. 수신자는 Gmail, Outlook 등 모든 클라이언트에서 원본 이메일 아래에 스레드로 묶인 상태로 보게 됩니다.
### 6단계: 스레드형 회신 보내기
"if true" 분기에서 **Send Email** 작업을 추가합니다. **Advanced options**를 클릭한 다음 **Add In-Reply-To**를 클릭합니다.
| 필드 | 값 |
| --------------- | -------------------------------------- |
| **받는 사람** | `{{Find Sender.first.handle}}` |
| **제목** | `Re: {{trigger.subject}}` |
| **Body** | `{{AI Triage & Draft Reply.response}}` |
| **In-Reply-To** | `{{trigger.headerMessageId}}` |
In-Reply-To 필드는 이 메시지를 새 대화가 아닌 회신으로 인식하게 합니다. 수신자는 Gmail, Outlook 등 모든 클라이언트에서 원본 이메일 아래에 스레드로 묶인 상태로 보게 됩니다.
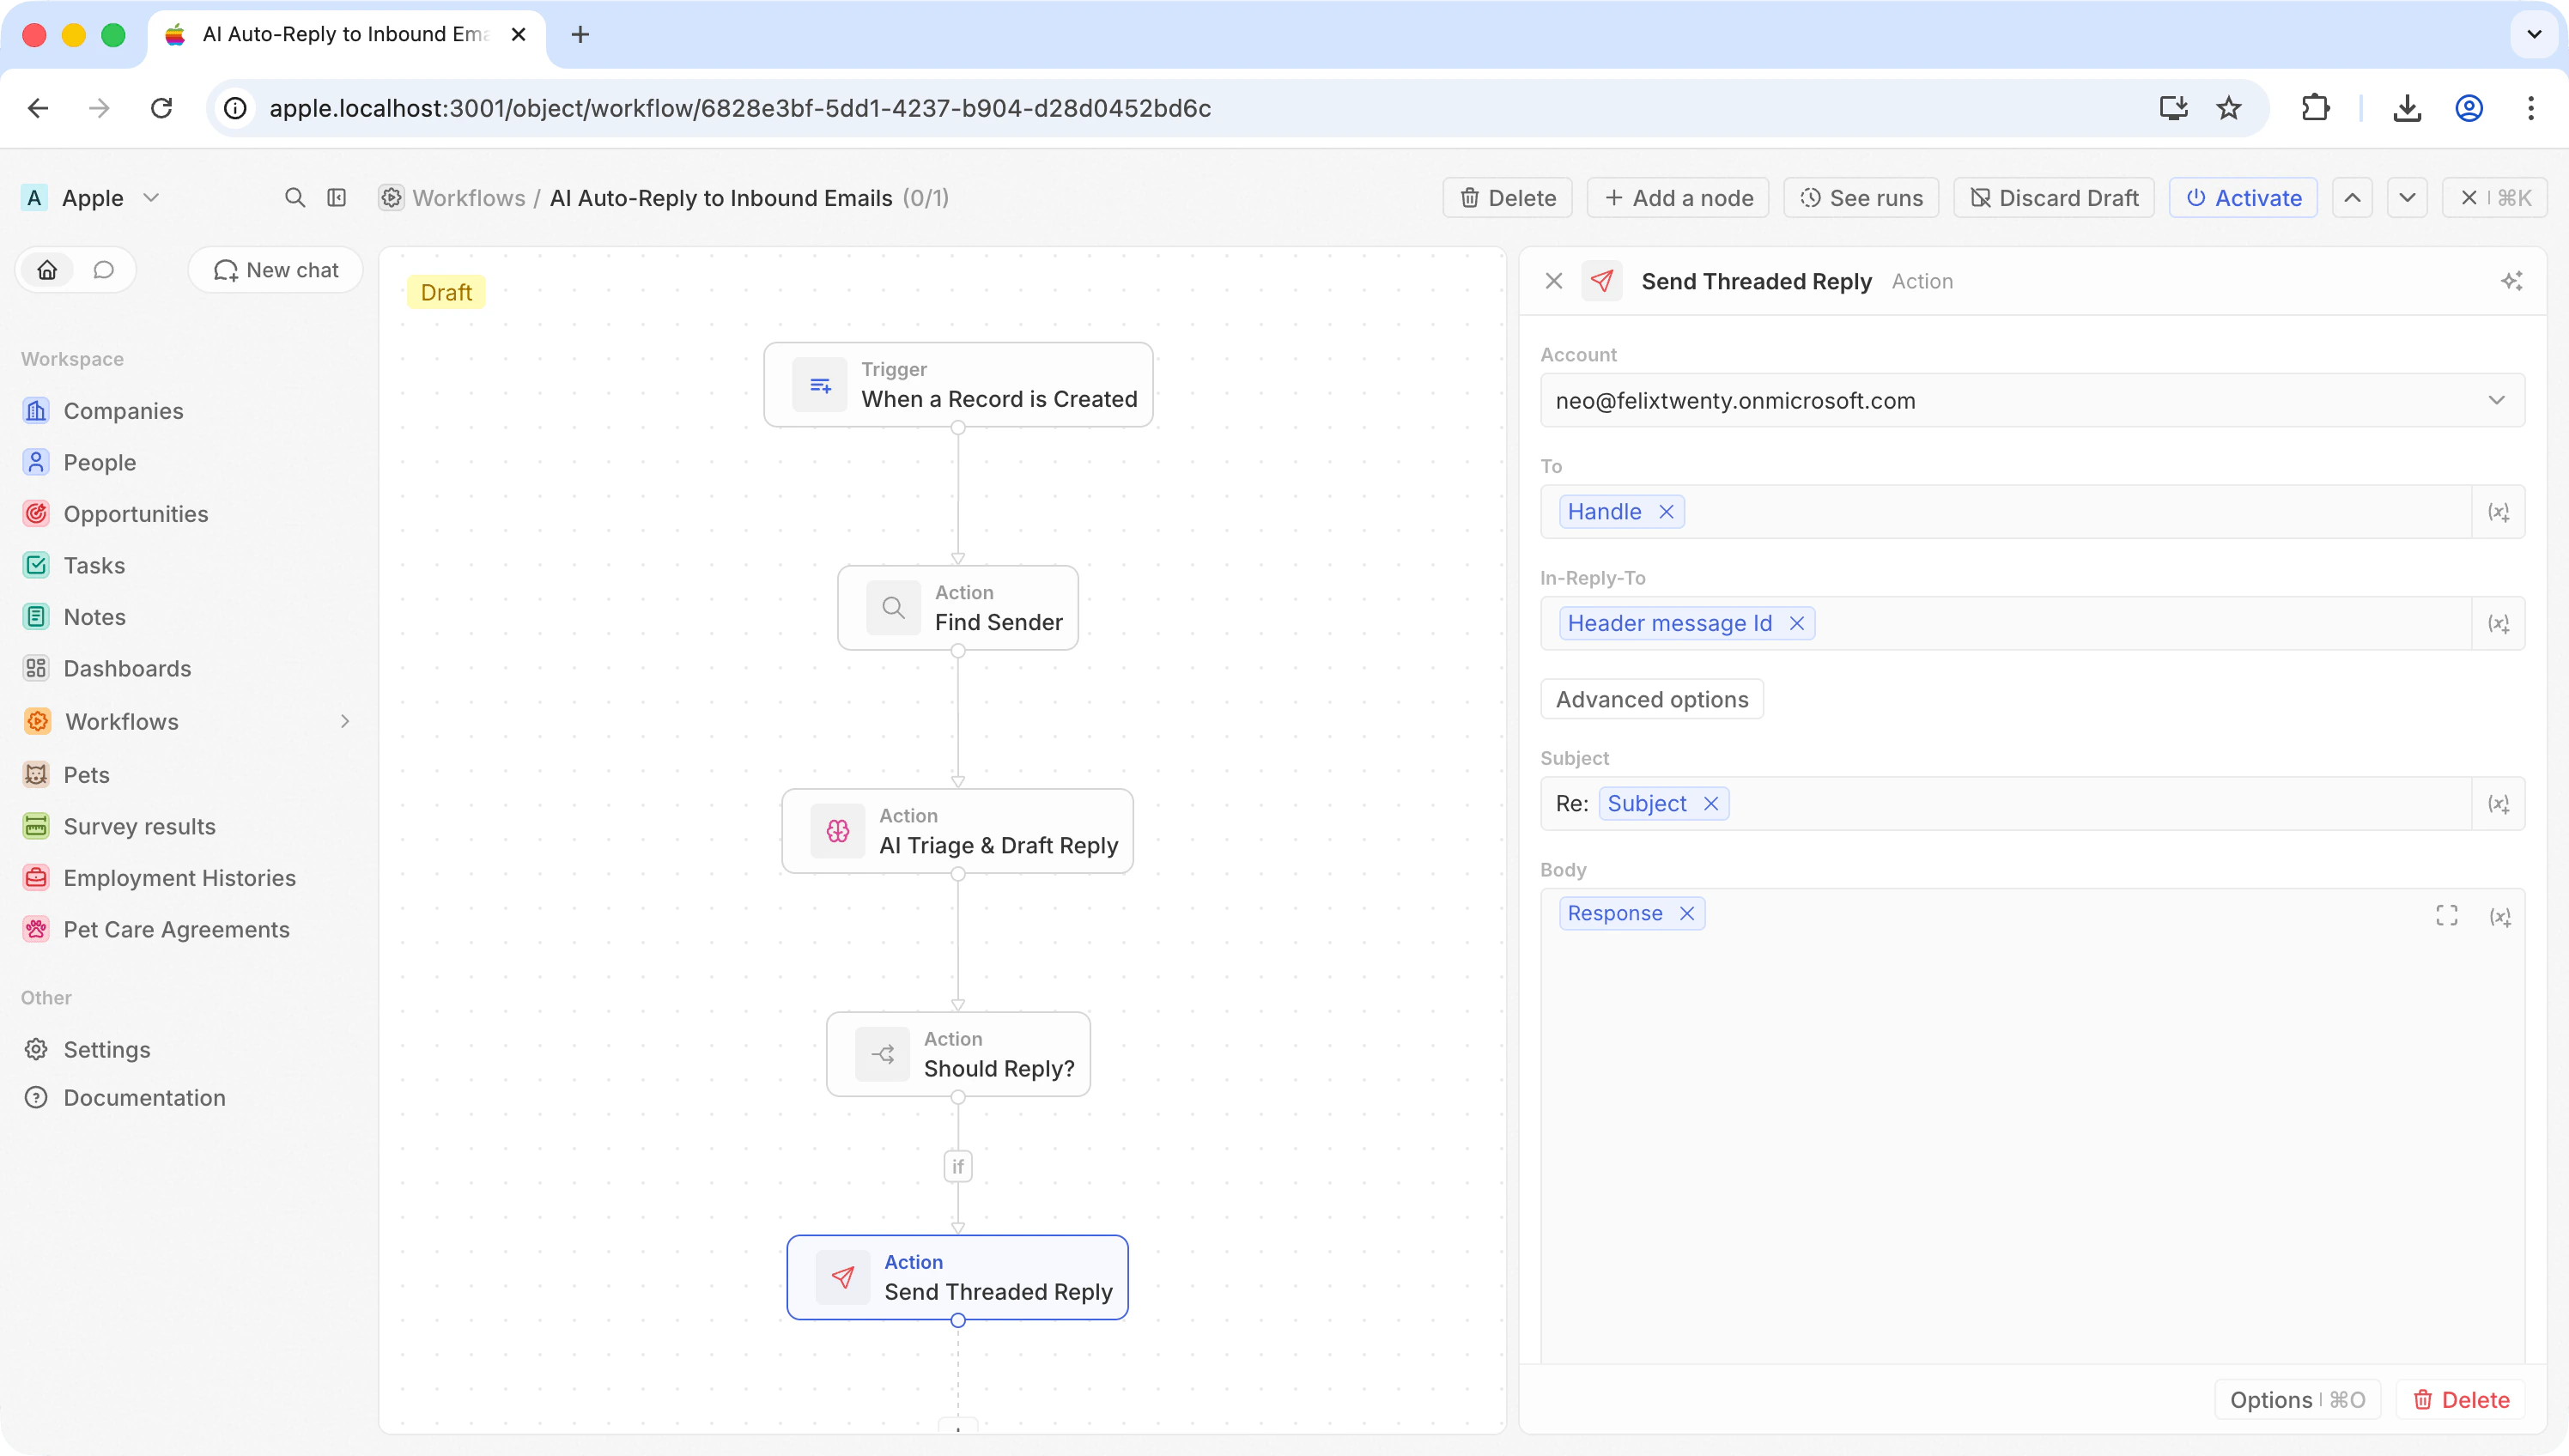 **In-Reply-To**에는 트리거에서 전달된 `message.headerMessageId`가 필요합니다 — 이는 수신자 주소가 아니라 이메일의 고유한 지문입니다. 비워 두면 이메일은 여전히 전송되지만 독립된 메시지로 보내집니다.
Gmail은 제목 줄을 사용하여 메시지를 스레드로 그룹화합니다. Gmail이 원래 스레드 내에 회신을 표시하려면 제목이 `Re:`(콜론과 공백 포함)로 시작해야 합니다. 이 표시가 없으면, In-Reply-To 헤더가 올바르게 설정되어 있어도 회신은 별도의 대화로 표시됩니다.
### 7단계: 테스트 및 활성화
**Test**를 클릭한 다음 메일 클라이언트를 확인하세요. 회신은 원본 메시지 아래에 스레드로 표시되어야 합니다.
만족스러우면 활성화하세요.
## 확장 아이디어
* **VIP에게만 회신** — 발신자의 도메인을 확인하거나 Twenty의 연락처로 존재하는지 확인하는 분기를 추가하세요
* **의도별 라우팅** — 영업 문의와 지원 요청을 다르게 처리하도록 별도의 AI Agent 프롬프트를 사용하세요
* **회신 전 정보 보강** — 보다 개인화된 회신을 위해 발신자의 회사나 거래 이력을 AI 프롬프트에 포함하도록 Search Records 단계를 추가하세요
**In-Reply-To**에는 트리거에서 전달된 `message.headerMessageId`가 필요합니다 — 이는 수신자 주소가 아니라 이메일의 고유한 지문입니다. 비워 두면 이메일은 여전히 전송되지만 독립된 메시지로 보내집니다.
Gmail은 제목 줄을 사용하여 메시지를 스레드로 그룹화합니다. Gmail이 원래 스레드 내에 회신을 표시하려면 제목이 `Re:`(콜론과 공백 포함)로 시작해야 합니다. 이 표시가 없으면, In-Reply-To 헤더가 올바르게 설정되어 있어도 회신은 별도의 대화로 표시됩니다.
### 7단계: 테스트 및 활성화
**Test**를 클릭한 다음 메일 클라이언트를 확인하세요. 회신은 원본 메시지 아래에 스레드로 표시되어야 합니다.
만족스러우면 활성화하세요.
## 확장 아이디어
* **VIP에게만 회신** — 발신자의 도메인을 확인하거나 Twenty의 연락처로 존재하는지 확인하는 분기를 추가하세요
* **의도별 라우팅** — 영업 문의와 지원 요청을 다르게 처리하도록 별도의 AI Agent 프롬프트를 사용하세요
* **회신 전 정보 보강** — 보다 개인화된 회신을 위해 발신자의 회사나 거래 이력을 AI 프롬프트에 포함하도록 Search Records 단계를 추가하세요