메인 콘텐츠로 건너뛰기
이제 핵심입니다. 템플릿과 레코드를 불러와 플레이스홀더를 채우고 새 문서를 저장하는 로직 함수입니다. 비즈니스 로직은 핸들러로 한 번만 작성한 다음, 여러 트리거를 통해 노출합니다. 이 장에서는 그중 두 가지, 즉 AI 도구워크플로 작업을 연결합니다.

렌더링 헬퍼

순수 로직은 별도의 파일로 분리해 두어 단위 테스트를 쉽게 할 수 있도록 하세요. 이는 레코드를 {{dot.path}} 토큰으로 평탄화하고, 해당 토큰을 치환합니다.
const PLACEHOLDER_PATTERN = /\{\{\s*([\w.]+)\s*\}\}/g;

export const renderTemplate = (body: string, values: Record<string, string>) => {
  const missingTokens = new Set<string>();
  const content = body.replace(PLACEHOLDER_PATTERN, (_m, token: string) => {
    const value = values[token];
    if (value === undefined || value === '') { missingTokens.add(token); return ''; }
    return value;
  });
  return { content, missingTokens: [...missingTokens] };
};
이 파일은 부작용이 없으므로, 빠른 단위 테스트(yarn test:unit)로 검증할 수 있습니다. 테스트를 참조하세요.

핸들러

핸들러는 생성된 CoreApiClient를 사용해 CRM 데이터를 읽고 씁니다. 템플릿을 불러오고, 대상 레코드를 불러온 뒤, 본문을 채우고 document를 생성합니다.
import { CoreApiClient } from 'twenty-client-sdk/core';
import { loadRecordValues } from 'src/logic-functions/utils/load-record-values';
import { renderTemplate } from 'src/logic-functions/utils/render-template';

export const generateDocumentHandler = async (
  input: { templateId: string; recordId: string },
) => {
  const client = new CoreApiClient();

  // Use a filtered list query, not the singular lookup: the singular query
  // throws when nothing matches, which would become a 500 instead of a 404.
  const { documentTemplates } = await client.query({
    documentTemplates: {
      __args: { filter: { id: { eq: input.templateId } }, first: 1 },
      edges: { node: { id: true, name: true, body: true, target: true } },
    },
  });
  const documentTemplate = documentTemplates?.edges?.[0]?.node;
  if (!documentTemplate?.id) return { success: false, status: 404, message: 'Template not found.' };

  const record = await loadRecordValues(client, documentTemplate.target, input.recordId);
  if (!record.found) return { success: false, status: 404, message: 'Record not found.' };

  const { content, missingTokens } = renderTemplate(documentTemplate.body ?? '', record.values);

  const { createDocument } = await client.mutation({
    createDocument: {
      __args: { data: {
        name: `${documentTemplate.name}${record.displayName}`,
        content, status: 'GENERATED', templateId: documentTemplate.id,
      } },
      id: true, name: true,
    },
  });

  return { success: true, documentId: createDocument.id, content, missingTokens };
};
loadRecordValues는 Person과 Company에 대해 서로 다른 쿼리를 실행하고 결과를 평탄화합니다. 자세한 내용은 load-record-values.ts를 참조하세요.

도구와 워크플로 작업으로 노출하기

하나의 defineLogicFunction에 여러 트리거를 실을 수 있습니다. 여기서는 toolTriggerSettings로 AI 에이전트가 호출할 수 있게 하고, workflowActionTriggerSettings로 시각적 워크플로 빌더에서 하나의 단계가 되도록 합니다. 둘 모두 JSON 스키마로 입력을 설명합니다.
import { defineLogicFunction } from 'twenty-sdk/define';
import { jsonSchemaToInputSchema } from 'twenty-sdk/logic-function';
import { GENERATE_DOCUMENT_LOGIC_FUNCTION_UNIVERSAL_IDENTIFIER } from 'src/constants/universal-identifiers';
import { generateDocumentHandler } from 'src/logic-functions/handlers/generate-document-handler';
import { generateDocumentInputSchema } from 'src/logic-functions/schemas/generate-document-input.schema';

export default defineLogicFunction({
  universalIdentifier: GENERATE_DOCUMENT_LOGIC_FUNCTION_UNIVERSAL_IDENTIFIER,
  name: 'generate-document',
  description: 'Generate a document from a template and a CRM record.',
  timeoutSeconds: 30,
  toolTriggerSettings: {
    inputSchema: generateDocumentInputSchema,
  },
  workflowActionTriggerSettings: {
    label: 'Generate Document',
    icon: 'IconFileText',
    inputSchema: jsonSchemaToInputSchema(generateDocumentInputSchema),
    outputSchema: [{ type: 'object', properties: {
      success: { type: 'boolean' }, documentId: { type: 'string' },
    } }],
  },
  handler: generateDocumentHandler,
});
입력 스키마는 templateIdrecordId를 설명하는 일반 JSON 스키마입니다. 자세한 내용은 generate-document-input.schema.ts를 참조하세요.

접근 권한 부여하기

로직 함수는 앱의 역할로 실행됩니다. 템플릿과 레코드를 읽고 문서를 생성해야 하므로, src/roles/default-role.ts에서 해당 권한을 허용하세요:
export default defineApplicationRole({
  universalIdentifier: DEFAULT_ROLE_UNIVERSAL_IDENTIFIER,
  label: 'Document Generator default role',
  canReadAllObjectRecords: true,
  canUpdateAllObjectRecords: true,
  canAccessAllTools: true,
  canBeAssignedToAgents: true,
  permissionFlagUniversalIdentifiers: [SystemPermissionFlag.UPLOAD_FILE],
});
UPLOAD_FILE은 다음 섹션에서 함수가 생성된 PDF를 업로드할 수 있게 해 줍니다. 보다 세분화된 권한에 대해서는 Roles를 참조하세요.

실제 PDF 파일 첨부하기

렌더링된 텍스트 필드만으로도 유용하지만, 사용자들은 실제 문서를 원합니다. 이제 PDF를 생성하여 레코드에 다운로드 가능한 파일로 저장해 봅시다. 먼저, document 객체에 PDF를 담을 FILES 필드를 추가합니다. 앱은 자신의 파일 필드로 업로드하므로, 이 필드가 업로드 경로를 결정합니다.
{
  universalIdentifier: DOCUMENT_FILE_FIELD_UNIVERSAL_IDENTIFIER,
  type: FieldType.FILES,
  name: 'file',
  label: 'File',
  icon: 'IconFileTypePdf',
  universalSettings: { maxNumberOfValues: 1 },
}
이제 해당 PDF를 렌더링합니다. 앱은 실제 Node 프로젝트이므로, 필요한 npm 패키지를 자유롭게 추가하고 다른 곳과 마찬가지로 import할 수 있습니다. 여기서는 **pdf-lib**로 PDF를 그리고, **marked**로 Markdown 본문을 파싱합니다. CLI가 이들을 함수 런타임에 설치해 줍니다.
yarn add pdf-lib marked
전체 헬퍼 코드는 generate-document-pdf.ts에 있습니다. 이 헬퍼는 marked.lexer로 Markdown을 토큰으로 파싱한 뒤, pdf-lib으로 레이아웃합니다. 실제 제목, 굵게/기울임 처리, 글머리 기호 및 번호 목록, 인용 블록과 구분선 등, 텍스트 덩어리가 아니라 템플릿 자체를 다듬어진 다중 페이지 A4 렌더링으로 만들어 줍니다.
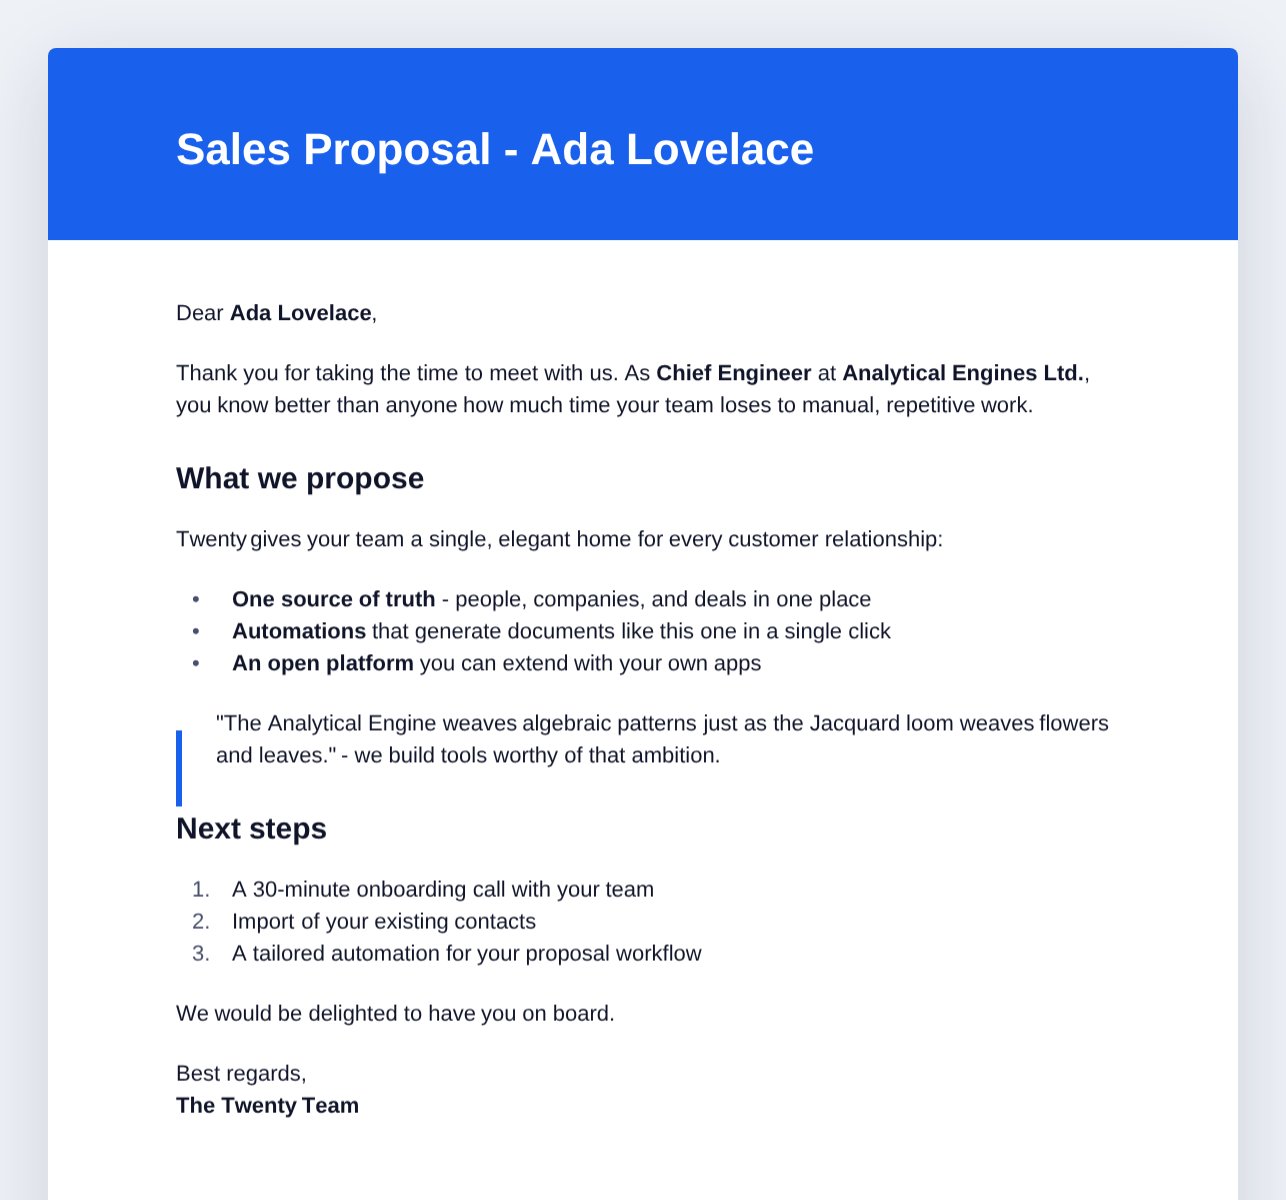
다듬어진, 상용 수준의 생성된 PDF
pdf-lib의 기본 제공 폰트는 WinAnsi 인코딩을 사용하므로, 서유럽 악센트 문자는 별도 설정 없이 렌더링됩니다. 헬퍼는 스마트 따옴표와 대시를 매핑하고, 인코딩할 수 없는 문자는 제거합니다. 비라틴 문자(중국어, 아랍어, 키릴 문자 등)를 렌더링하려면 Unicode 폰트를 임베딩해야 합니다.
이제 이를 업로드하고 레코드에 해당 참조를 저장합니다. uploadFile은 바이트를 앱이 소유한 파일 필드로 라우팅하며, 반환된 id가 저장해야 할 값입니다.
import { MetadataApiClient } from 'twenty-client-sdk/metadata';
import { generateDocumentPdf } from 'src/logic-functions/utils/generate-document-pdf';

const documentName = `${documentTemplate.name}${record.displayName}`;
const bytes = await generateDocumentPdf(documentName, content);
const fileName = 'proposal.pdf';

const uploaded = await new MetadataApiClient().uploadFile(
  Buffer.from(bytes),
  fileName,
  'application/pdf',
  DOCUMENT_FILE_FIELD_UNIVERSAL_IDENTIFIER,
);

await client.mutation({
  updateDocument: {
    __args: {
      id: documentId,
      data: { file: [{ fileId: uploaded.id, label: fileName }] },
    },
    id: true,
  },
});
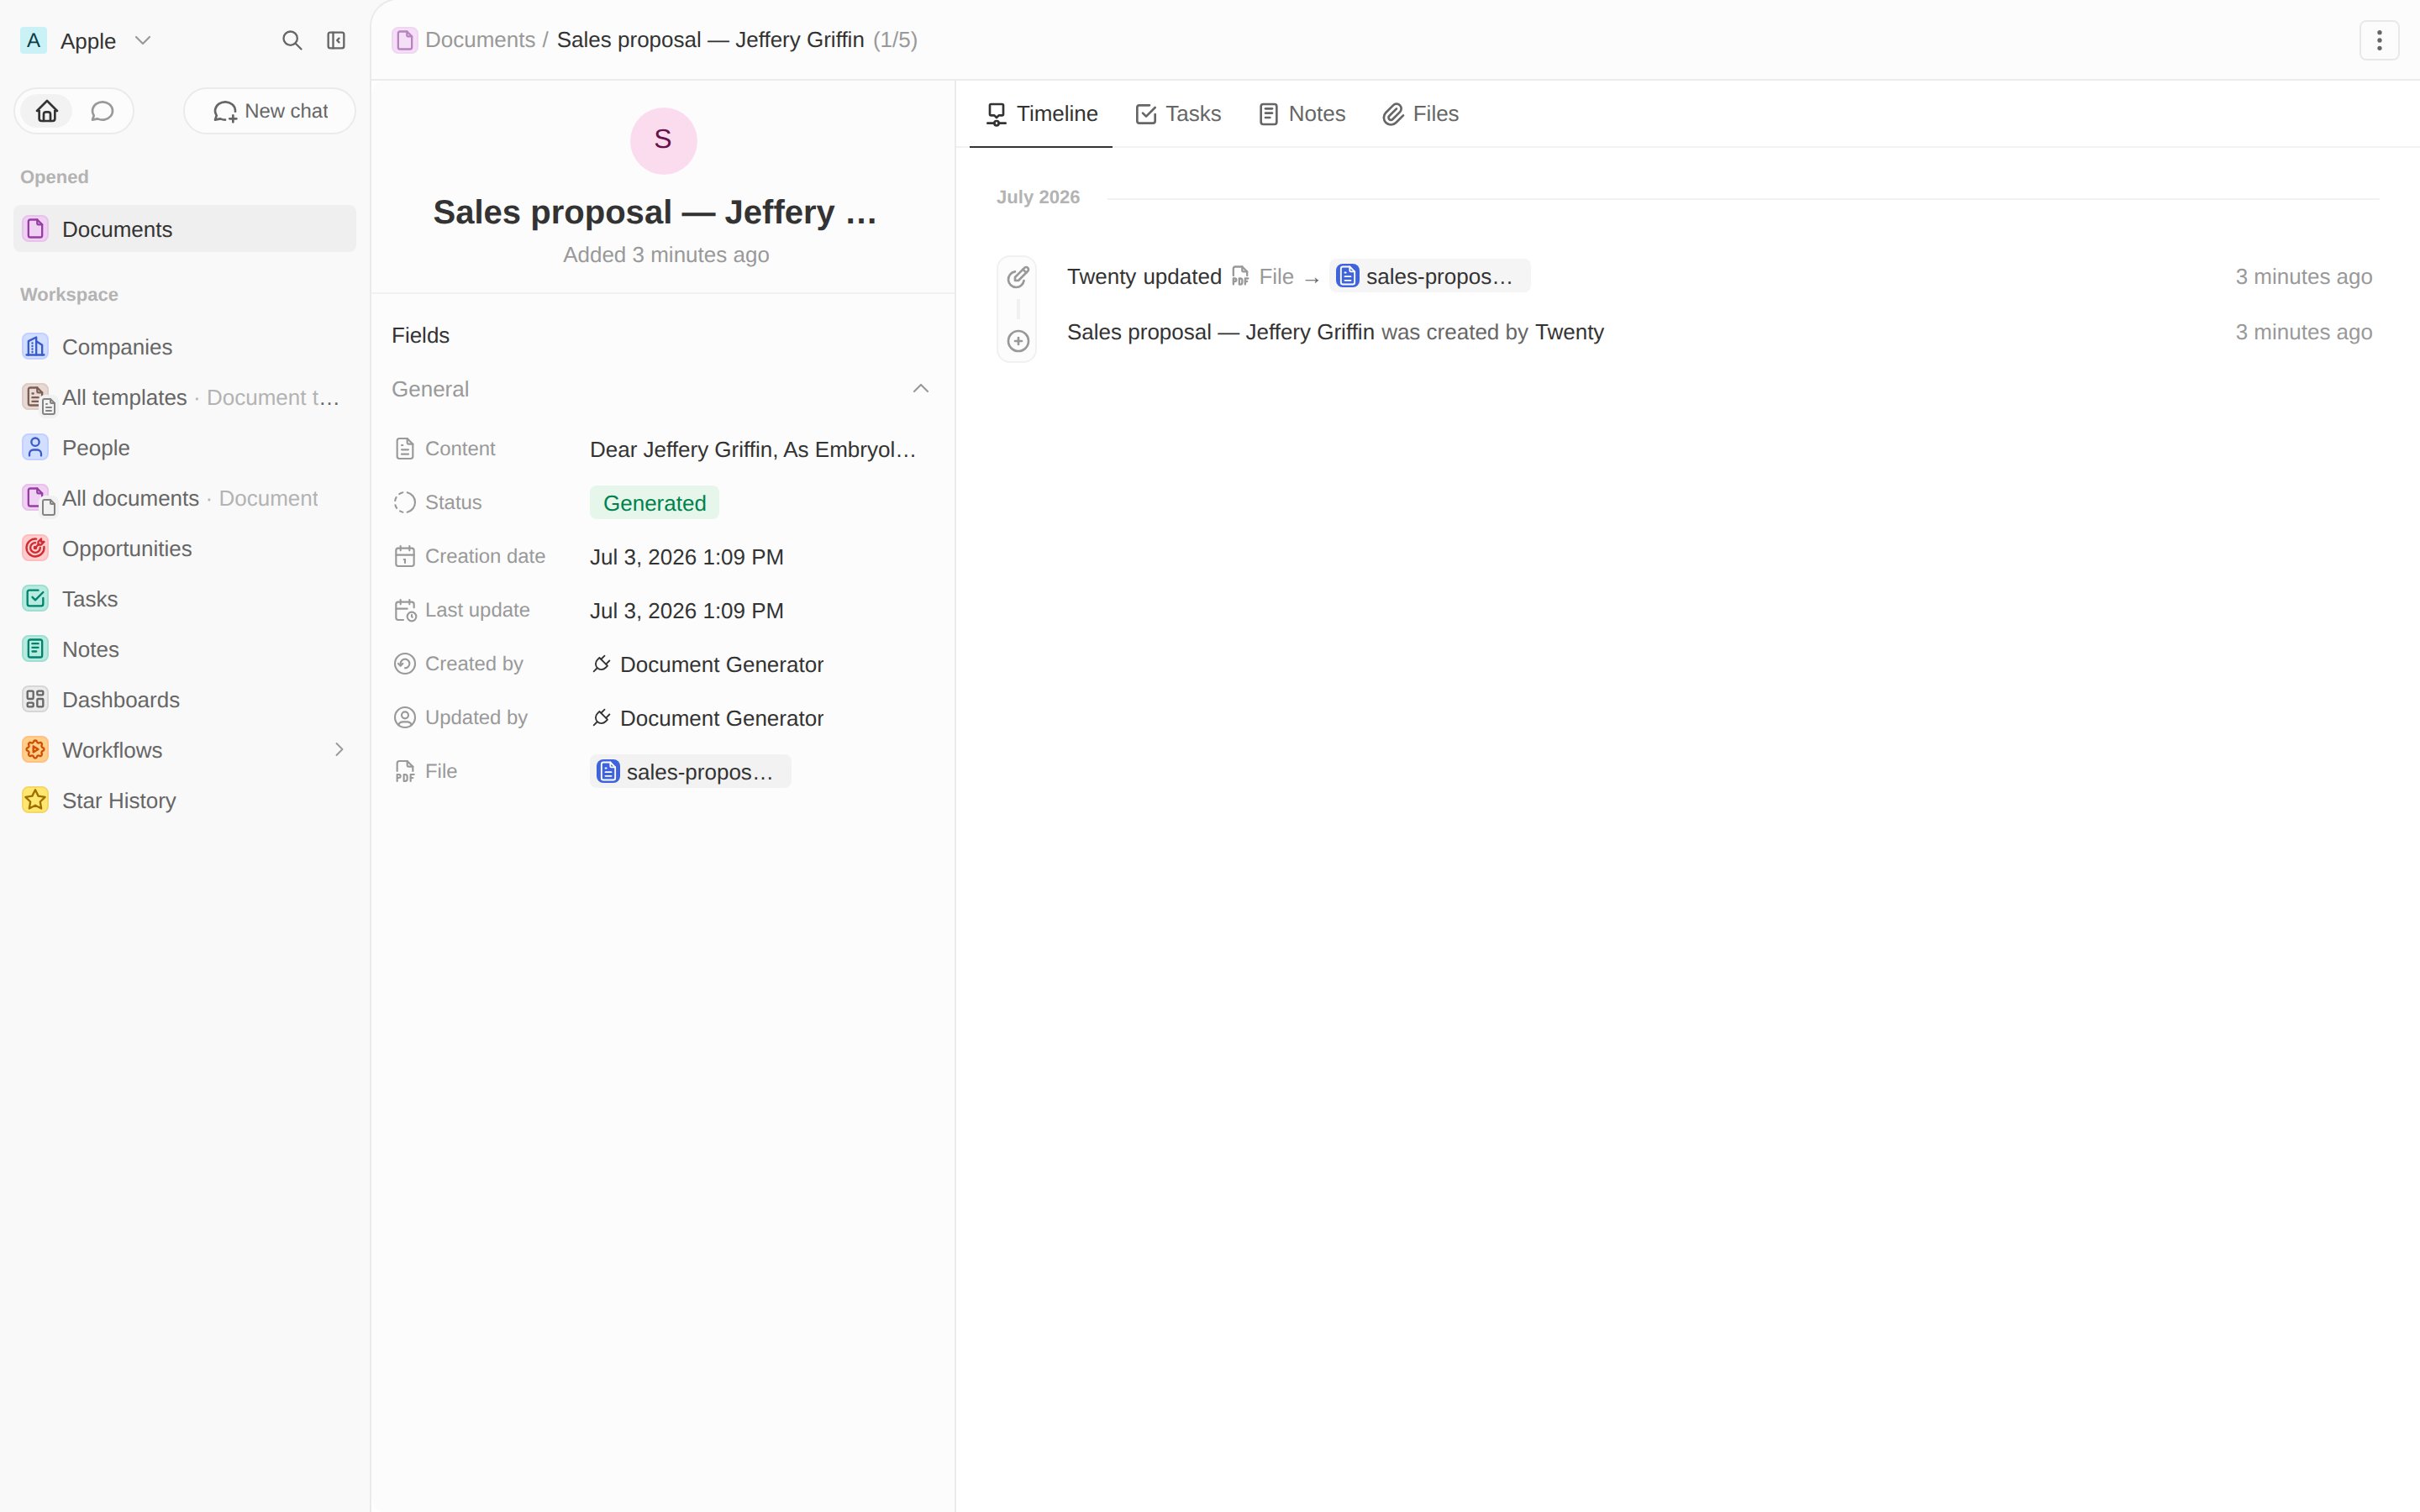
이제 생성된 문서에는 다운로드 가능한 PDF가 연결됩니다.
생성된 PDF 파일이 연결된 문서 레코드
uploadFile앱이 소유한 파일 필드만을 대상으로 합니다(따라서 업로드에는 항상 해당 필드를 소유한 앱과 UPLOAD_FILE 역할 플래그가 필요합니다). 그래서 PDF는 레코드의 자체 file 필드에 저장됩니다. 이는 call-recorder 앱이 녹음을 위해 사용하는 것과 동일한 패턴입니다.
이 단계를 마치면: 각 생성된 문서에 실제 다운로드 가능한 PDF가 포함됩니다. 하지만 아직 UI에서 생성기를 호출할 수는 없습니다. 그러려면 HTTP 경로가 필요합니다.

다음: HTTP 경로 →

HTTP를 통해 함수를 제공하고 문서를 웹 페이지로 렌더링합니다.