À propos des actions
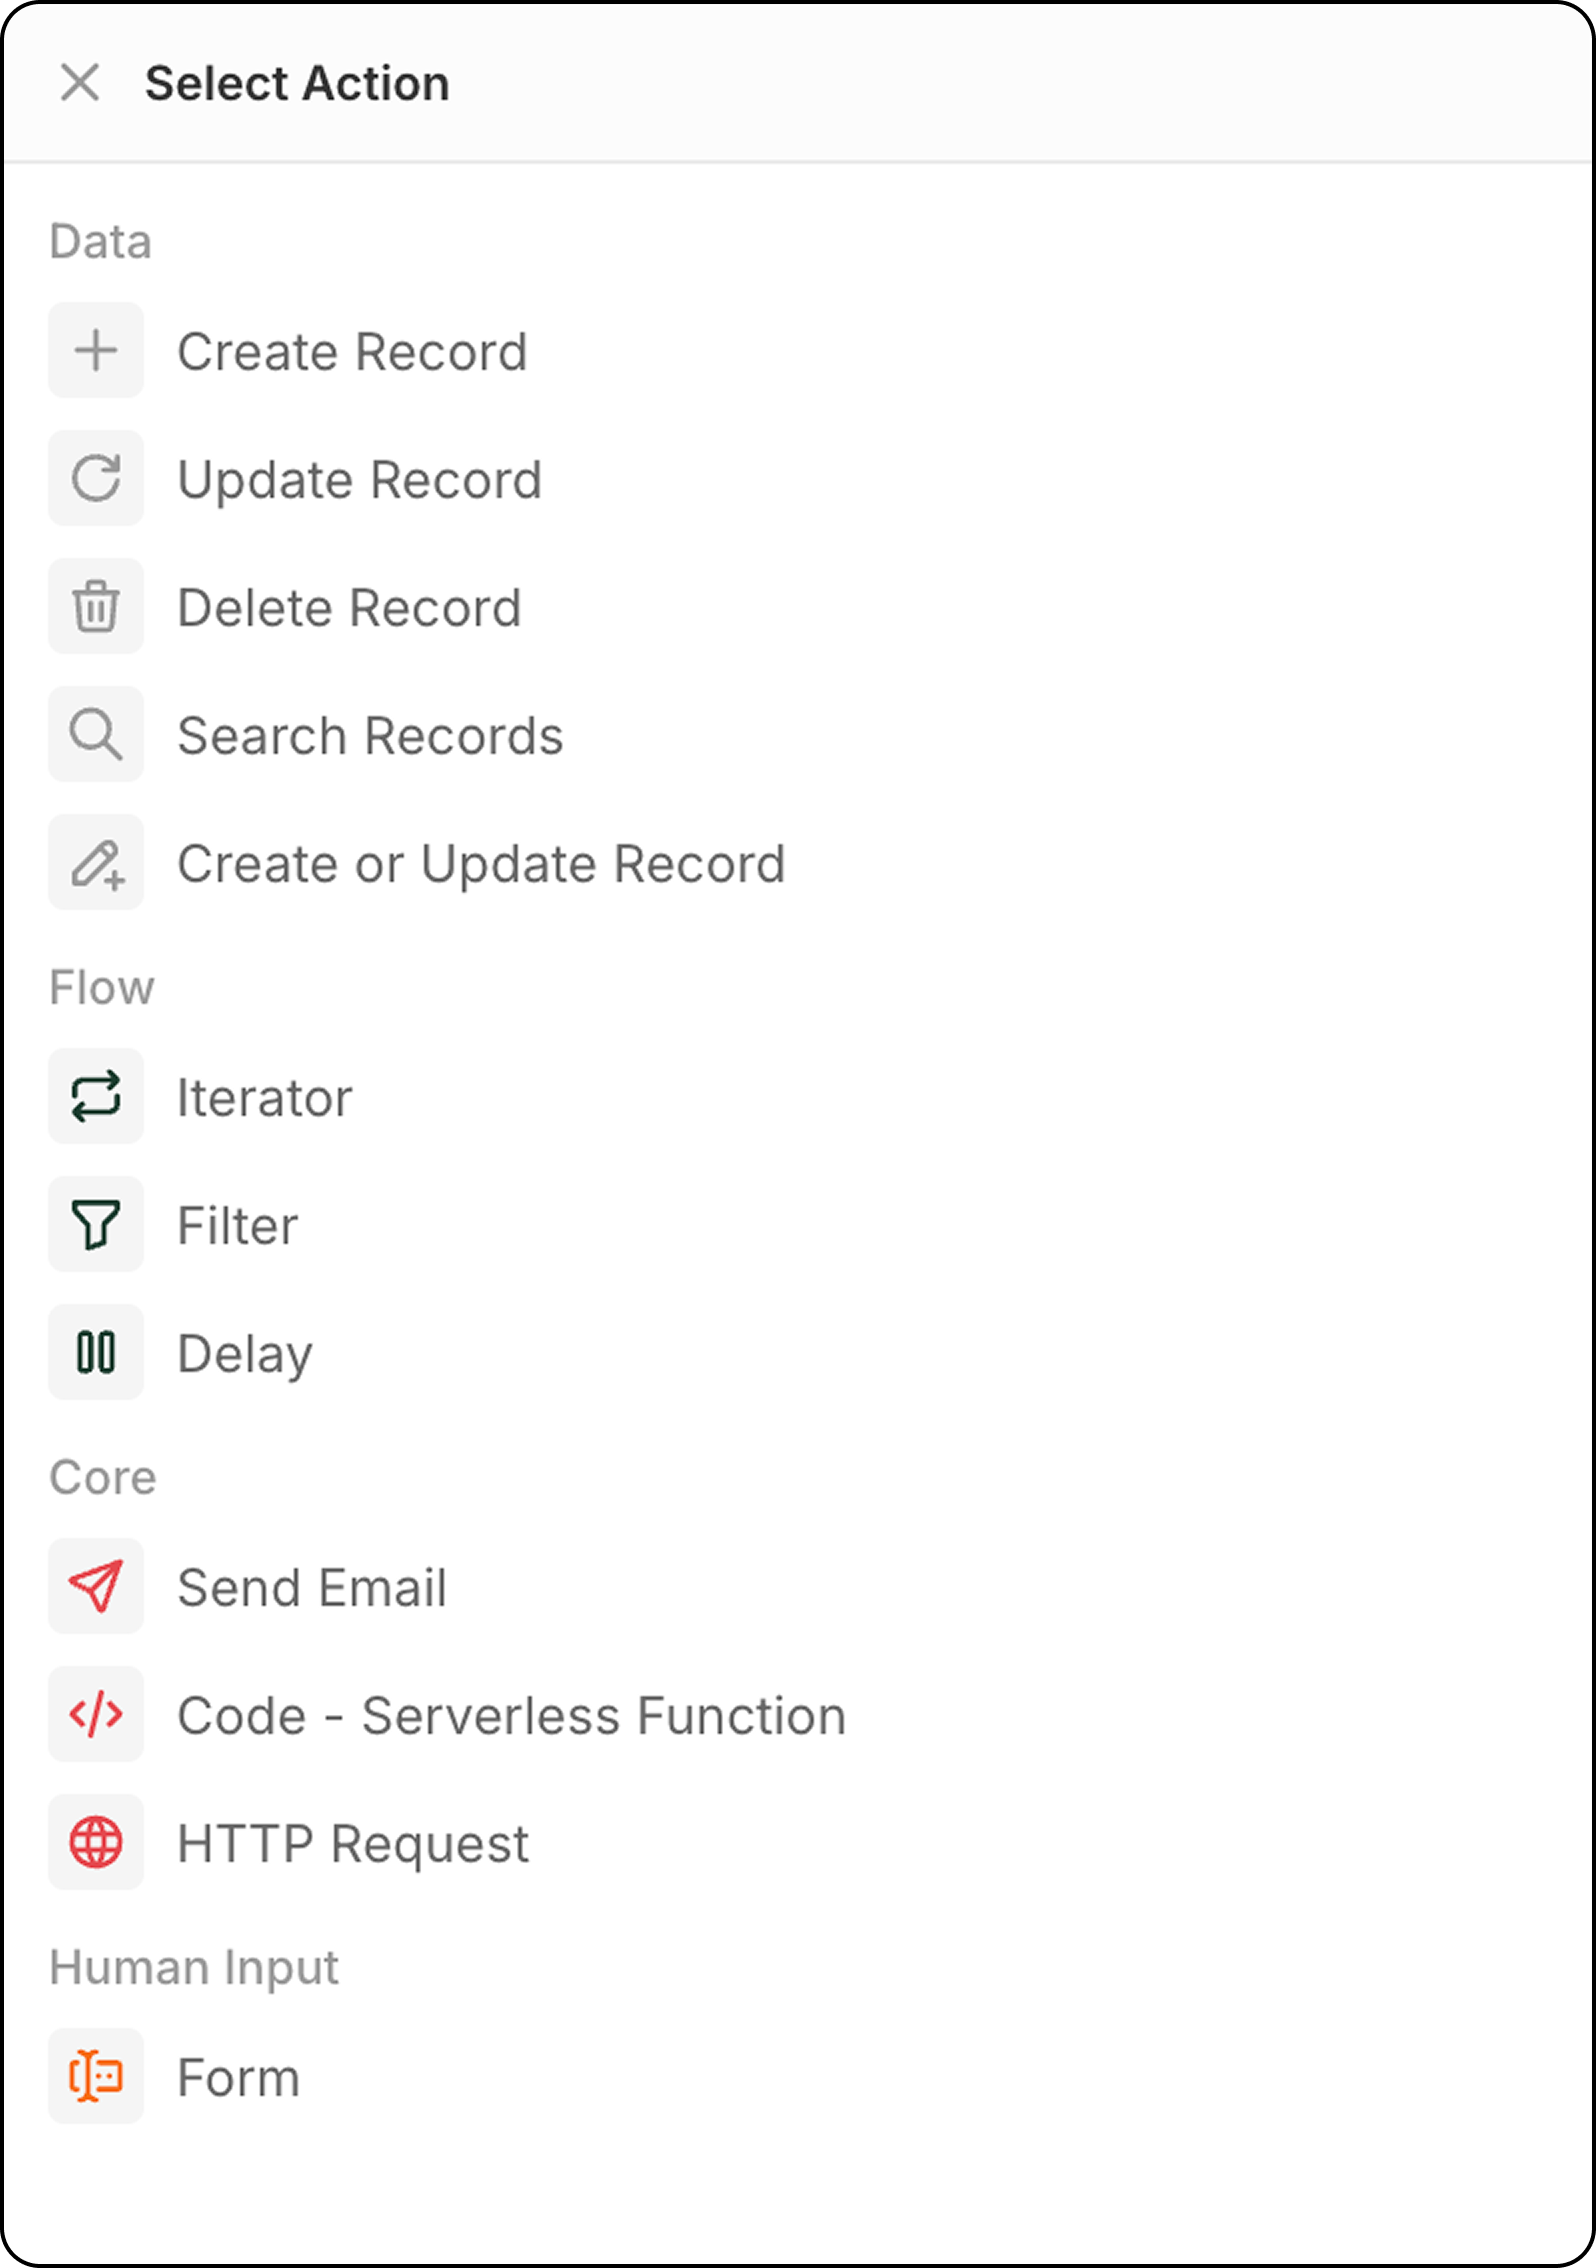
Les actions définissent ce qui se passe après le déclenchement d’un déclencheur. Vous pouvez enchaîner plusieurs actions pour créer des automatisations complexes.Actions sur les enregistrements
Créer un enregistrement
Ajoute un nouvel enregistrement à un objet sélectionné. Configuration:- Sélectionnez l’objet cible
- Remplissez les champs requis et optionnels
- Utilisez les données des étapes précédentes ou saisissez des valeurs manuellement pour remplir les champs
Mettre à jour un enregistrement
Modifie un enregistrement existant dans un objet sélectionné.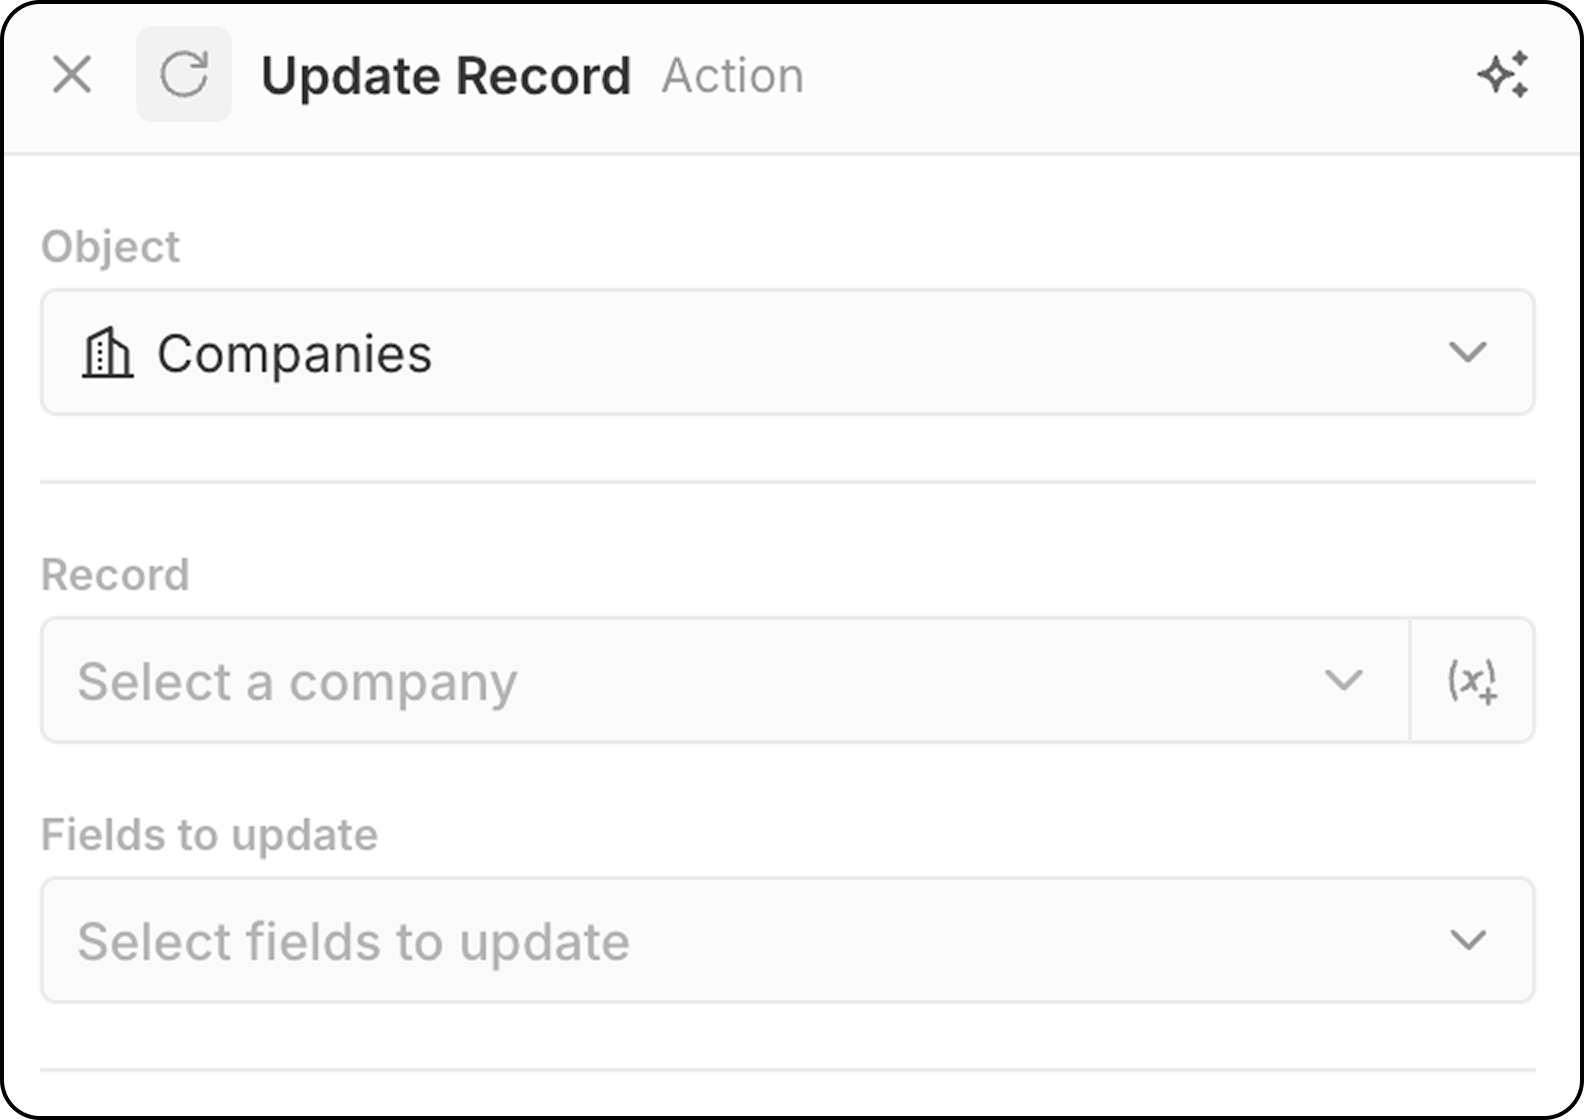
- Sélectionnez l’objet cible
- Choisissez l’enregistrement spécifique à mettre à jour.
- Vous pouvez choisir un enregistrement fixe, à l’aide du menu déroulant affichant tous les enregistrements disponibles.
- Ou vous pouvez sélectionner l’enregistrement de façon dynamique, en désignant un enregistrement trouvé lors d’une étape précédente, à l’aide du
(x+). Vous ne pouvez pas rechercher l’enregistrement selon différents critères à ce stade. Si vous n’avez pas encore identifié l’enregistrement, ajoutez une étapeSearch Recordavant cette étapeUpdate Record.
- Sélectionnez les champs à modifier et entrez de nouvelles valeurs
Supprimer un enregistrement
Supprime un enregistrement d’un objet sélectionné. Configuration:- Sélectionnez l’objet cible
- Choisissez l’enregistrement spécifique à supprimer
Rechercher des enregistrements
Trouve des enregistrements dans un objet sélectionné en utilisant des conditions de filtre. Configuration:- Sélectionnez l’objet à rechercher
- Définissez les critères de filtre pour restreindre les résultats
- Configurez le tri et les limites
Limite: Search Records renvoie un maximum de 200 enregistrements. Si vous devez en traiter davantage, ajoutez des filtres spécifiques pour réduire les résultats ou utilisez des workflows planifiés pour traiter par lots.
Créer ou mettre à jour un enregistrement
Crée un nouvel enregistrement ou met à jour un enregistrement existant en fonction de critères de correspondance. C’est utile lorsque vous n’êtes pas certain qu’un enregistrement existe déjà.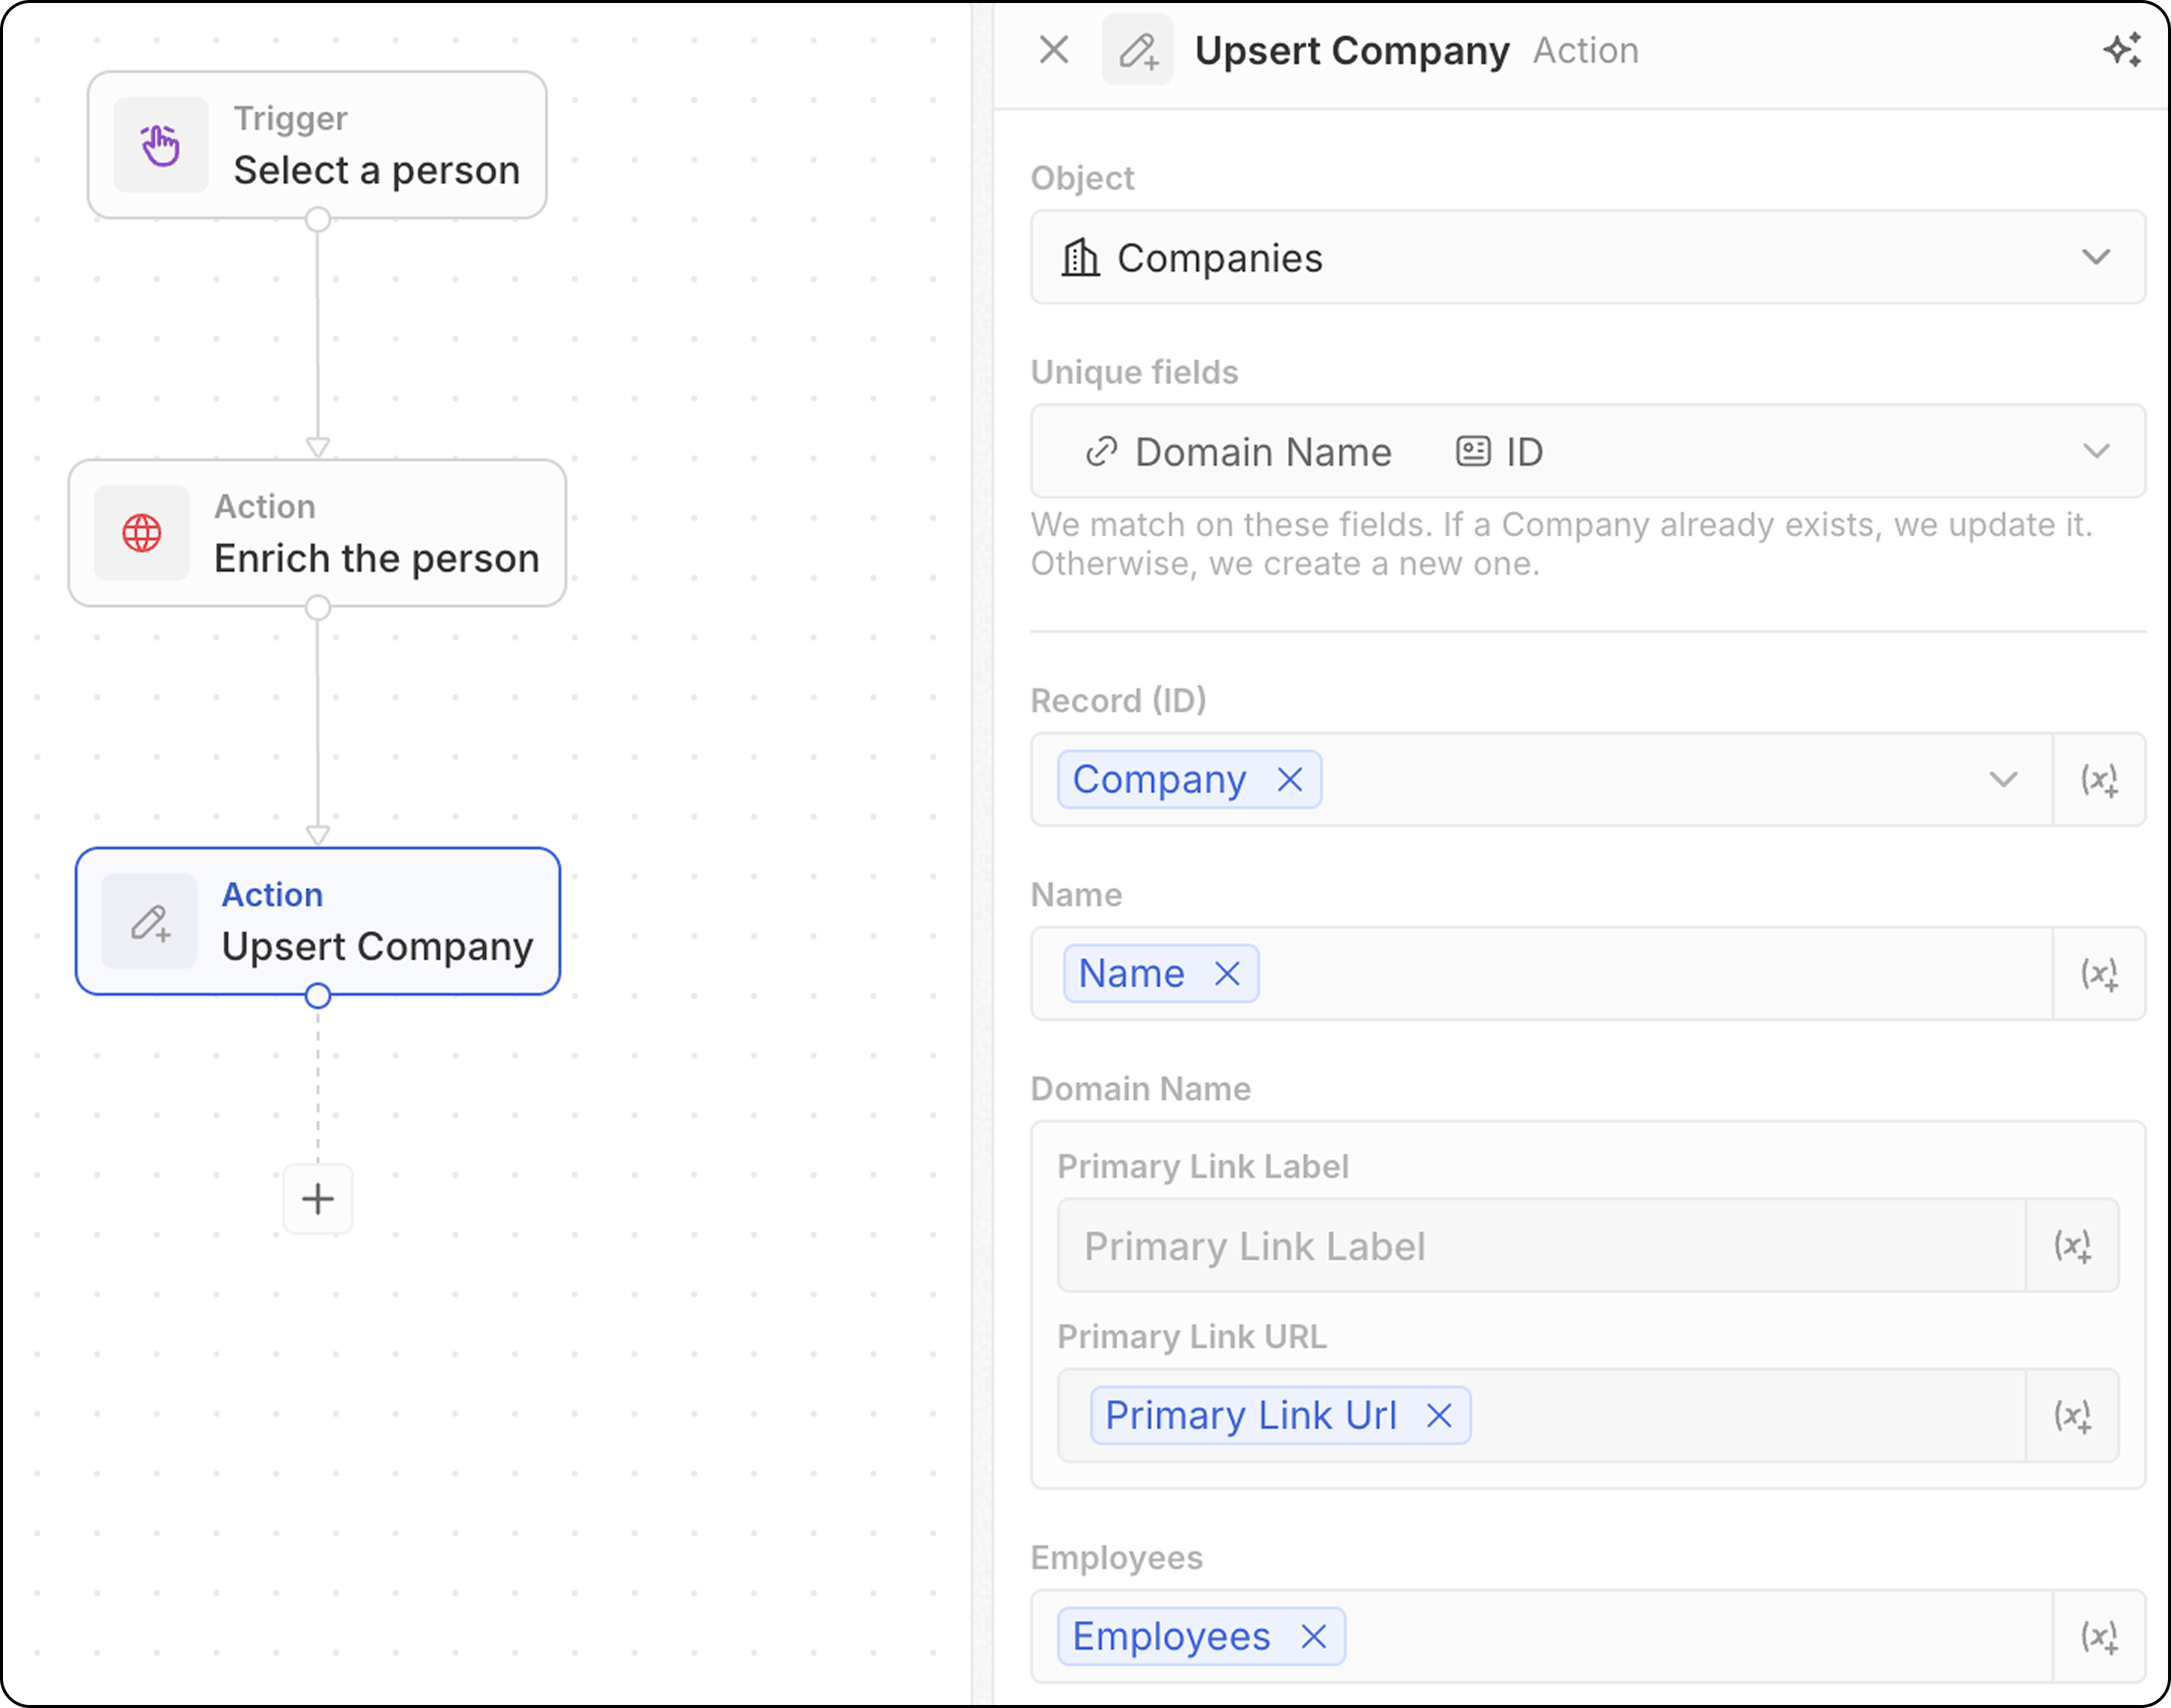
- Sélectionnez l’objet cible
- Notez quels champs peuvent être utilisés pour la correspondance : adresse e-mail pour les Contacts, domaine pour les Entreprises, ID pour tout objet, ou tout champ marqué comme unique. Vous devrez renseigner au moins l’un des éléments ci-dessous.
- Renseignez les valeurs des champs. N’oubliez pas de renseigner au moins un des identifiants uniques.
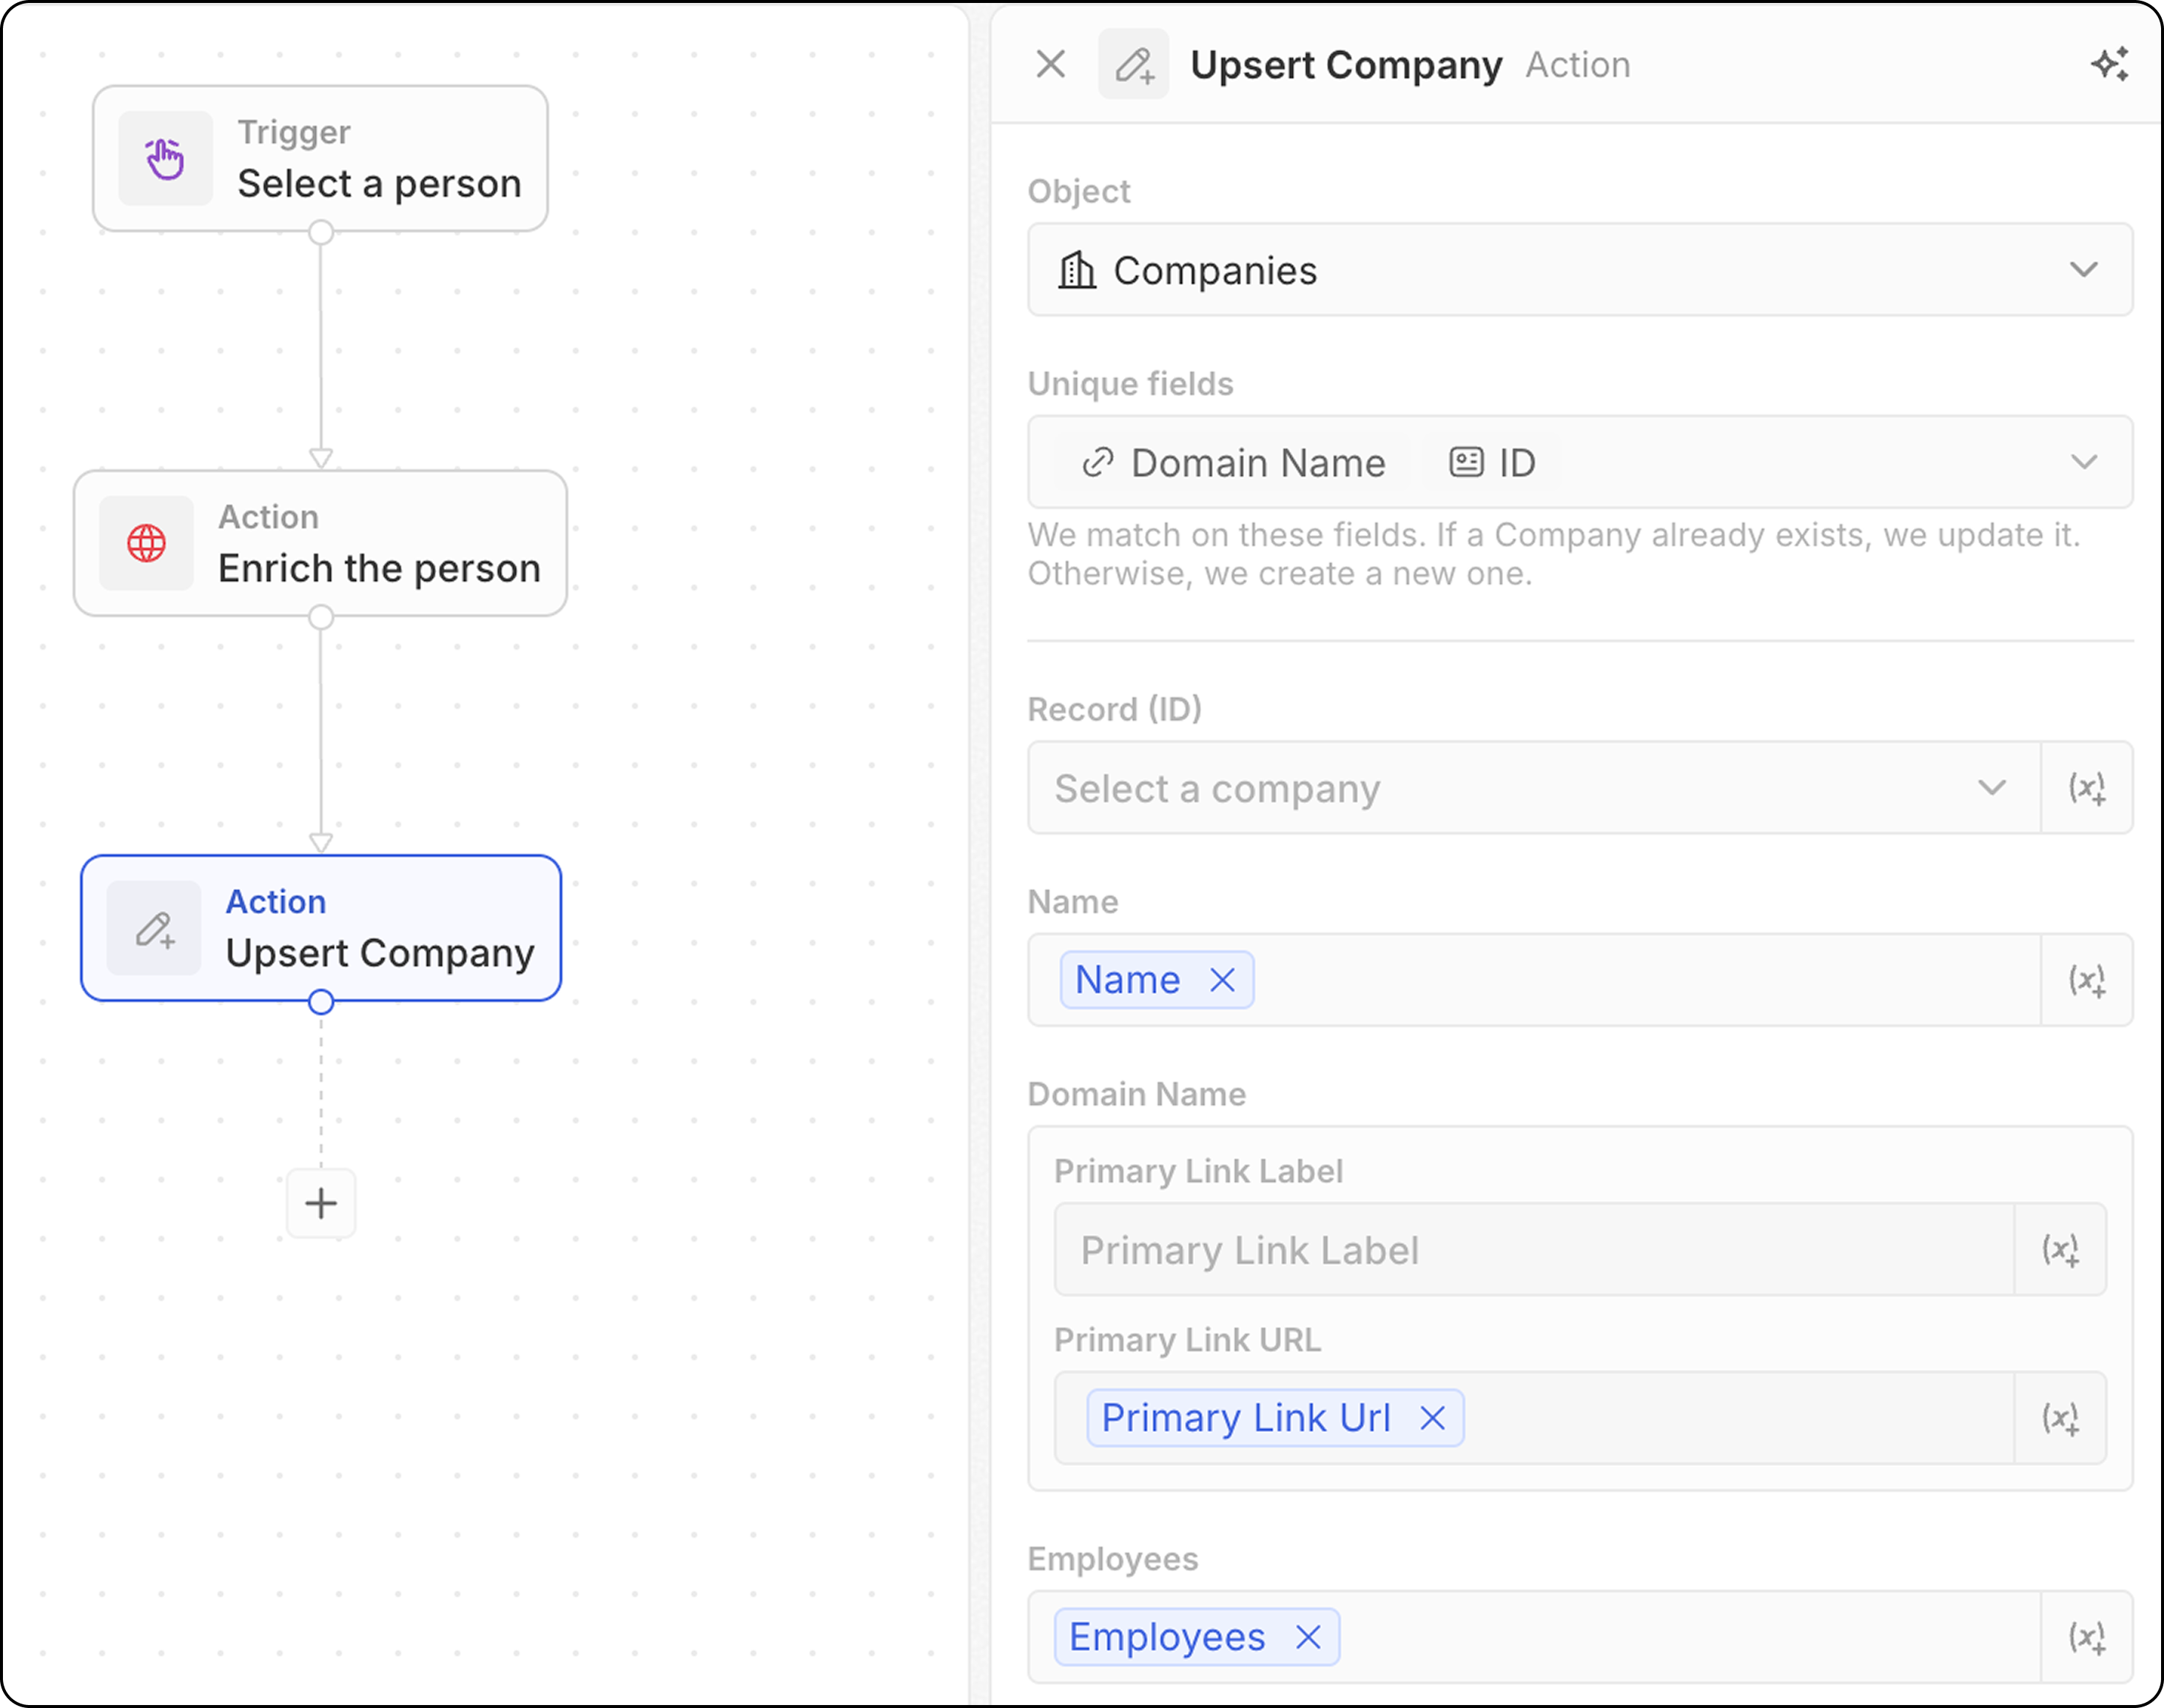
La correspondance fonctionne généralement encore mieux lorsque vous n’ajoutez qu’un seul identifiant unique. Par exemple, la capture d’écran ci-dessous fera correspondre les entreprises en fonction de leur domaine. L’ID n’est pas forcément nécessaire.
- Utilisez les données des étapes précédentes pour remplir les champs
- Recherche un enregistrement correspondant à vos critères
- S’il est trouvé → met à jour l’enregistrement existant
- S’il n’est pas trouvé → crée un nouvel enregistrement
Actions de flux de travail
Itérateur
Parcourt un tableau d’enregistrements renvoyé par une étape précédente, vous permettant d’effectuer des actions sur chaque enregistrement individuellement. Configuration:- Sélectionnez le tableau d’enregistrements depuis une étape précédente (par ex., résultats de Rechercher des enregistrements, d’un déclencheur manuel avec exécution par lots, d’un nœud de code). Lorsqu’une étape Code ou fonction logique renvoie un tableau de premier niveau, sélectionnez l’option Whole list pour itérer sur l’intégralité de la sortie.
- Définissez les actions à effectuer sur chaque enregistrement dans la boucle.
- Vous pouvez ajouter plusieurs actions au sein d’un itérateur.
- Lorsque vous utilisez des branches à l’intérieur d’un itérateur, assurez-vous que la dernière étape de chaque branche revient à l’itérateur pour fermer la boucle.
- Accéder aux champs
Current Item: pour utiliser les champs de l’enregistrement en cours de traitement, cliquez sur l’étape Iterator, puis sélectionnez Current item. La liste des champs disponibles de cet enregistrement s’affichera et pourra être sélectionnée pour une utilisation dans les actions suivantes. Vous pouvez également sélectionner Use the whole item pour transmettre l’intégralité de l’élément en cours à une étape en aval.
Filtre
Filtre les enregistrements selon des conditions spécifiées, ne laissant passer que ceux qui répondent aux critères. Configuration:- Sélectionnez l’enregistrement à filtrer
- Définissez les conditions de filtre et les critères
- Configurez quels enregistrements doivent passer aux étapes suivantes
- Sortie: Les nœuds de filtre ne renvoient pas de données — ils agissent comme des portes. Si les conditions sont remplies, le flux de travail continue. Sinon, le flux de travail s’arrête à cette branche.
- L’opérateur
ISpeut être utilisé avec des champs numériques. Il équivaut àEQUAL.
Délai
Met en pause l’exécution du flux de travail pendant une durée spécifiée ou jusqu’à une date/heure spécifique. Types de délai:| Type | Description |
|---|---|
| Durée | Attendre une durée spécifique (jours, heures, minutes, secondes) |
| Date planifiée | Attendre jusqu’à une date et une heure spécifiques |
- Définissez des jours, des heures, des minutes et/ou des secondes
- Combinez plusieurs unités (par ex., 2 jours et 4 heures)
- Sélectionnez une date et une heure
- Peut référencer un champ de date d’une étape précédente (par ex., relancer 3 jours après une réunion)
- Attendre 24 heures avant d’envoyer un e-mail de relance
- Mettre en pause jusqu’à la date de clôture d’une opportunité
- Planifier des actions pendant les heures ouvrées
La date planifiée ne peut pas être dans le passé. Si un champ de date d’une étape précédente est utilisé et que la date est déjà passée, le flux de travail échouera.
- Aucune limite de durée maximale — vous pouvez définir des délais de quelques minutes, jours, semaines, ou plus
- 1 crédit consommé lorsque le nœud Délai s’exécute, quelle que soit la durée
- Aucun crédit consommé pendant l’attente — un délai de 5 minutes coûte autant qu’un délai de 5 jours
Actions de communication
Envoyer l’email
Envoie un e-mail à partir de votre flux de travail. Idéal pour des e-mails groupés basés sur des modèles. Les e-mails auront l’apparence de ceux que vous envoyez depuis votre boîte aux lettres. Ne convient pas aux newsletters (qui nécessitent un formatage plus riche) ni aux séquences d’e-mails automatisées. Prérequis: Ajoutez un compte de messagerie dans Paramètres → Comptes Configuration:- Sélectionnez le compte e-mail de l’expéditeur
Vous pouvez uniquement envoyer des e-mails à partir de boîtes aux lettres synchronisées avec votre propre compte Twenty. L’envoi depuis les boîtes aux lettres d’autres membres de l’équipe (par ex., l’e-mail du propriétaire du compte) est sur la feuille de route.
- Entrez l’adresse e-mail du destinataire.
Un seul destinataire est possible pour le moment.
- Définissez la ligne d’objet.
- Rédigez le corps du message. Vous pouvez formater des liens, créer des listes numérotées, des listes à puces, ajouter des pièces jointes.
L’ajout de signatures HTML n’est pas possible pour le moment.
Formulaire
Affiche un formulaire lors de l’exécution du flux de travail pour recueillir les saisies de l’utilisateur. Les réponses peuvent ensuite être utilisées dans les étapes suivantes pour créer des enregistrements, envoyer des e-mails ou exécuter toute autre action selon la saisie. Configuration:- Configurez les champs que les utilisateurs devront remplir. Pour chaque champ, choisissez
- un type parmi texte, nombre, date, un enregistrement donné, un champ de sélection. Les champs de sélection de tous les objets sont disponibles.
- une étiquette
- une valeur par défaut sous
Placeholder(facultatif)
- Modifiez le titre du formulaire
Cmd + K.
Comment remplir le formulaire:
- Déclenchez votre flux de travail manuel depuis le menu de commande
Cmd K - Remplissez le formulaire affiché dans le panneau latéral et cliquez sur
Submit.
Les champs ne peuvent pas être rendus obligatoires.
Actions d’intégration
Code
Exécute du JavaScript personnalisé dans votre flux de travail. En arrière-plan, chaque action de code est prise en charge par sa propre fonction logique — une fonction TypeScript côté serveur qui s’exécute sur la plateforme Twenty. Lorsque vous ajoutez une action de code, Twenty crée une fonction logique dédiée pour cette étape et affiche son éditeur en ligne, de sorte que le code que vous écrivez soit associé au workflow. Configuration:- Accédez aux variables des étapes précédentes. Vous pouvez modifier dynamiquement les noms des variables.
- Écrivez le code JavaScript dans l’éditeur
- Retournez des variables pour une utilisation dans les étapes suivantes
- Testez le code directement dans l’étape
Si vous devez utiliser des clés d’API externes dans votre code, vous devez les saisir directement dans le corps de la fonction. Vous ne pouvez pas configurer des clés d’API ailleurs et les référencer dans la fonction logique.
Réutiliser une fonction logique dans plusieurs workflows
L’action de code en ligne est idéale pour de la logique ponctuelle, mais le code qu’elle contient est propre à cette seule étape. Lorsque vous voulez partager la même logique entre plusieurs workflows — ou la maintenir comme code source versionné dans une application — définissez une fonction logique réutilisable au lieu de copier-coller du code dans chaque action de code. Une fonction logique est définie une seule fois dans une application (à l’aide dedefineLogicFunction du SDK) et exposée au concepteur de workflows en ajoutant workflowActionTriggerSettings. Une fois votre application installée, cette fonction apparaît comme une action à part entière dans le concepteur de workflows, à côté des actions intégrées. La sélectionner affiche les champs d’entrée que vous avez déclarés (avec des sélecteurs de variables, comme pour les autres actions) et exécute votre code mutualisé — aucun JavaScript en ligne n’est requis.
| Action de code | Fonction logique réutilisable | |
|---|---|---|
| Où le code est stocké | Éditeur en ligne, lié à une étape de workflow | Définie dans une application, versionnée dans un système de contrôle de version |
| Réutilisation | Copié-collé par étape | Ajoutée comme action dans n’importe quel workflow |
| Entrées | Variables connectées dans l’éditeur | Champs générés à partir de votre schéma d’entrée déclaré |
| Idéal pour | Logique rapide, spécifique à un workflow | Logique partagée utilisée dans plusieurs workflows |
Requête HTTP
Envoie une requête à une API externe dans le cadre de votre flux de travail.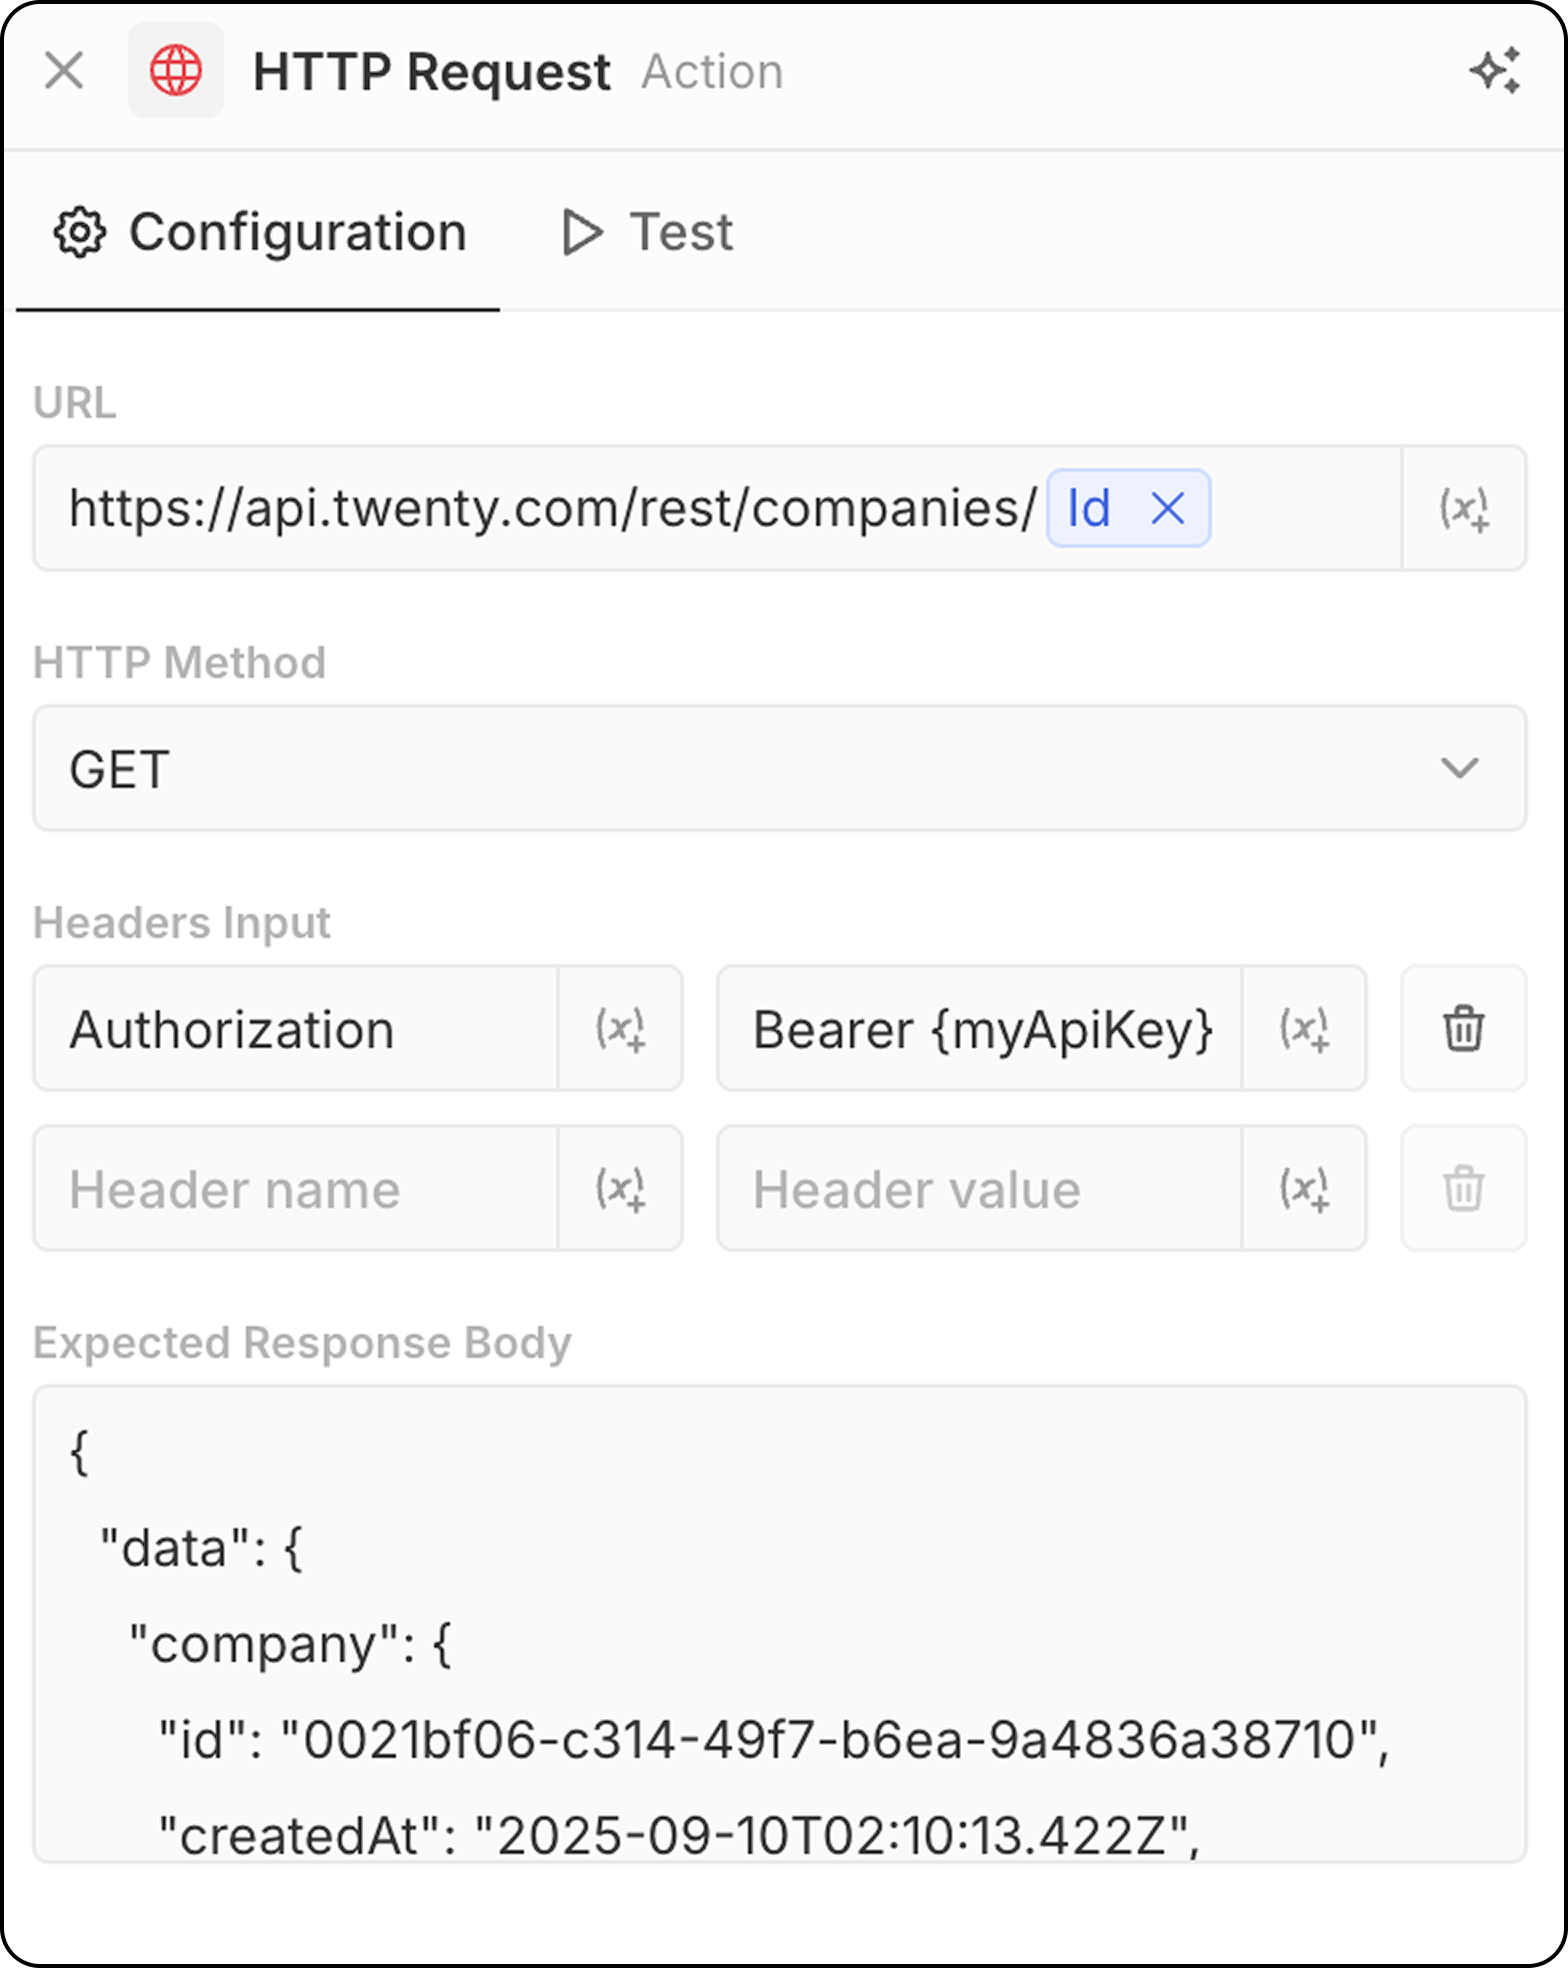
- Entrez l’URL du point de terminaison de l’API. Il est possible d’utiliser des paramètres issus des étapes précédentes.
- Sélectionnez la méthode HTTP (GET, POST, PUT, PATCH, DELETE)
- Ajoutez les en-têtes et valeurs requis
- Fournissez un exemple de réponse pour l’aperçu de la structure
Actions d’IA
Agent IA - Bientôt disponible
Exécute un agent IA au sein de votre flux de travail pour effectuer des tâches intelligentes. Configuration:- Agent: Sélectionnez un agent IA existant ou utilisez l’agent par défaut
- Prompt: Écrivez l’instruction pour l’agent IA
- Référencez des variables des étapes précédentes dans le prompt
- Analyser et résumer des données
- Classer ou catégoriser des enregistrements
- Générer du contenu textuel
- Prendre des décisions basées sur des données
- Interagir avec vos données CRM à l’aide d’outils
Les actions d’agent IA consomment des crédits de flux de travail en fonction du modèle d’IA utilisé. Voir Crédits de flux de travail pour plus de détails.
Les agents IA respectent les autorisations basées sur les rôles. Vous pouvez attribuer des rôles spécifiques aux agents dans Paramètres → Membres → Rôles pour contrôler les données auxquelles ils peuvent accéder. Voir Autorisations pour plus de détails.