Eylemler Hakkında
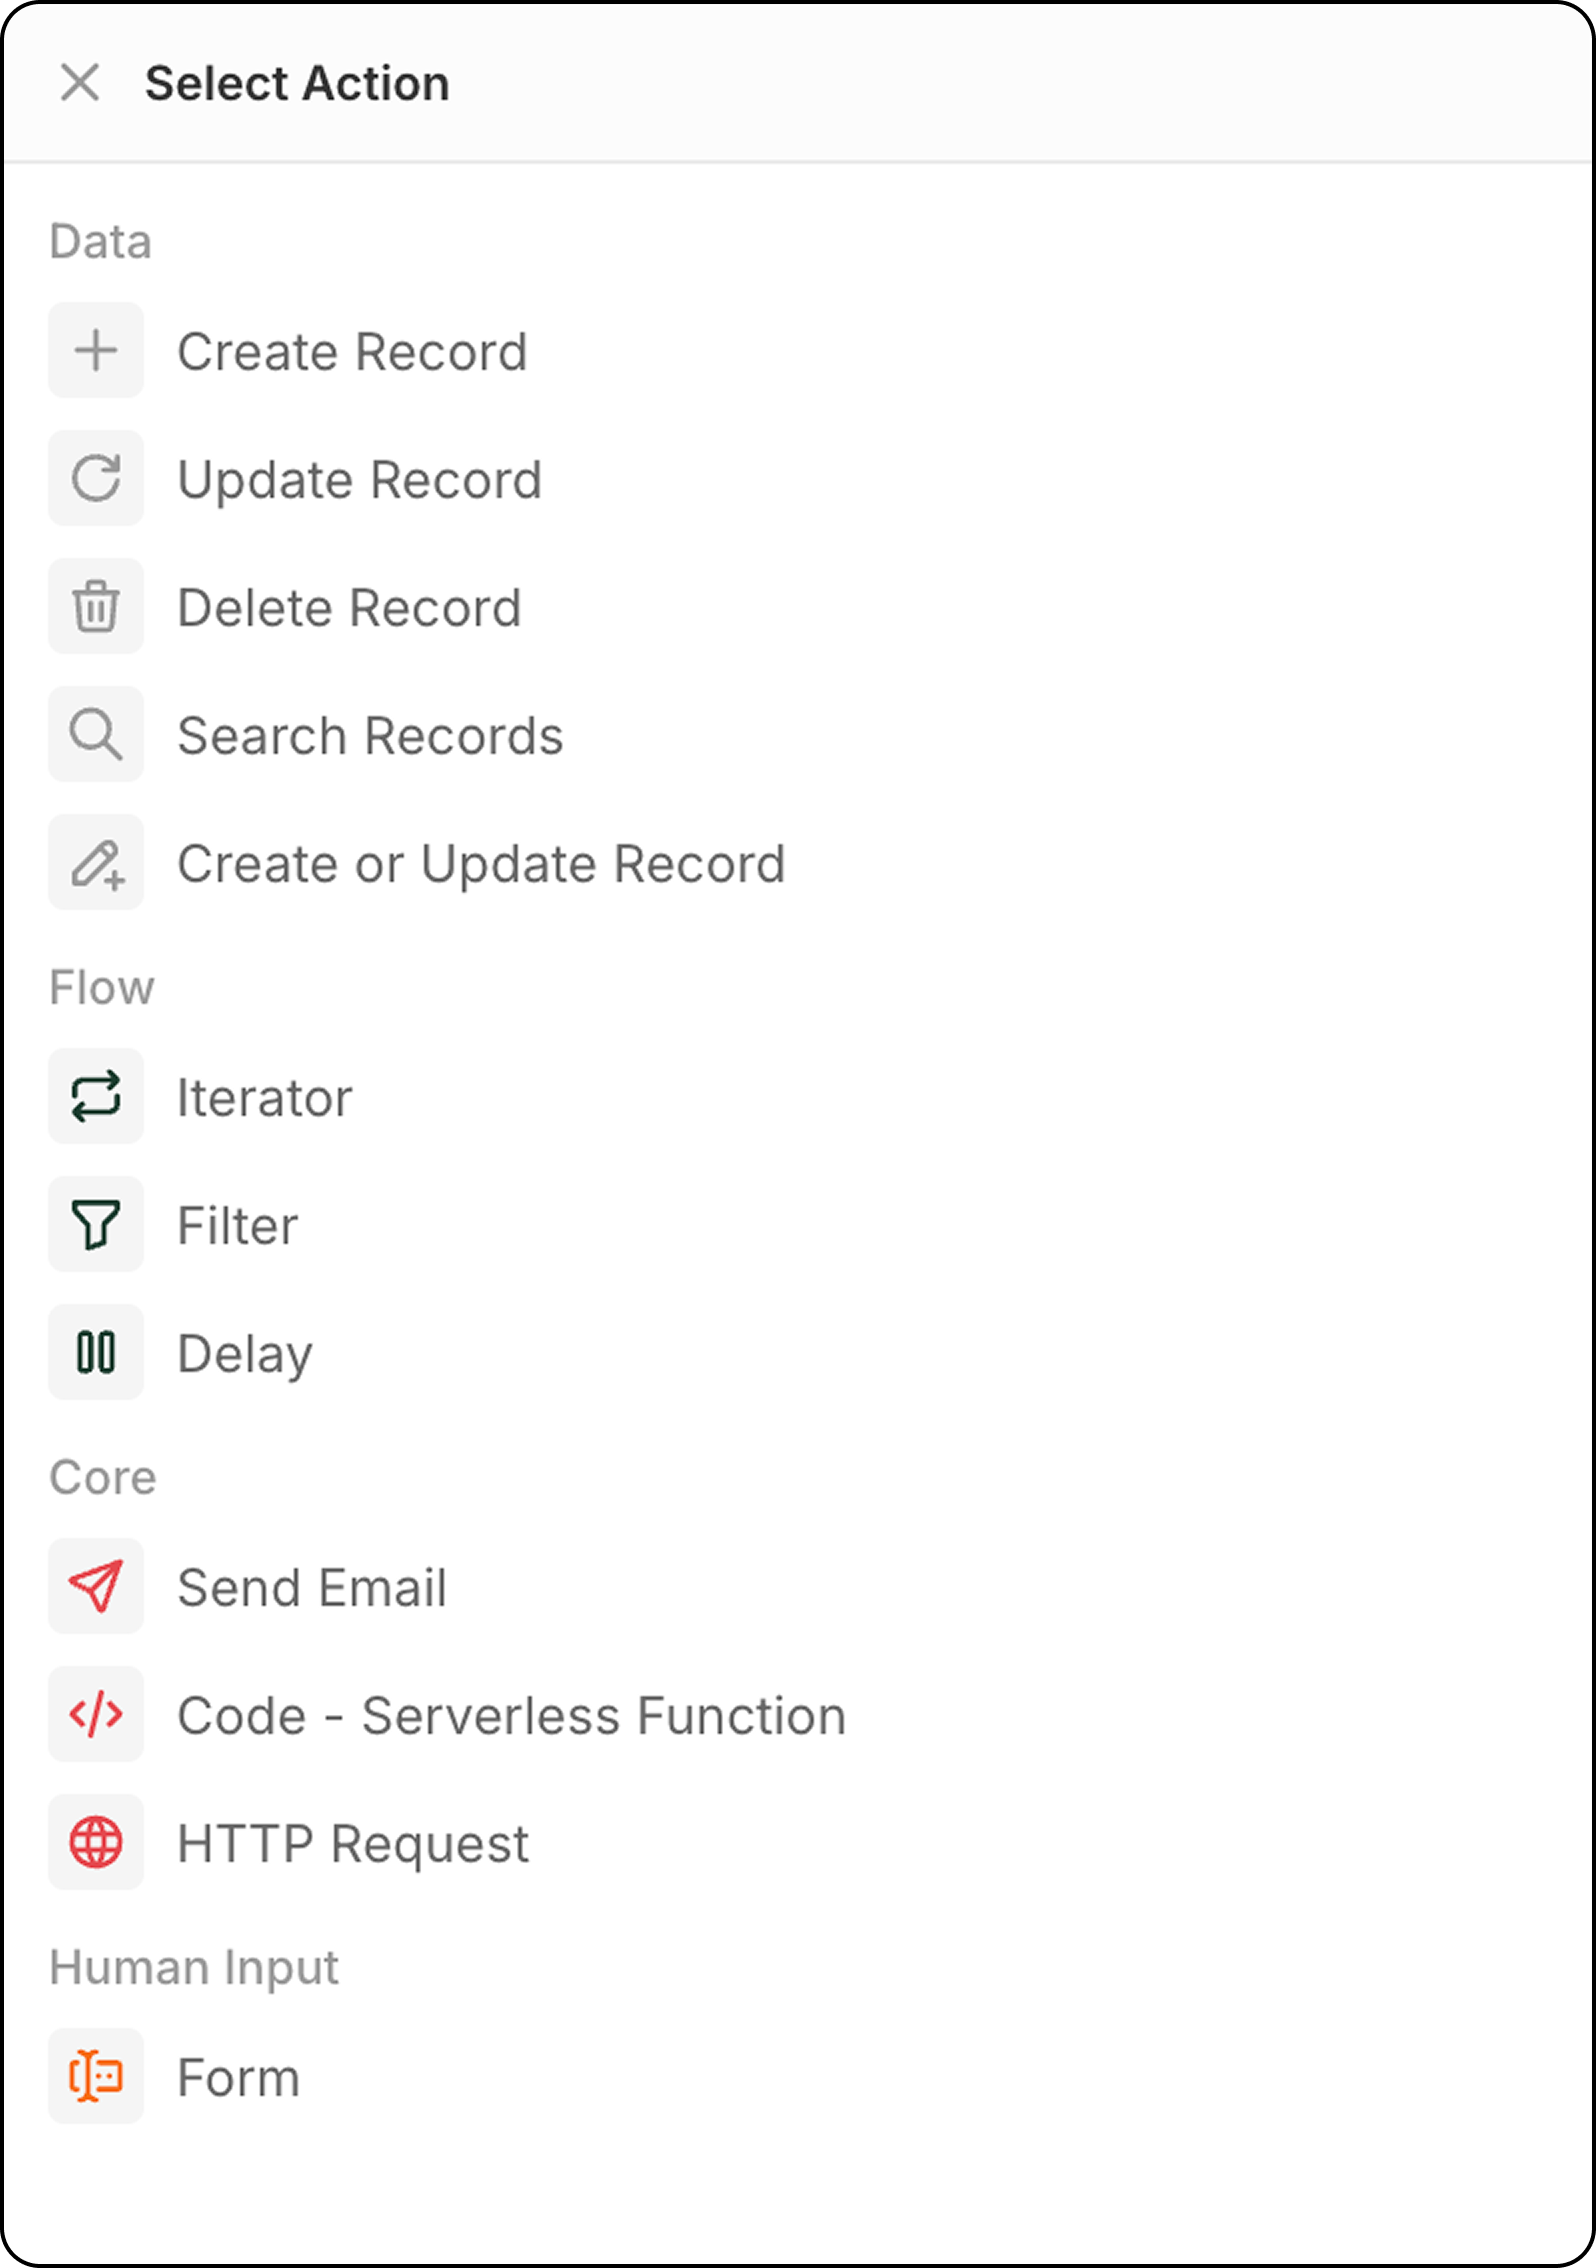
Aksiyonlar, bir tetikleyici devreye girdiğinde neler olacağını tanımlar. Karmaşık otomasyonlar oluşturmak için birden fazla eylemi birbirine zincirleyebilirsiniz.Kayıt Eylemleri
Kayıt Oluştur
Seçilen bir nesneye yeni bir kayıt ekler. Yapılandırma:- Hedef nesneyi seçin
- Gerekli ve isteğe bağlı alanları doldurun
- Alanları doldurmak için önceki adımlardan gelen verileri kullanın veya değerleri el ile girin
Kayıt Güncelle
Seçilen bir nesnedeki mevcut bir kaydı değiştirir.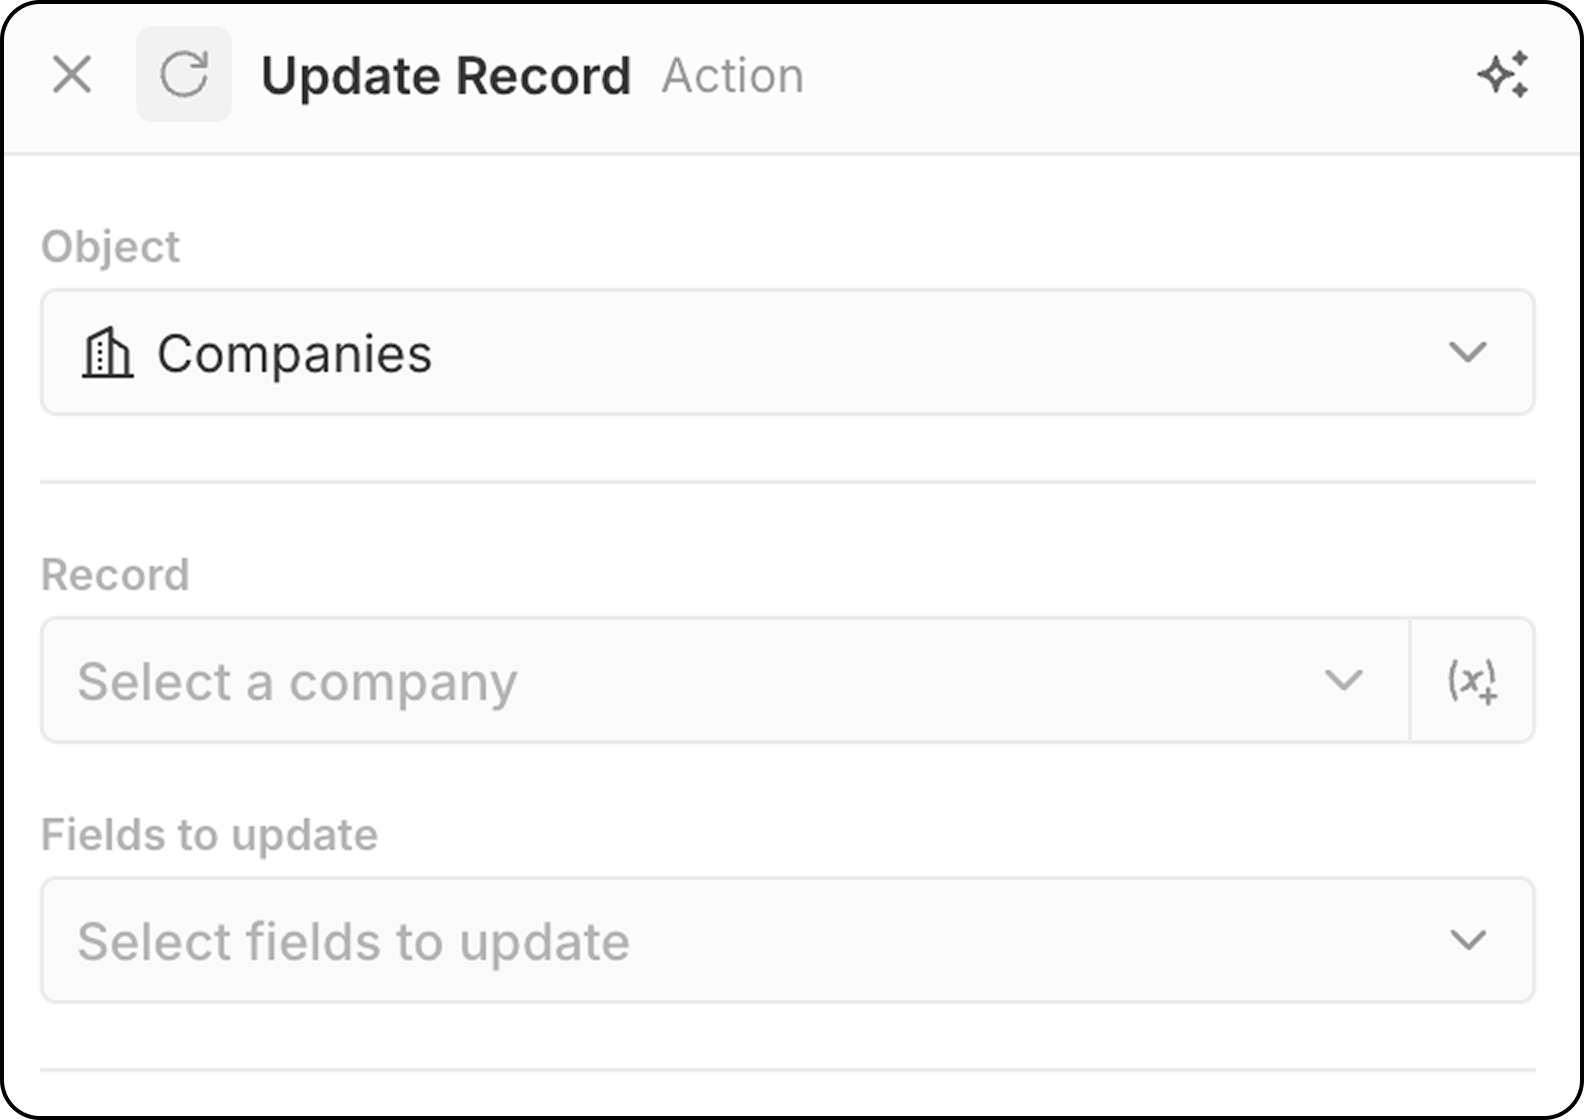
- Hedef nesneyi seçin
- Güncellenecek belirli kaydı seçin.
- Tüm mevcut kayıtları gösteren açılır menüyü kullanarak sabit bir kayıt seçebilirsiniz.
- Veya
(x+)kullanarak önceki bir adımda bulunan bir kaydı belirleyip kaydın dinamik olarak seçilmesini sağlayabilirsiniz. Bu aşamada kaydı farklı ölçütlere göre arayamazsınız. Kaydı henüz belirlemediyseniz, buUpdate Recordadımından önce birSearch Recordadımı ekleyin.
- Değiştirilecek alanları seçin ve yeni değerler girin
Kayıt Sil
Seçilen bir nesneden bir kaydı kaldırır. Yapılandırma:- Hedef nesneyi seçin
- Silinecek belirli kaydı seçin
Kayıt Ara
Seçilen bir nesnede filtreleme koşulları kullanarak kayıt bulur. Yapılandırma:- Aranacak nesneyi seçin
- Sonuçları daraltmak için filtre kriterlerini ayarlayın
- Sıralama ve sınırları yapılandırın
Sınır: Search Records en fazla 200 kayıt döndürür. Daha fazlasını işlemeniz gerekiyorsa, sonuçları azaltmak için belirli filtreler ekleyin veya toplu olarak işlemek için zamanlanmış iş akışlarını kullanın.
Kayıt Ekle/Güncelle
Eşleştirme ölçütlerine göre yeni bir kayıt oluşturur veya mevcut bir kaydı günceller. Bir kaydın zaten var olup olmadığından emin olmadığınızda faydalıdır.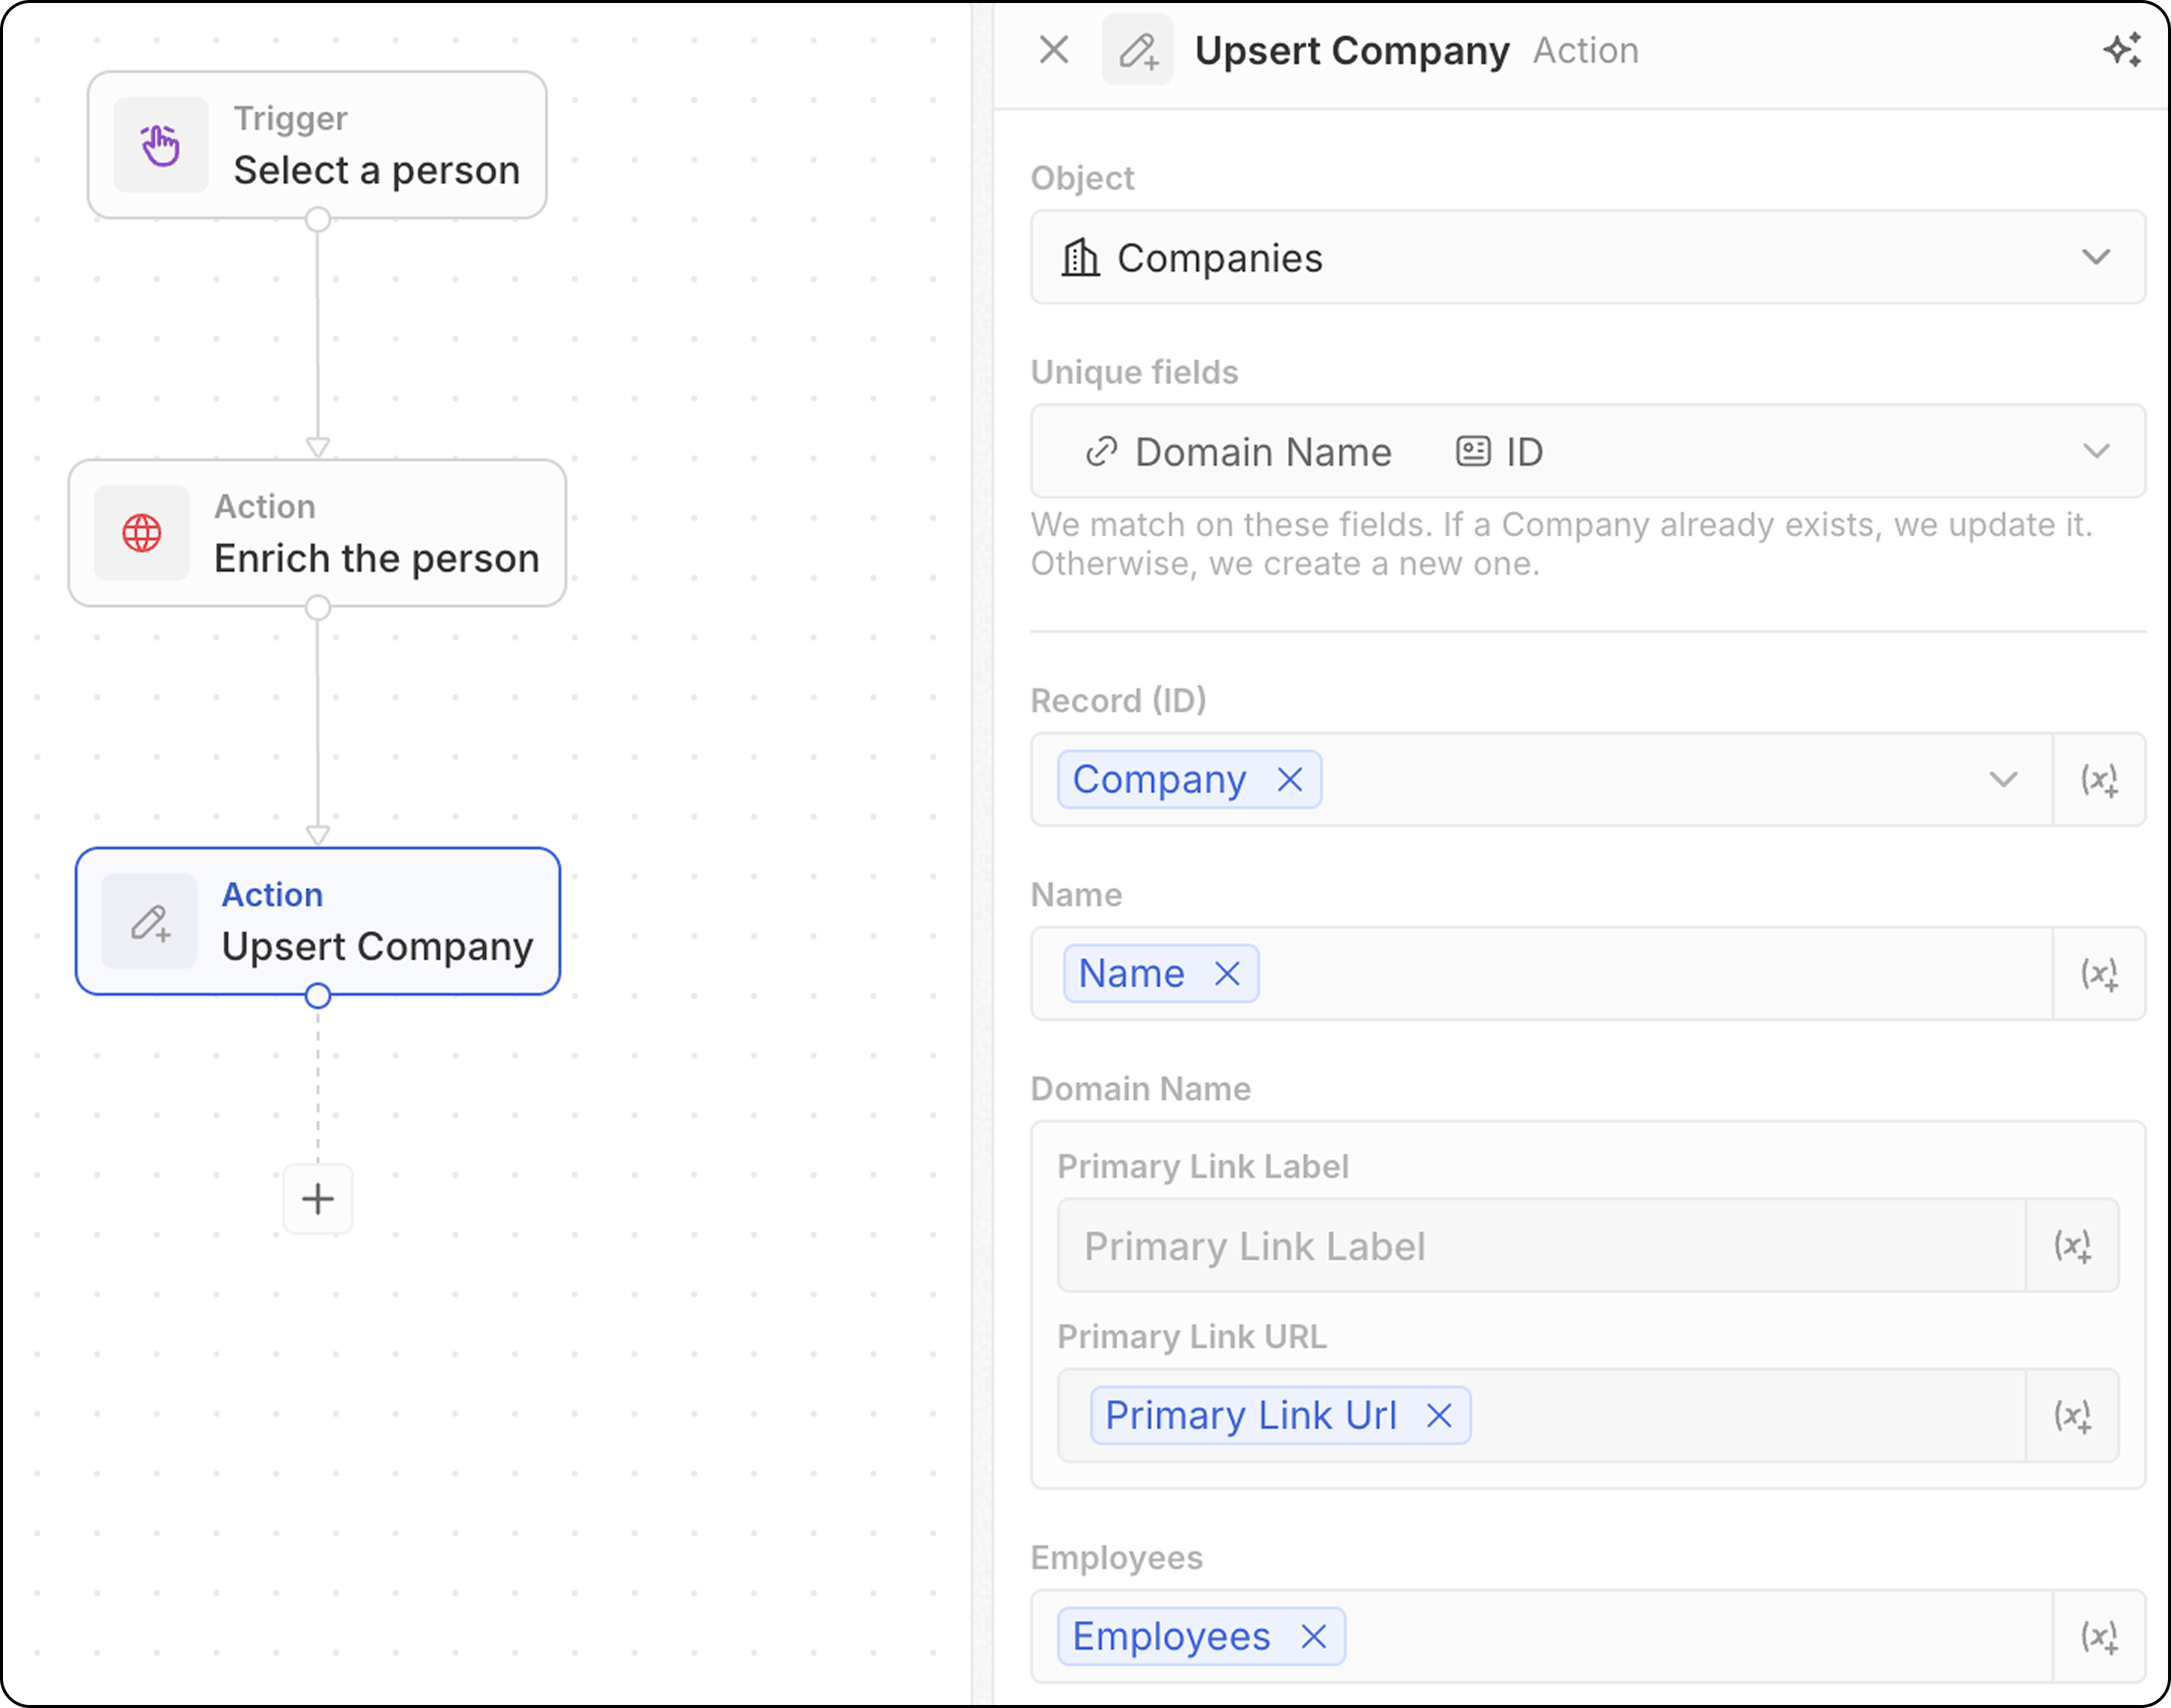
- Hedef nesneyi seçin
- Eşleştirme için hangi alanların kullanılabileceğine dikkat edin: Kişiler için e-posta, Şirketler için alan adı (domain), herhangi bir nesne için ID veya Benzersiz olarak işaretlenmiş herhangi bir alan. Aşağıdakilerden en az birini doldurmanız gerekecek.
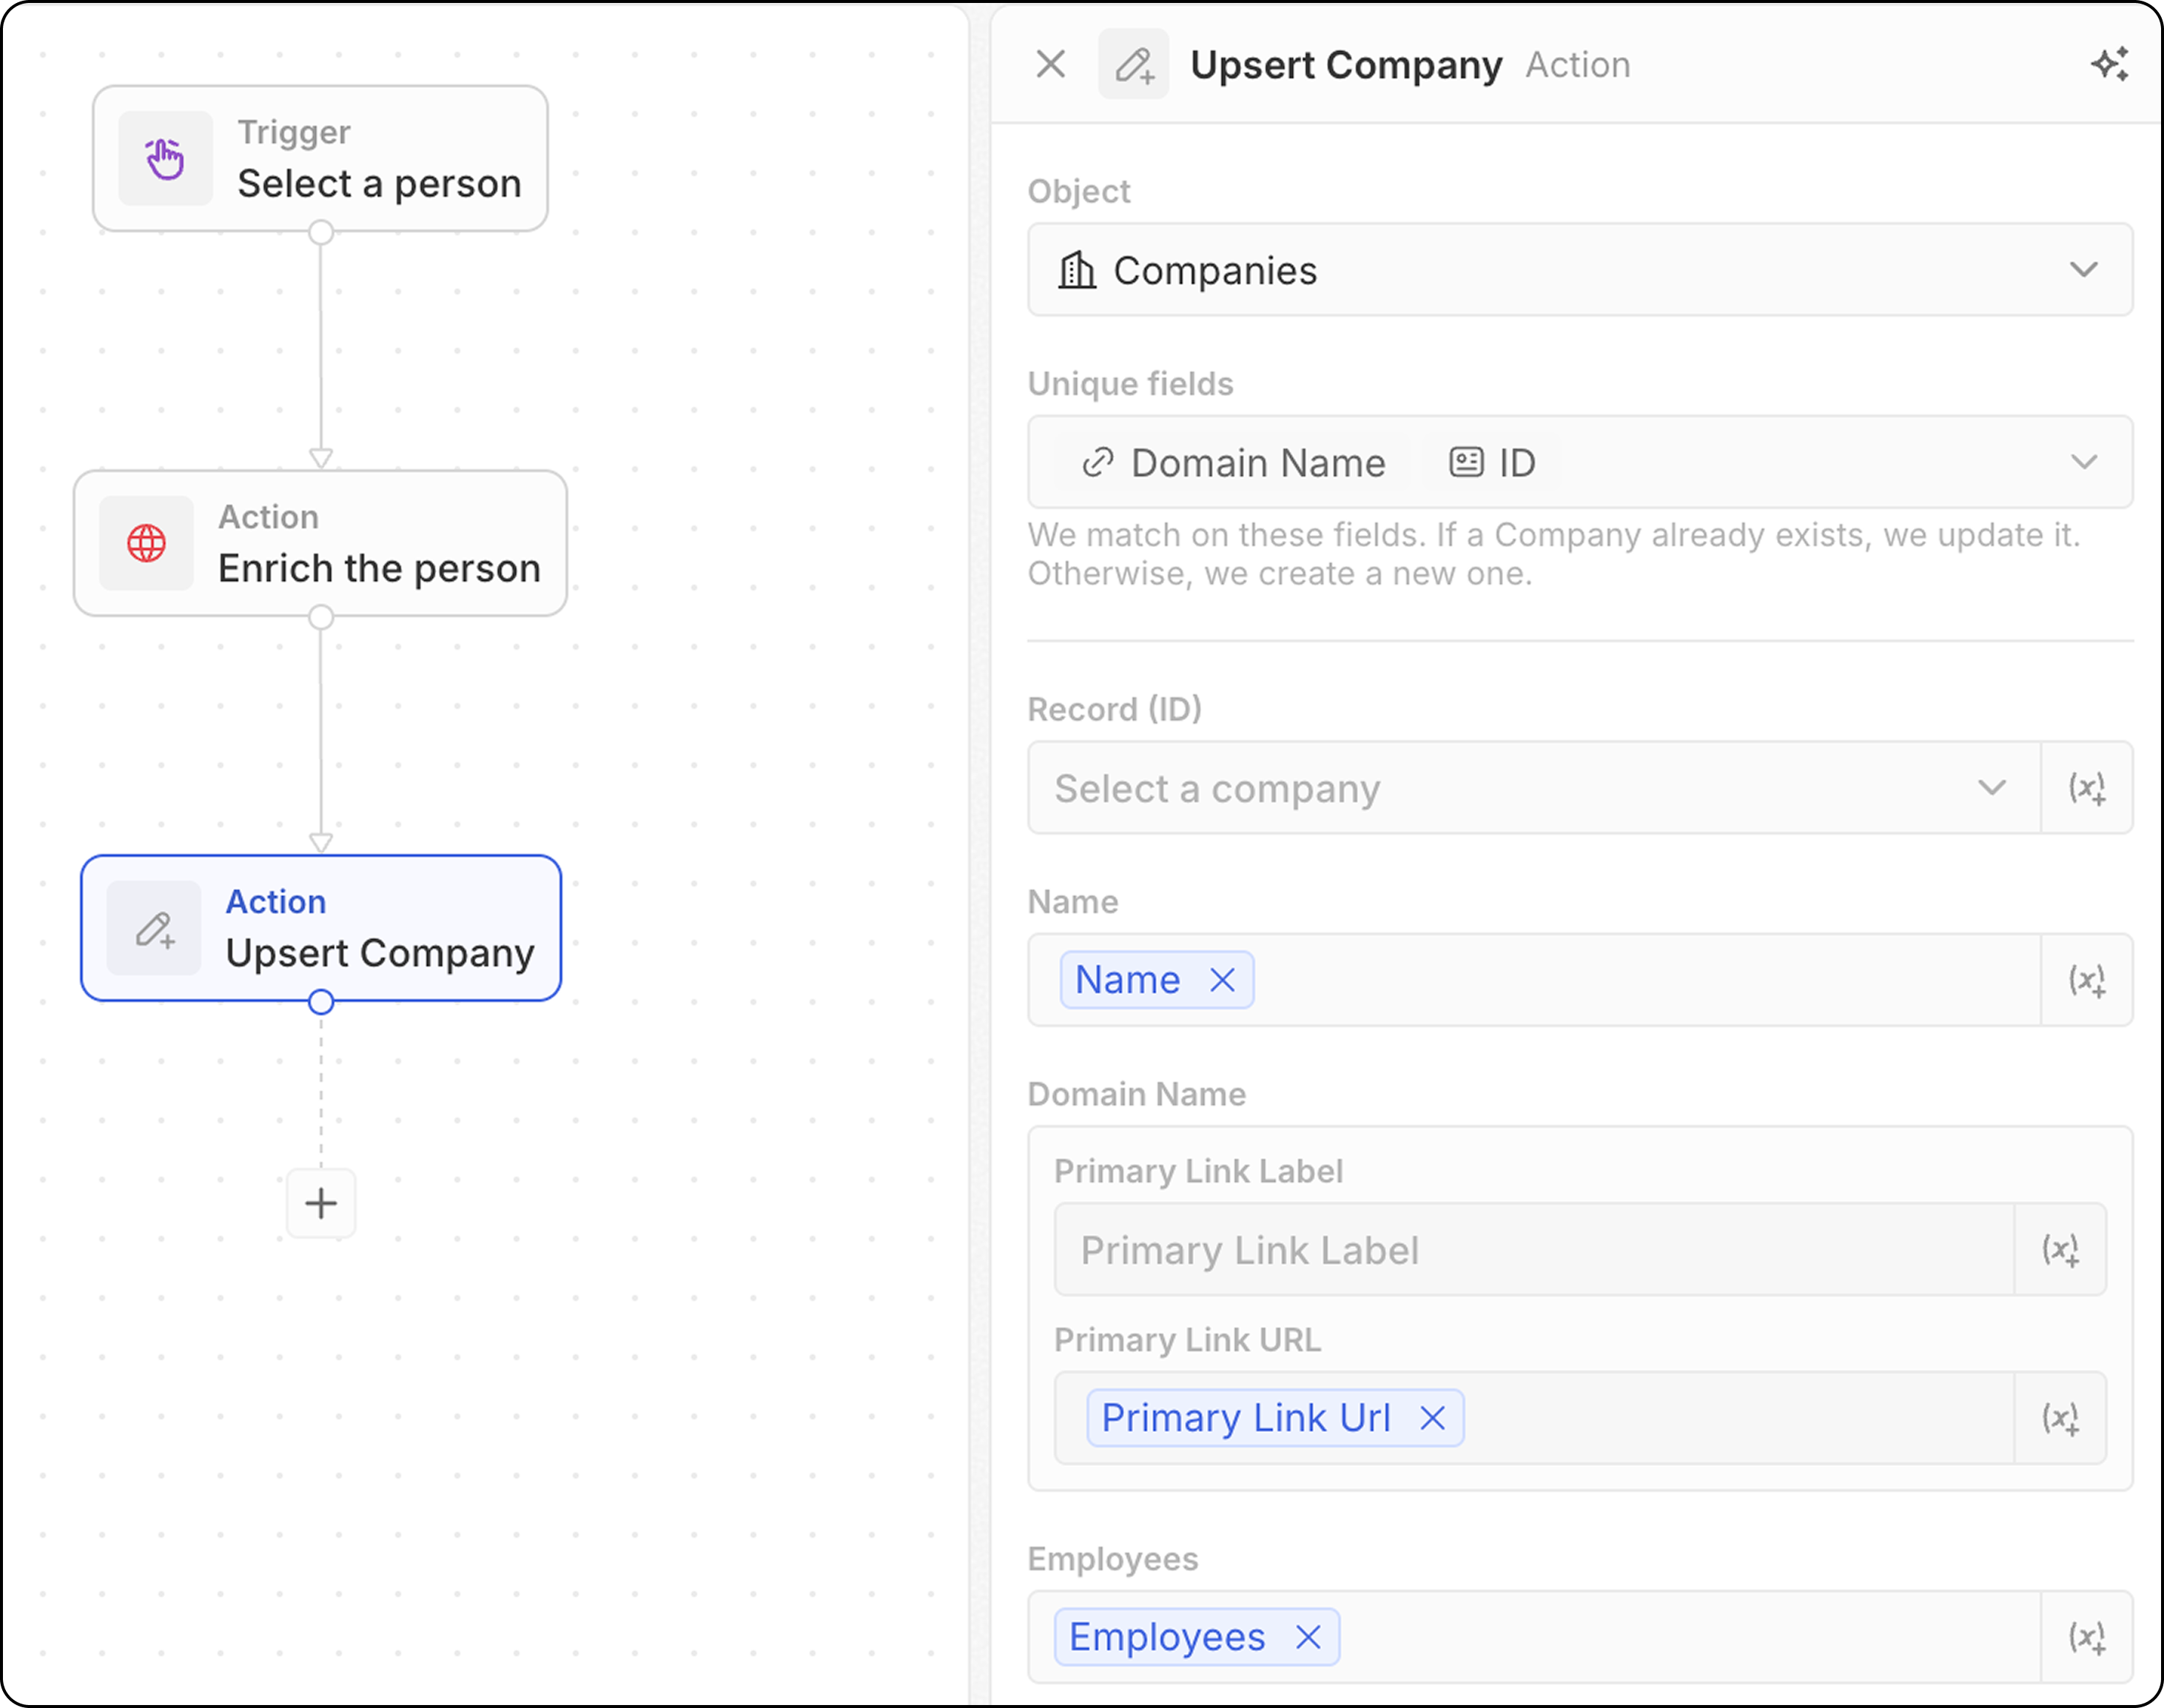
- Alan değerlerini doldurun. Benzersiz tanımlayıcılardan en az birini doldurmayı unutmayın.
Yalnızca bir benzersiz tanımlayıcı eklemek, genellikle eşleştirmenin daha iyi çalışmasını sağlar. Örneğin, aşağıdaki ekran görüntüsü şirketleri alan adlarına göre eşleştirecektir. ID mutlaka gerekli değildir.
- Alanları doldurmak için önceki adımlardan gelen verileri kullanın
- Kriterlerinize uyan bir kaydı arar
- Bulunursa → mevcut kaydı günceller
- Bulunamazsa → yeni bir kayıt oluşturur
Akış Eylemleri
Yineleyici
Önceki bir adımdan dönen kayıt dizisi üzerinde döngü oluşturur, her kayıt üzerinde ayrı ayrı işlem yapmanıza olanak tanır. Yapılandırma:- Önceki bir adımdan gelen kayıt dizisini seçin (ör. Kayıt Ara sonuçları, Toplu kullanılabilirliğe sahip bir Manuel tetikleyici, bir kod düğümü). Bir Code adımı veya mantık işlevi adımı üst düzey bir dizi döndürdüğünde, çıktının tamamı üzerinde döngü yapmak için Tüm liste seçeneğini seçin.
- Döngüde her kayıt üzerinde gerçekleştireceğiniz işlemleri tanımlayın.
- Bir yineleyici içinde birden fazla eylem ekleyebilirsiniz.
- Bir yineleyici içinde dallar kullanırken, her dalın son adımının döngüyü kapatmak için yineleyiciye geri bağlandığından emin olun.
Current ItemAlanlarına Erişim: şu anda işlenen kayıttaki alanları kullanmak için Iterator adımına tıklayın, ardından Current item seçin. Bu kayıttan kullanılabilir alanların listesi görüntülenir ve sonraki eylemlerde kullanılmak üzere seçilebilir. Ayrıca, geçerli öğenin tamamını bir sonraki adıma aktarmak için Öğenin tamamını kullan seçeneğini de belirleyebilirsiniz.
Filtre
Belirtilen koşullara göre kayıtları filtreler ve yalnızca kriterleri karşılayan kayıtların geçmesine izin verir. Yapılandırma:- Filtrelenecek kaydı seçin
- Filtre koşullarını ve kriterlerini tanımlayın
- Sonraki adımlara geçmesi gereken kayıtları yapılandırın
- Çıktı: Filtre düğümleri veri döndürmez—geçit görevi görürler. Koşullar karşılanırsa iş akışı devam eder. Karşılanmazsa iş akışı o dalda durur.
ISişleci sayısal alanlarla kullanılabilir. BirEQUALgibi çalışır.
Gecikme
İş akışının yürütülmesini belirtilen bir süre boyunca veya belirli bir tarih/saate kadar duraklatır. Gecikme Türleri:| Tür | Açıklama |
|---|---|
| Süre | Belirli bir süre bekleyin (gün, saat, dakika, saniye) |
| Zamanlanmış Tarih | Belirli bir tarih ve saate kadar bekleyin |
- Gün, saat, dakika ve/veya saniye ayarlayın
- Birden fazla birimi birleştirin (ör. 2 gün ve 4 saat)
- Bir tarih ve saat seçin
- Önceki bir adımdaki bir tarih alanına referans verebilir (ör. bir toplantıdan 3 gün sonra takip)
- Takip e-postası göndermeden önce 24 saat bekleyin
- Bir fırsatın kapanış tarihine kadar duraklatın
- Eylemleri mesai saatlerine göre zamanlayın
Planlanan tarih geçmişte olamaz. Önceki bir adımdaki tarih alanı kullanılırsa ve tarih zaten geçmişse, iş akışı başarısız olur.
- Maksimum süre sınırı yoktur—dakika, gün, hafta veya daha uzun gecikmeler ayarlayabilirsiniz.
- Süreye bakılmaksızın Gecikme düğümü çalıştığında 1 kredi harcanır
- Beklerken kredi harcanmaz—5 dakikalık bir gecikmenin maliyeti 5 günlük bir gecikmeyle aynıdır
İletişim Eylemleri
E-posta Gönder
İş akışınızdan bir e-posta gönderir. Bu, şablonlu grup e-postaları için harikadır. E-postalar, posta kutunuzdan gönderdiğiniz e-postalara benzeyecektir. Bültenler (daha zengin biçimlendirme gerektirir) veya otomatik e-posta dizileri için uygun değildir. Ön Koşullar: Ayarlar → Hesaplar bölümüne bir e-posta hesabı ekleyin Yapılandırma:- Gönderen e-posta hesabını seçin
Yalnızca kendi Twenty hesabınıza senkronize edilmiş posta kutularından e-posta gönderebilirsiniz. Diğer ekip üyelerinin posta kutularından gönderim (ör. hesap sahibinin e-postası) yol haritasındadır.
- Alıcı e-posta adresini girin.
Şu anda yalnızca bir alıcı mümkündür.
- Konu satırını ayarlayın.
- Mesaj gövdesini yazın. Bağlantıları biçimlendirebilir, numaralı listeler ve madde işaretli listeler oluşturabilir, ekler ekleyebilirsiniz.
Şu anda HTML imzaları eklemek mümkün değildir.
Form
İş akışı gerçekleştirilirken kullanıcı girdisi toplamak için bir form açar. Yanıtlar daha sonra sonraki adımlarda, girdiye bağlı olarak kayıtlar oluşturmak, e-postalar göndermek veya başka herhangi bir eylemi yürütmek için kullanılabilir. Yapılandırma:- Kullanıcılardan doldurmaları istenecek alanları yapılandırın. Her alan için şunları seçin
- metin, sayı, tarih, belirli bir kayıt veya bir seçim alanı türü. Tüm nesnelerden seçim alanları kullanılabilir.
- bir etiket
Placeholderaltında varsayılan bir değer (isteğe bağlı)
- Form başlığını düzenleyin
Cmd + K içinde her yerden erişilebilir.
Form nasıl doldurulur:
- Manuel iş akışınızı komut menüsünden
Cmd Kile tetikleyin - Kenar panelde görüntülenen formu doldurun ve
Submitdüğmesine tıklayın.
Alanlar zorunlu hale getirilemez.
Entegrasyon Eylemleri
Kod
İş akışınızda özel JavaScript çalıştırır. Arka planda, her Code eylemi kendi mantık işlevi ile desteklenir — Twenty platformunda çalışan sunucu tarafı bir TypeScript işlevi. Bir Code eylemi eklediğinizde, Twenty o adım için özel bir mantık işlevi oluşturur ve düzenleyicisini satır içinde gösterir; böylece yazdığınız kod iş akışının parçası olur. Yapılandırma:- Önceki adımlardan gelen değişkenlere erişin. Değişken adlarını dinamik olarak düzenleyebilirsiniz.
- Düzenleyicide JavaScript kodu yazın
- Sonraki adımlarda kullanılmak üzere değişkenler döndürün
- Kodu doğrudan adımda test edin
Kodunuzda harici API anahtarlarını kullanmanız gerekiyorsa, bunları doğrudan fonksiyon gövdesine girmeniz gerekir. API anahtarlarını başka bir yerde yapılandıramazsınız ve bunlara mantık fonksiyonu içinde referans veremezsiniz.
İş akışları arasında bir mantık işlevini yeniden kullanma
Satır içi Code eylemi, tek seferlik mantık için harikadır, ancak içerdiği kod yalnızca o adıma aittir. Aynı mantığı birden fazla iş akışında paylaşmak — ya da bir uygulamada sürümlendirilen kaynak olarak korumak — istediğinizde, her Code eylemine kod kopyalayıp yapıştırmak yerine yeniden kullanılabilir bir mantık işlevi tanımlayın. Bir mantık işlevi bir uygulamada bir kez tanımlanır (SDK’nindefineLogicFunction işlevi kullanılarak) ve workflowActionTriggerSettings eklenerek iş akışı oluşturucuya açığa çıkarılır. Uygulamanız yüklendikten sonra, bu işlev, yerleşik eylemlerin yanında, iş akışı oluşturucuda kendi eylemi olarak görünür. Onu seçmek, tanımladığınız giriş alanlarını (diğer eylemlerde olduğu gibi değişken seçicilerle birlikte) oluşturur ve paylaşılan kodunuzu çalıştırır — satır içi JavaScript gerekmez.
| Code eylemi | Yeniden kullanılabilir mantık işlevi | |
|---|---|---|
| Kodun bulunduğu yer | Satır içi düzenleyici, tek bir iş akışı adımıyla bağlantılı | Bir uygulamada tanımlanır, kaynak kontrolünde sürümlendirilir |
| Yeniden kullanım | Her adım için kopyalanıp yapıştırılır | Herhangi bir iş akışına bir eylem olarak eklenir |
| Girdiler | Düzenleyicide bağlanan değişkenler | Tanımladığınız giriş şemasından oluşturulan alanlar |
| En uygun | Hızlı, iş akışına özgü mantık | Birden fazla iş akışında kullanılan paylaşılan mantık |
HTTP İsteği
İş akışınızın bir parçası olarak harici bir API’ye istek gönderir.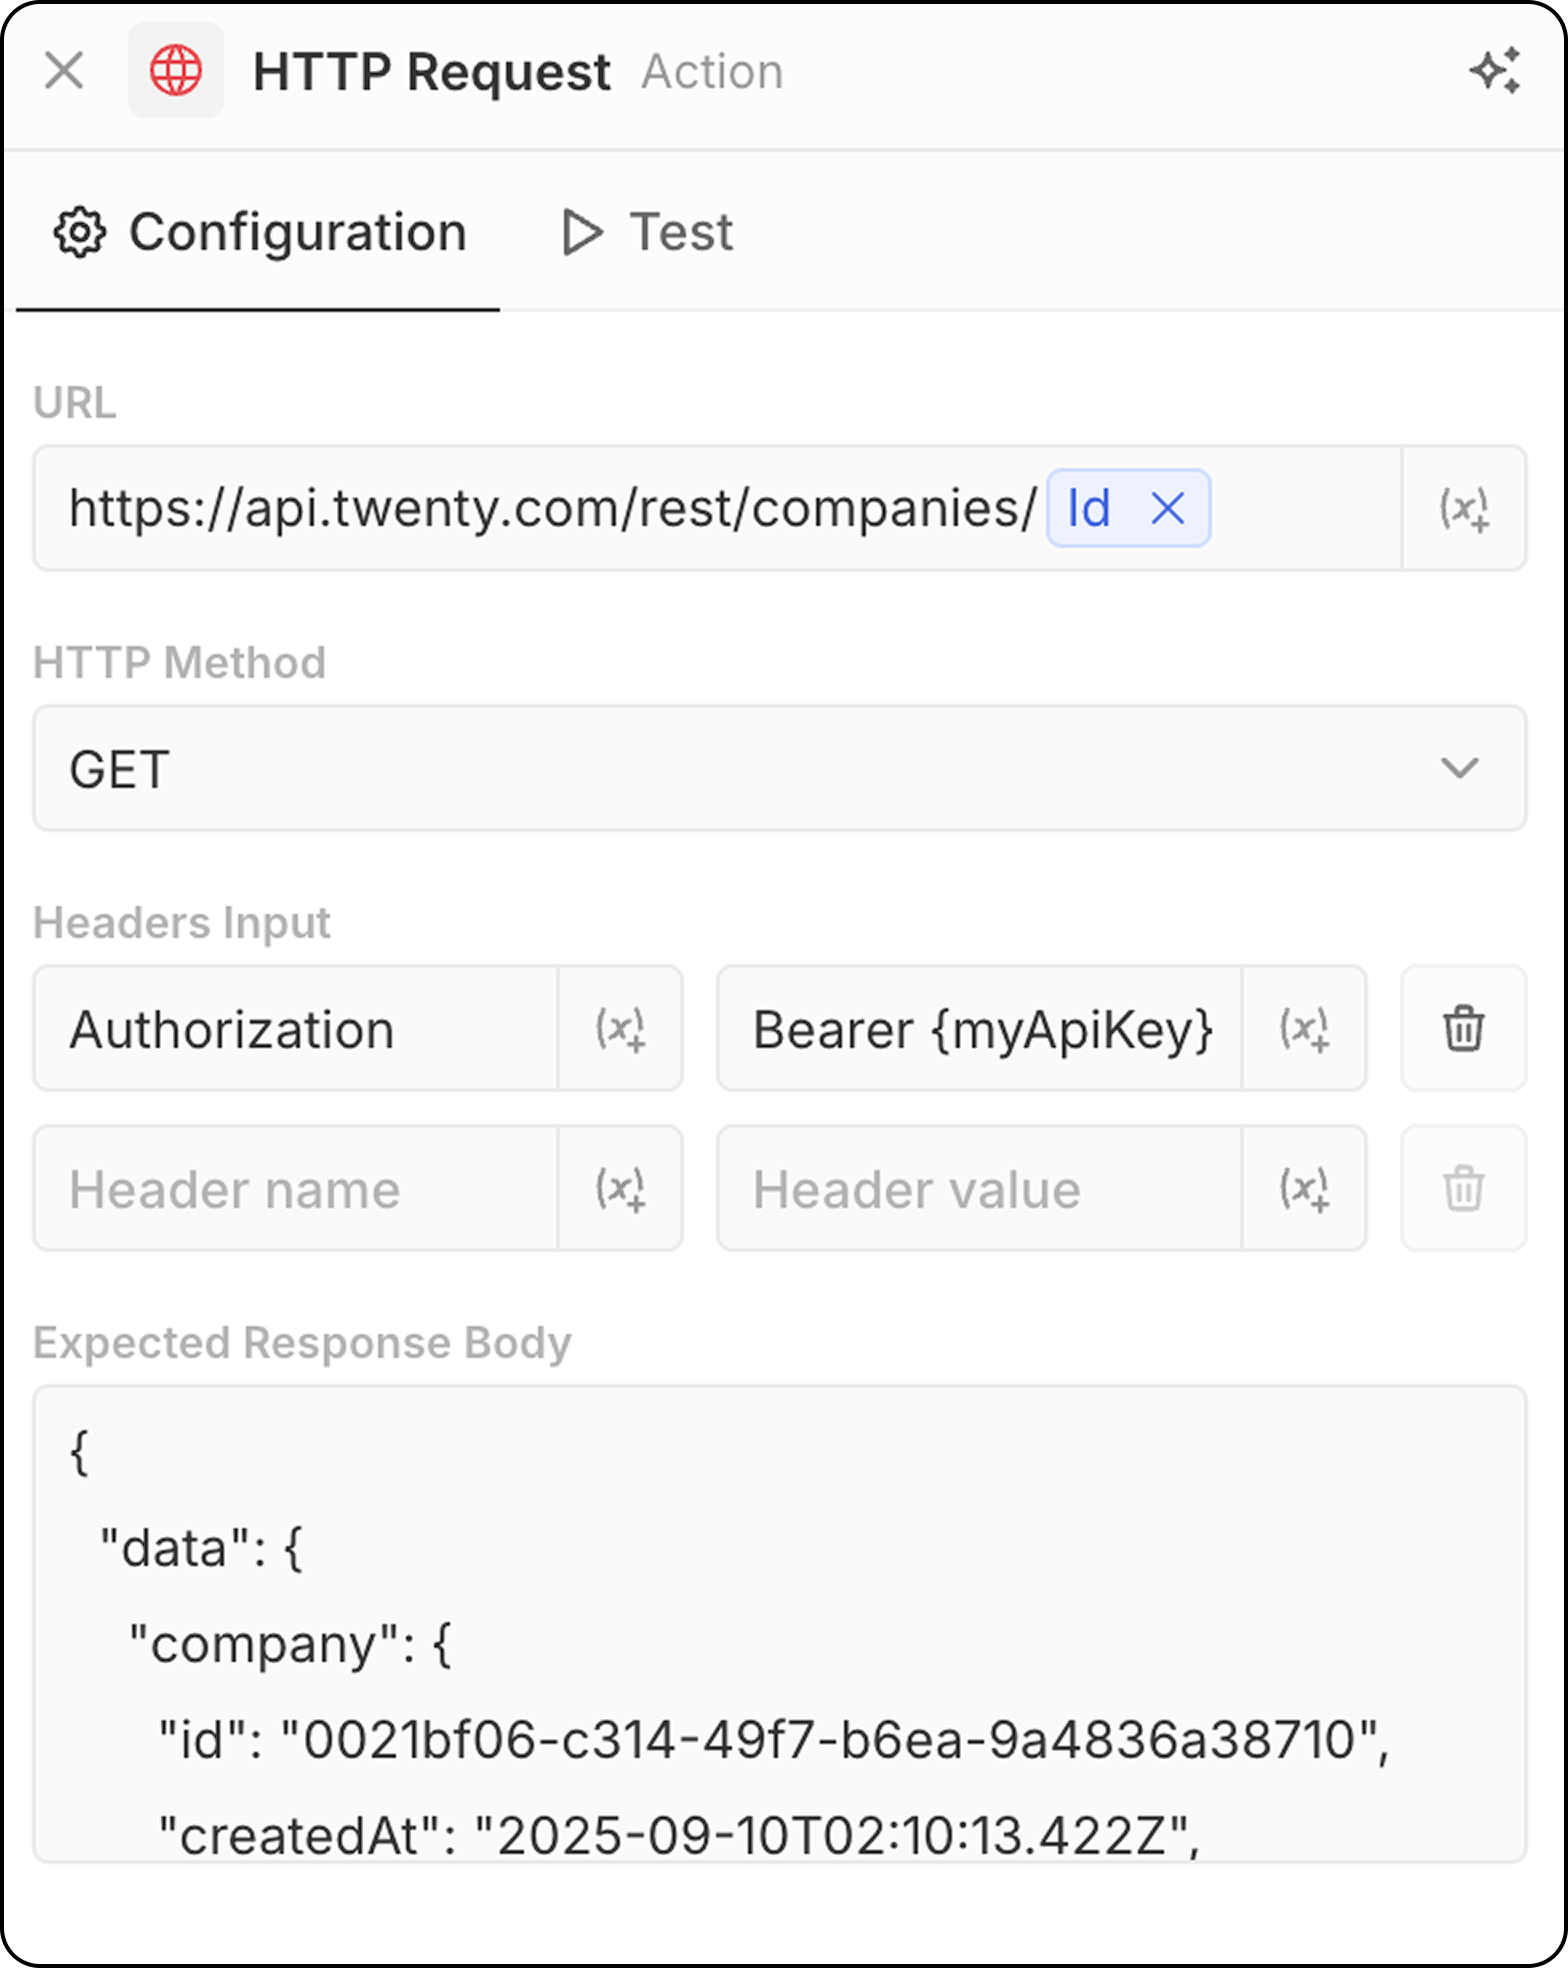
- API endpoint URL’sini girin. Önceki adımlardaki parametreleri kullanmak mümkündür.
- HTTP yöntemini seçin (GET, POST, PUT, PATCH, DELETE)
- Gerekli başlıkları ve değerleri ekleyin
- Yapı önizlemesi için örnek yanıt sağlayın
Yapay Zeka Eylemleri
Yapay Zeka Aracısı - Çok Yakında
İş akışınız içinde akıllı görevler gerçekleştirmek için bir yapay zeka aracısını çalıştırır. Yapılandırma:- Aracı: Mevcut bir yapay zeka aracısını seçin veya varsayılan aracıyı kullanın
- İstem: Yapay zeka aracısı için talimatı yazın
- İstemde önceki adımlardaki değişkenlere başvurun
- Verileri analiz edip özetleyin
- Kayıtları sınıflandırın veya kategorilere ayırın
- Metin içeriği oluşturun
- Verilere dayalı kararlar verin
- Araçlar kullanarak CRM verilerinizle etkileşim kurun
Yapay Zeka Aracısı eylemleri, kullanılan yapay zeka modeline bağlı olarak iş akışı kredileri tüketir. Ayrıntılar için İş Akışı Kredileri bölümüne bakın.
Yapay zeka aracıları role dayalı izinlere uyar. Temsilcilerin hangi verilere erişebileceklerini kontrol etmek için Ayarlar → Üyeler → Roller altında temsilcilere belirli roller atayabilirsiniz. Ayrıntılar için İzinler bölümüne bakın.