Informazioni sulle azioni
Le azioni definiscono cosa accade dopo l’attivazione di un trigger. Puoi concatenare più azioni per creare automazioni complesse.Azioni sui record
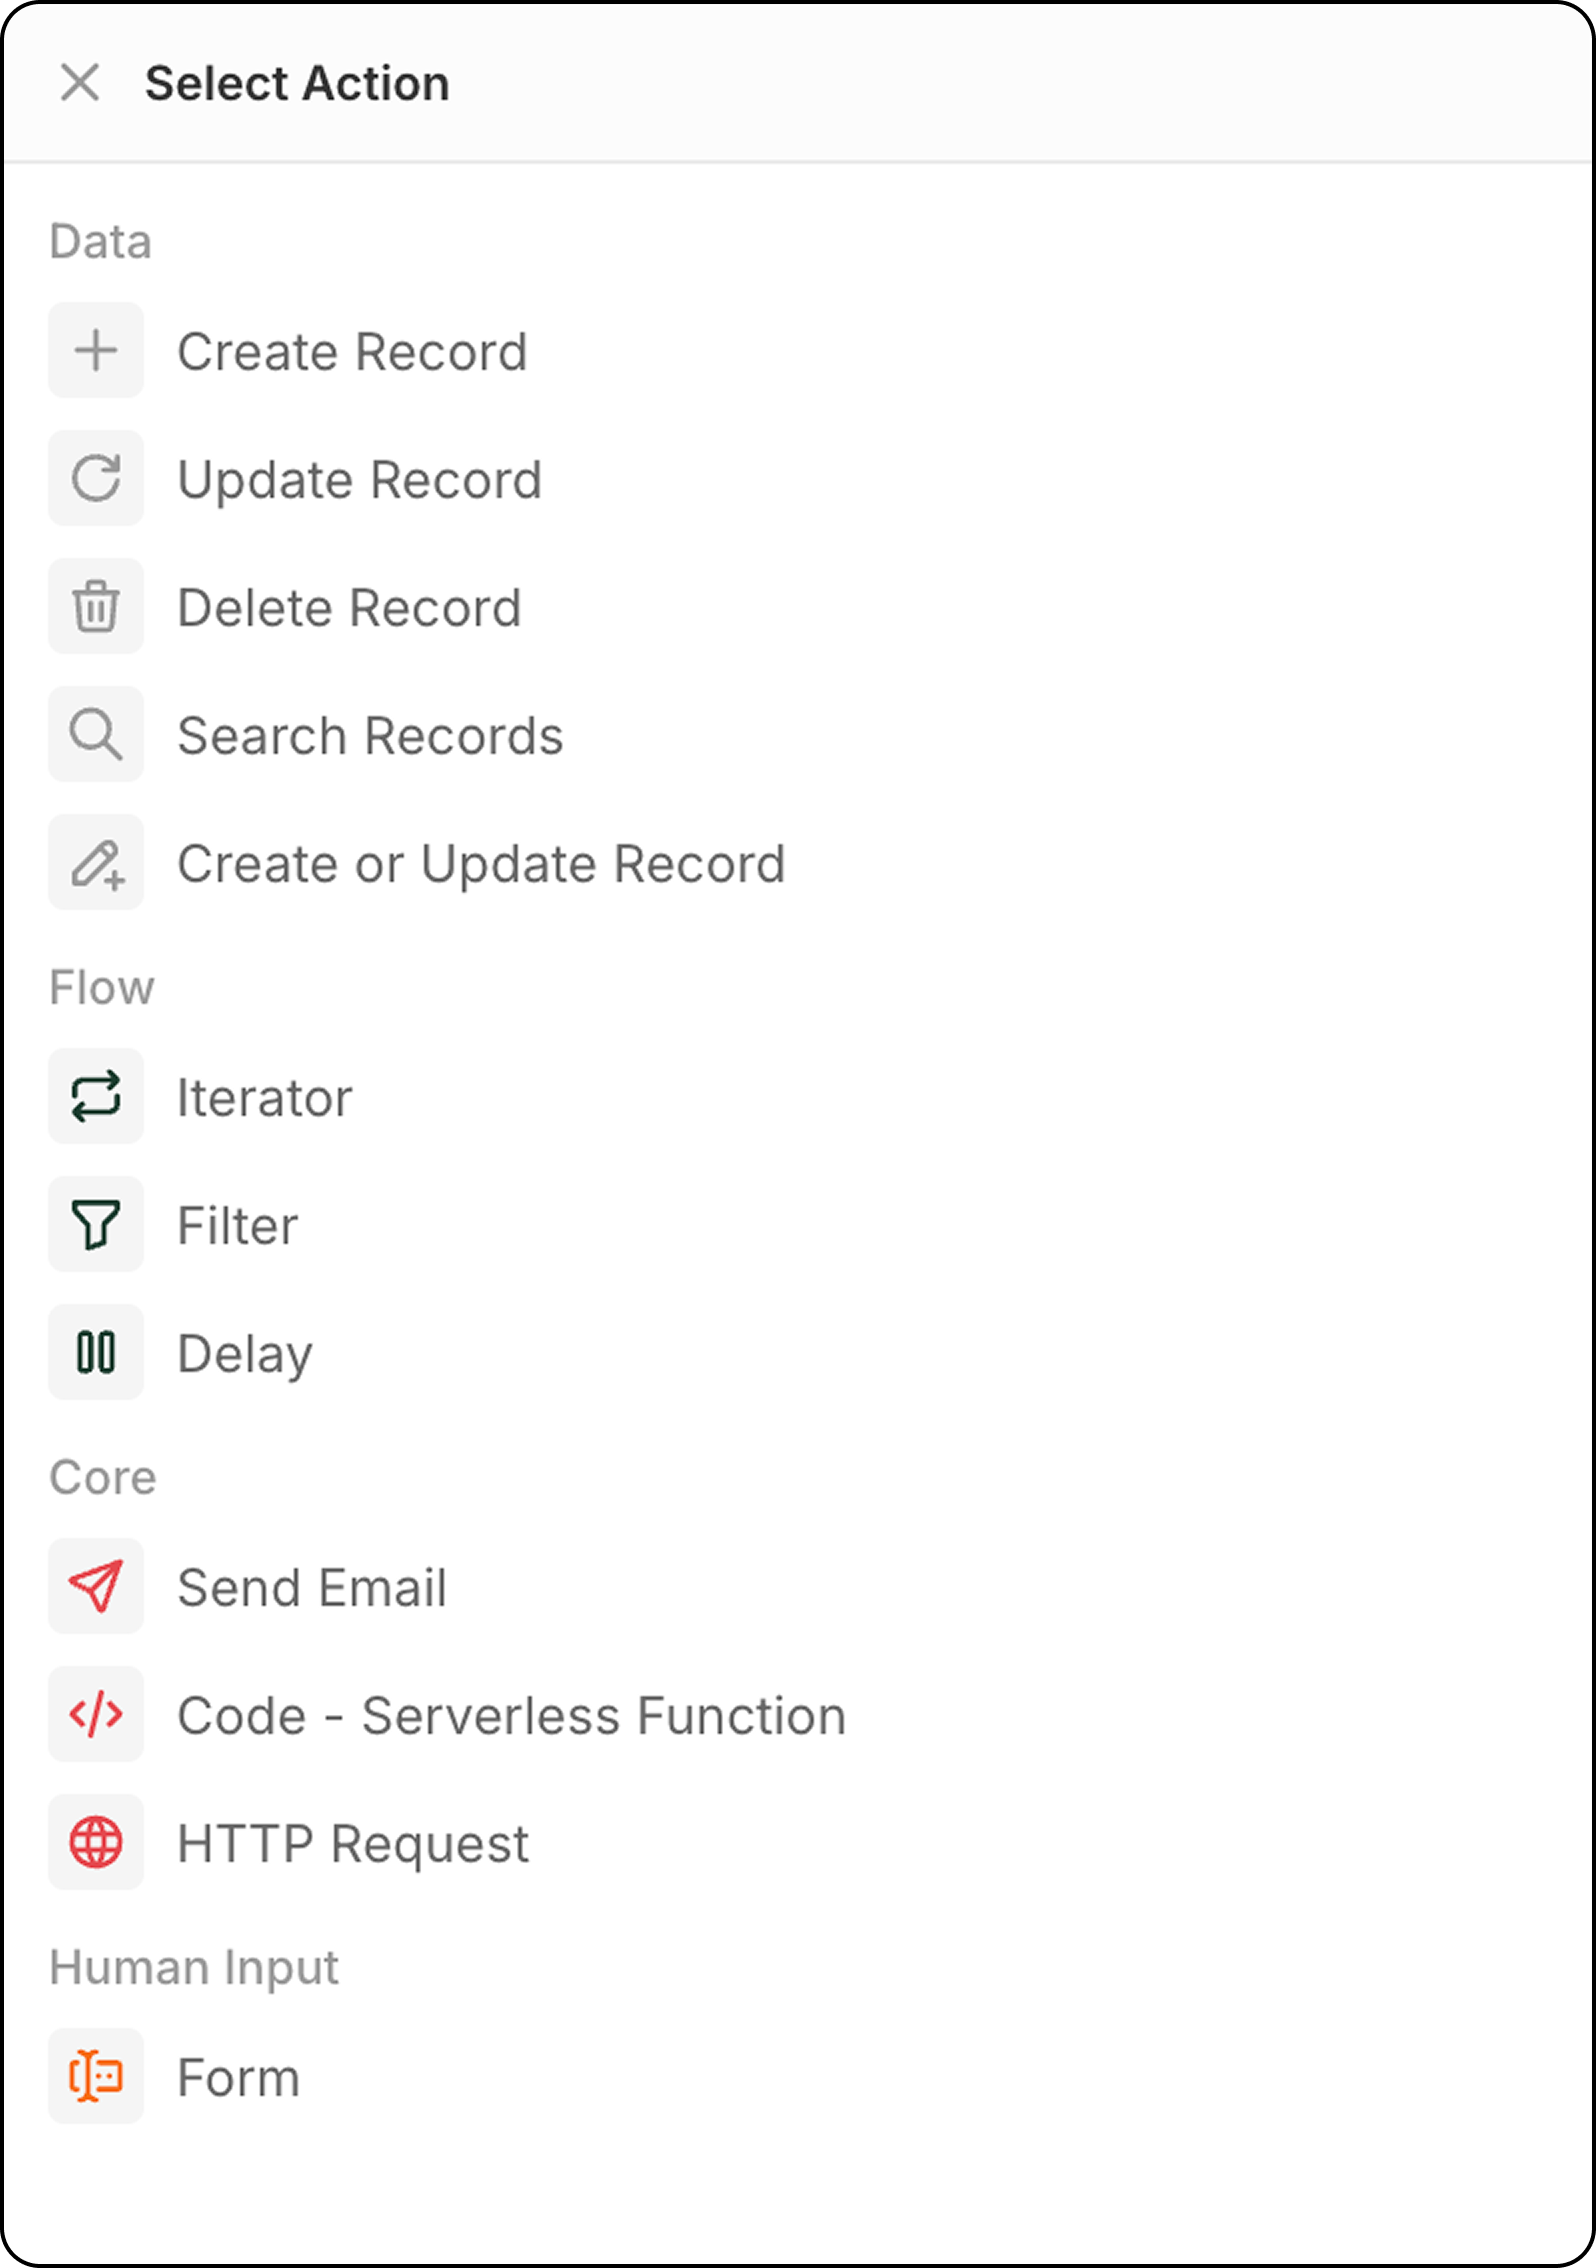
Crea un Record
Aggiunge un nuovo record a un oggetto selezionato. Configurazione:- Seleziona l’oggetto di destinazione
- Compila i campi richiesti e opzionali
- Usa i dati dai passaggi precedenti oppure inserisci i valori manualmente per popolare i campi
Aggiorna Record
Modifica un record esistente in un oggetto selezionato.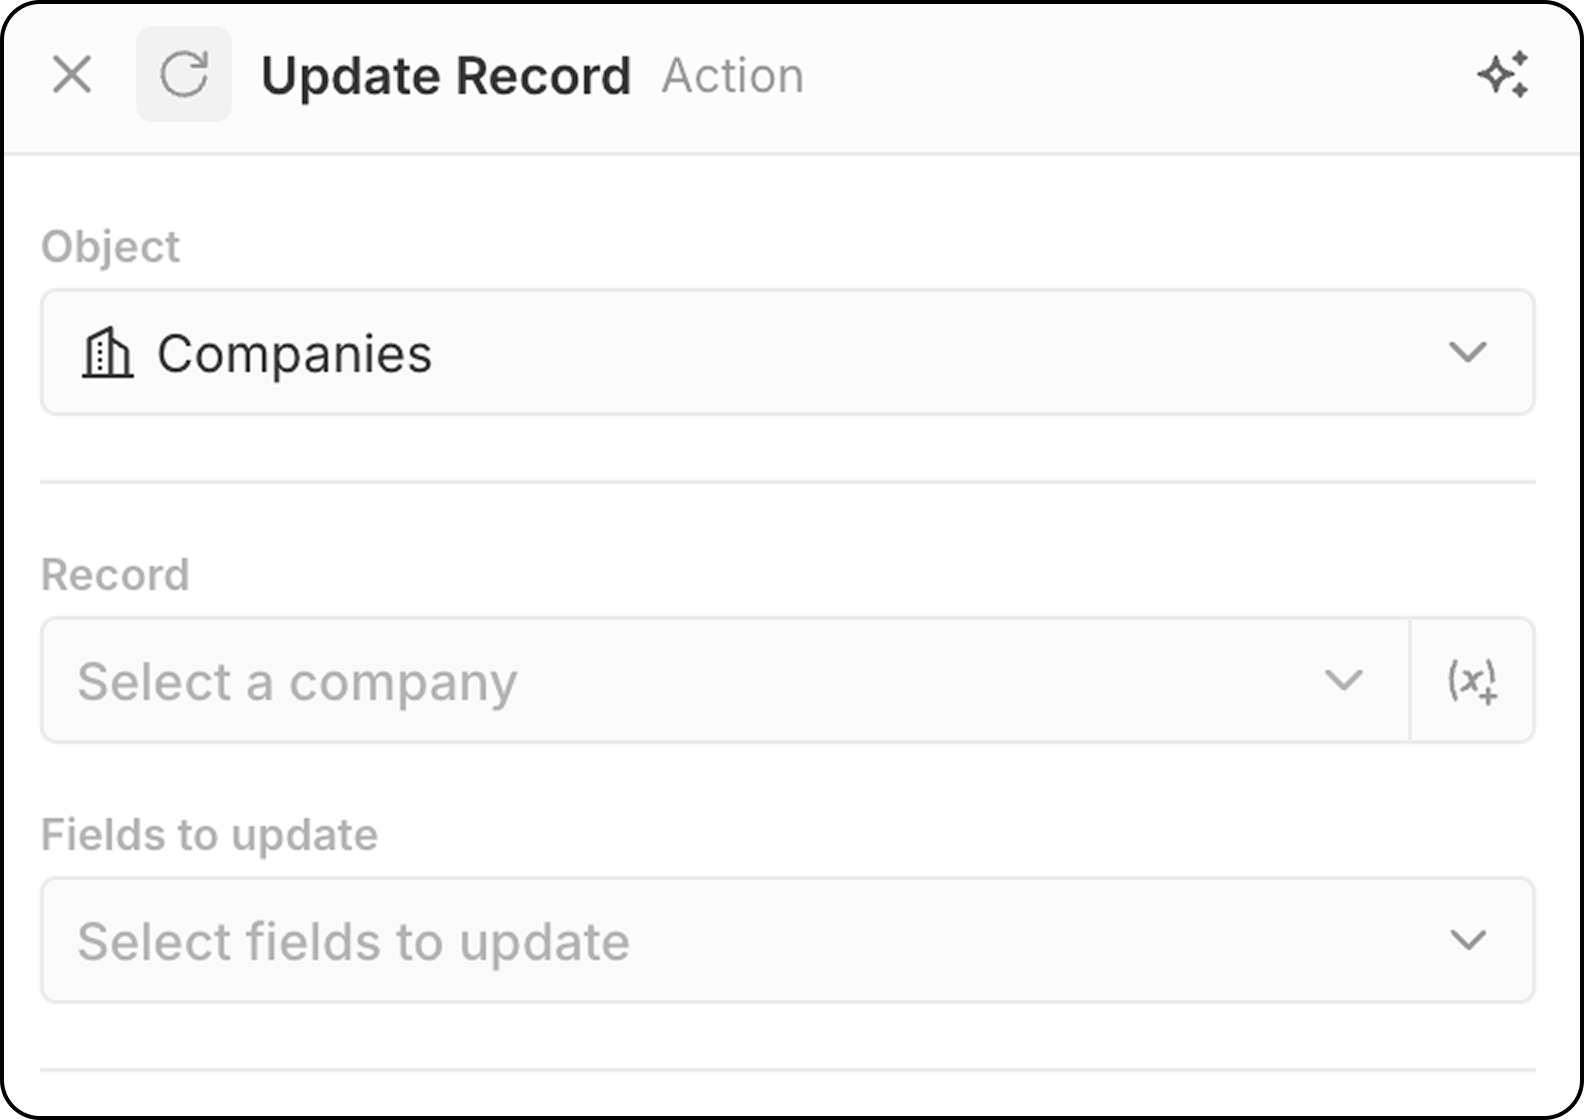
- Seleziona l’oggetto di destinazione
- Scegli il record specifico da aggiornare.
- Puoi scegliere un record fisso, utilizzando il menu a discesa che mostra tutti i record disponibili.
- Oppure puoi selezionare dinamicamente il record, indicando un record trovato in un passaggio precedente, usando
(x+). In questa fase non è possibile cercare il record in base a criteri diversi. Se non hai ancora identificato il record, aggiungi un passaggioSearch Recordprima di questo passaggioUpdate Record.
- Seleziona i campi da modificare e inserisci nuovi valori
Elimina Record
Rimuove un record da un oggetto selezionato. Configurazione:- Seleziona l’oggetto di destinazione
- Scegli il record specifico da eliminare
Cerca Record
Trova i record all’interno di un oggetto selezionato utilizzando condizioni di filtro. Configurazione:- Seleziona l’oggetto da cercare
- Imposta criteri di filtro per restringere i risultati
- Configura l’ordinamento e i limiti
Limite: Search Records restituisce un massimo di 200 record. Se devi elaborarne di più, aggiungi filtri specifici per ridurre i risultati oppure usa workflow pianificati per elaborare a lotti.
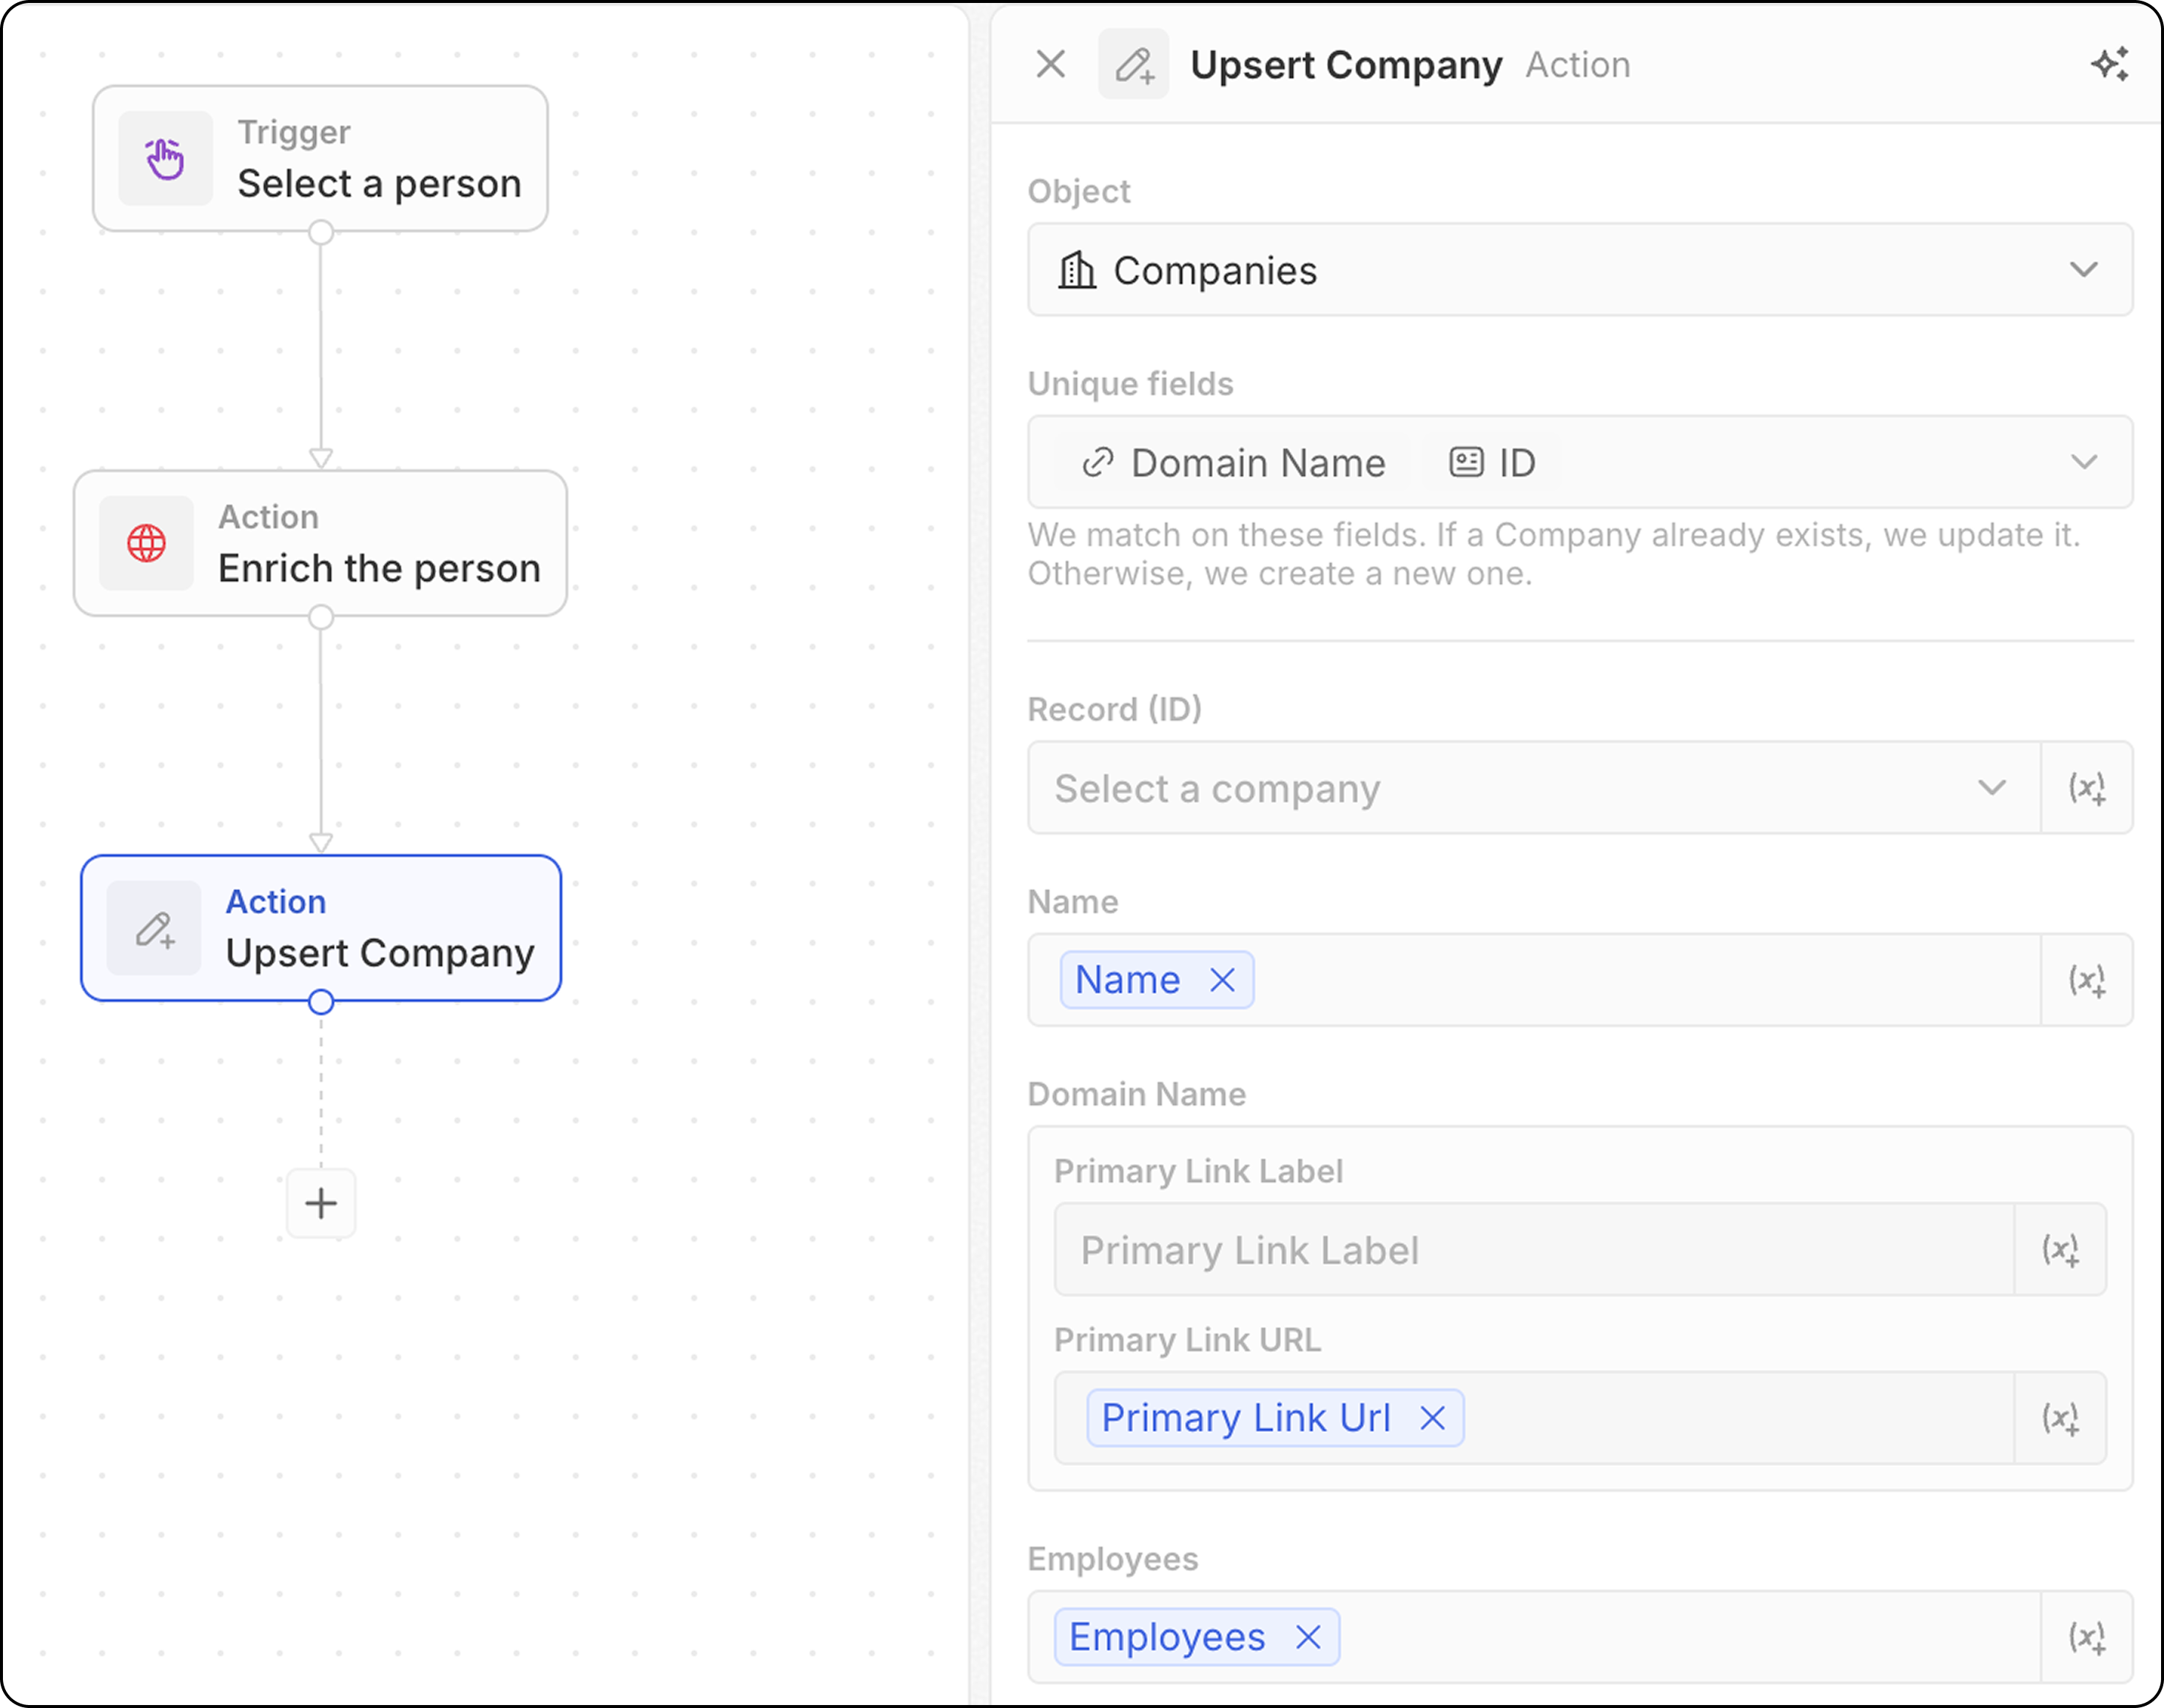
Inserisci o aggiorna Record
Crea un nuovo record o aggiorna uno esistente in base ai criteri di corrispondenza. È utile quando non sei sicuro che un record esista già.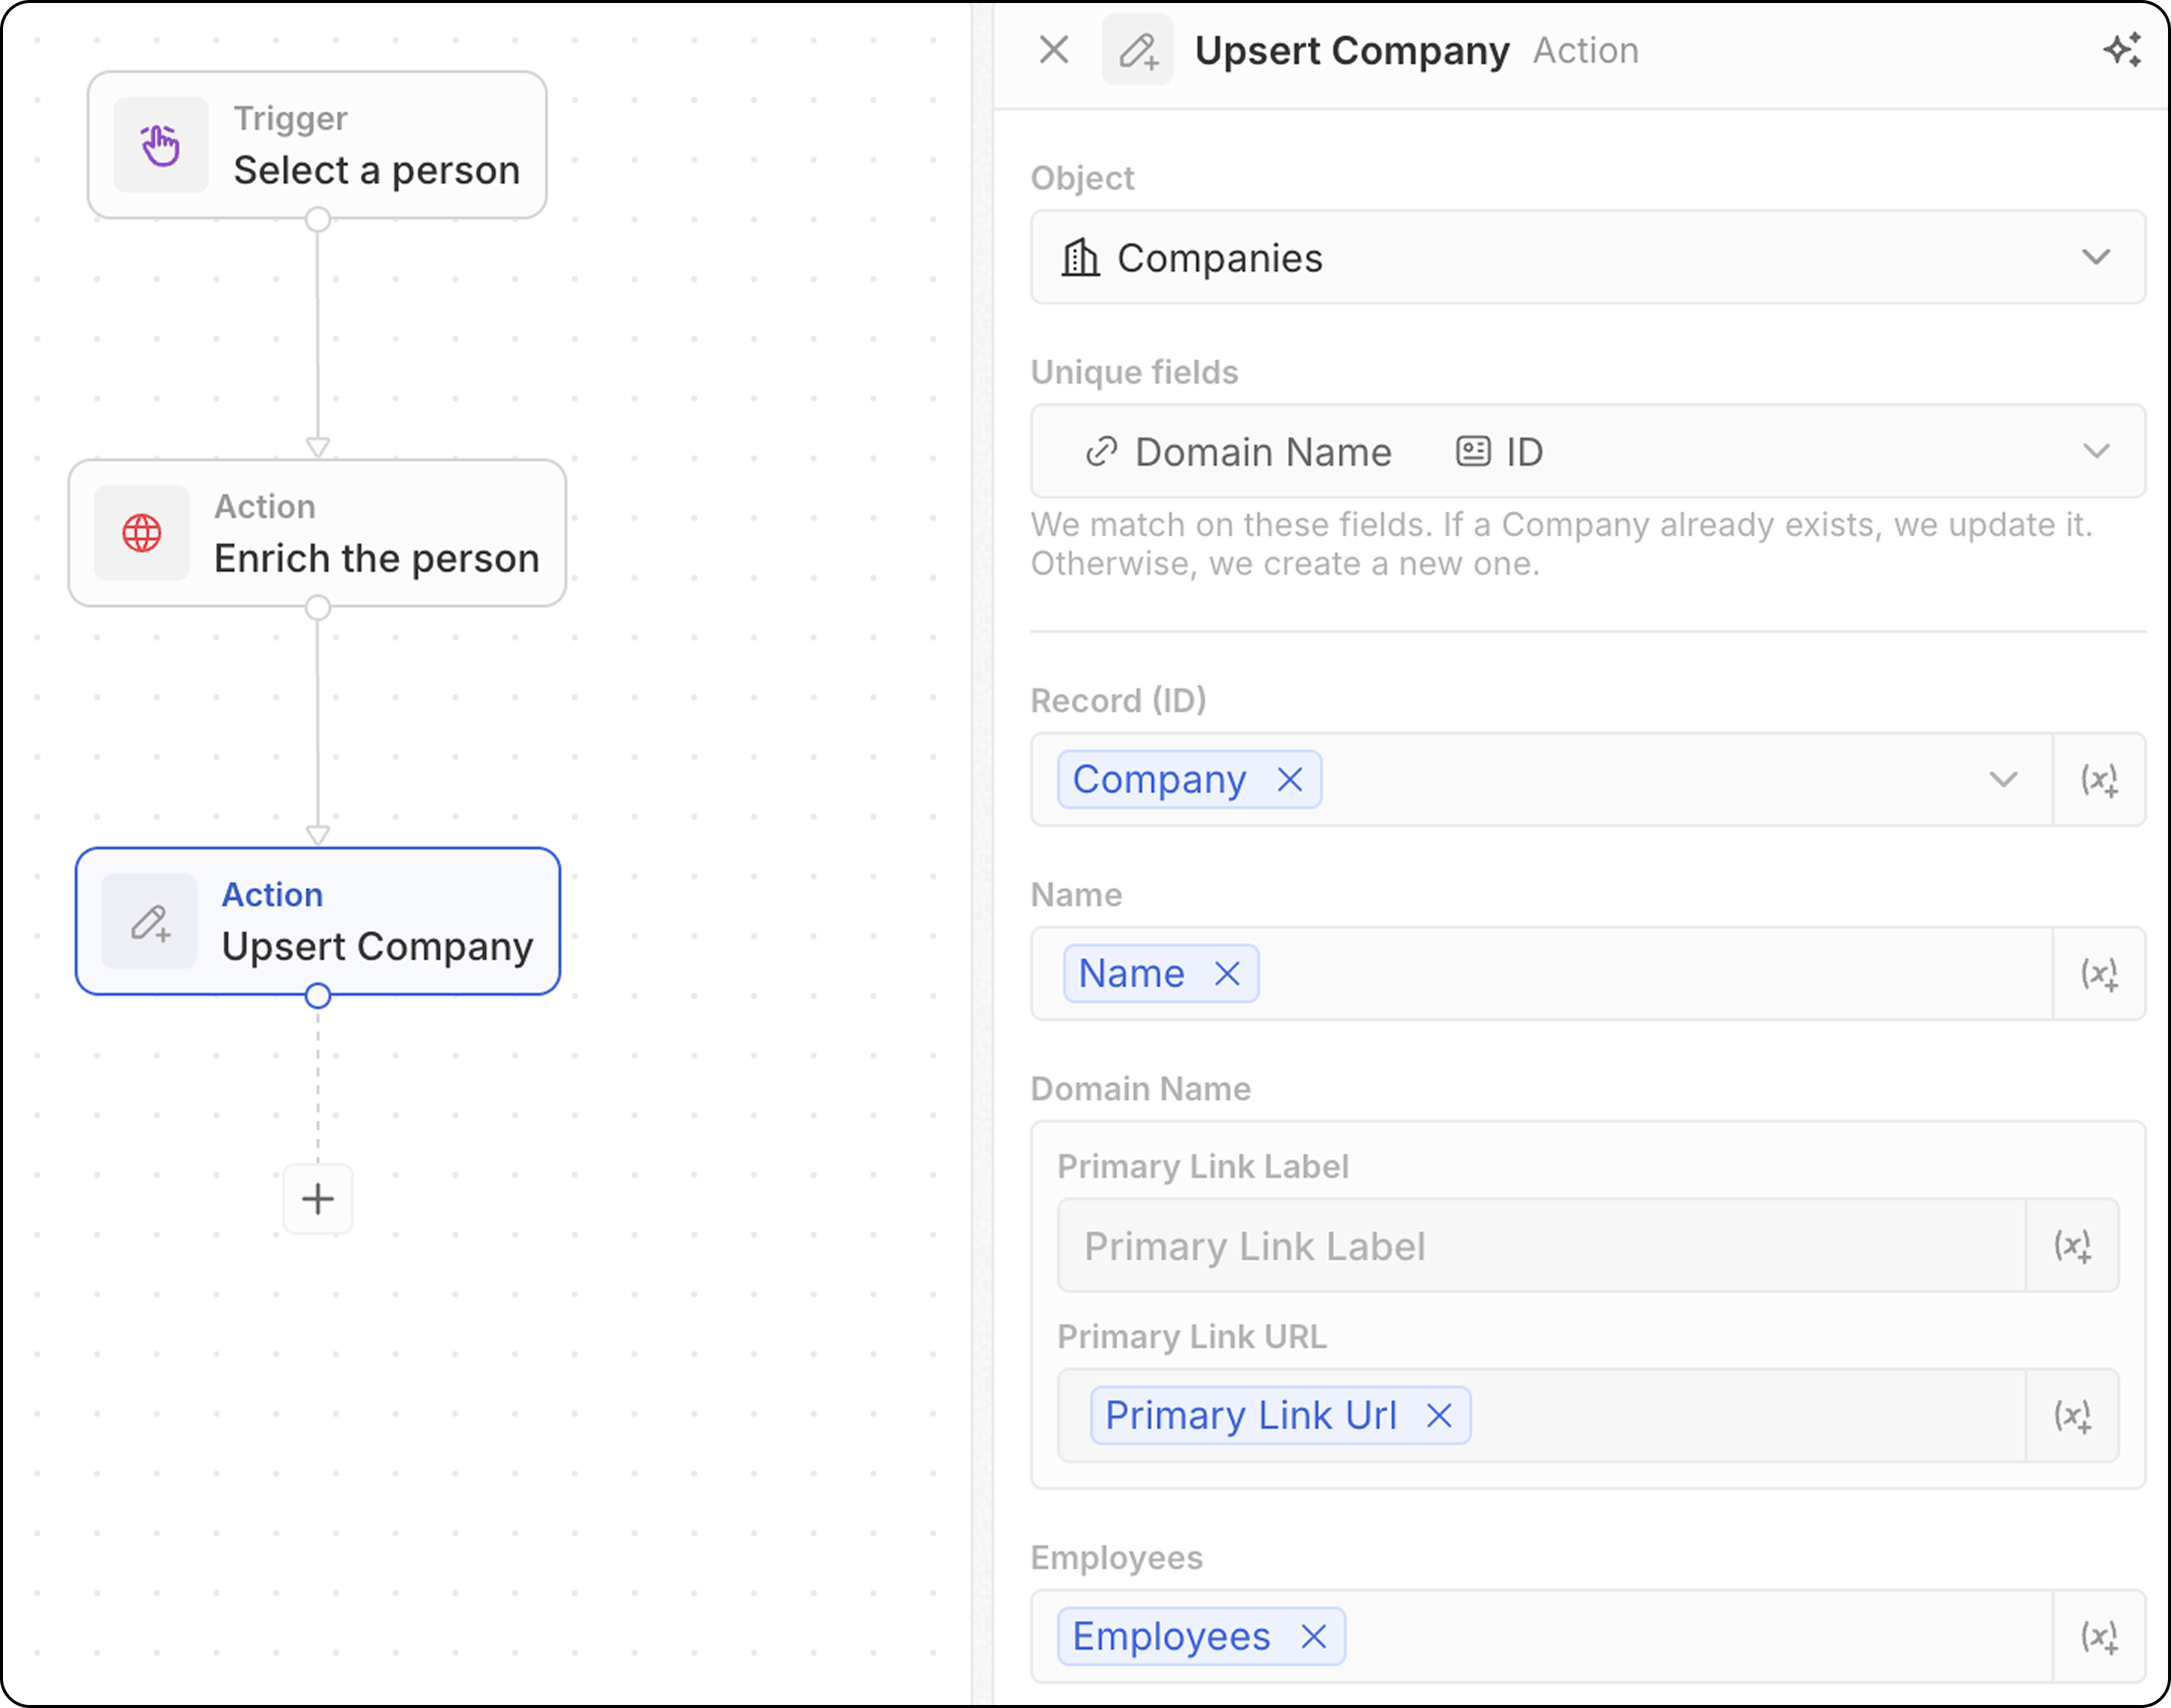
- Seleziona l’oggetto di destinazione
- Tieni presente quali campi possono essere utilizzati per la corrispondenza: email per Persone, dominio per Aziende, ID per qualsiasi oggetto o qualsiasi campo contrassegnato come Univoco. Dovrai compilare almeno uno di questi qui sotto.
- Compila i valori dei campi. Non dimenticare di valorizzare almeno uno degli identificatori univoci.
La corrispondenza di solito funziona ancora meglio aggiungendo un solo identificatore univoco. Ad esempio, lo screenshot qui sotto abbinerà le aziende in base al loro dominio. L’ID non è necessariamente richiesto.
- Usa dati dai passaggi precedenti per popolare i campi
- Cerca un record che corrisponde ai tuoi criteri
- Se trovato → aggiorna il record esistente
- Se non trovato → crea un nuovo record
Azioni del flusso
Iteratore
Esegue un ciclo su un array di record restituito da un passaggio precedente, consentendo di eseguire azioni su ciascun record individualmente. Configurazione:- Seleziona l’array di record da un passaggio precedente (ad es., risultati da Search Records, da un trigger Manual con disponibilità Bulk, da un nodo di codice). Quando un passaggio di tipo Code o Logic Function restituisce un array di primo livello, seleziona l’opzione Whole list per eseguire il loop su tutto l’output.
- Definisci le azioni da eseguire su ciascun record nel ciclo.
- Puoi aggiungere diverse azioni all’interno di un iteratore.
- Quando utilizzi diramazioni all’interno di un iteratore, assicurati che l’ultimo passaggio di ciascuna diramazione si ricolleghi all’iteratore per chiudere il ciclo.
- Accedi ai campi di
Current Item: per utilizzare i campi del record attualmente in elaborazione, fai clic sul passaggio Iterator, quindi seleziona Current item. Verrà visualizzato l’elenco dei campi disponibili di quel record e potrai selezionarli per l’uso nelle azioni successive. Puoi anche selezionare Use the whole item per passare l’intero elemento corrente a un passaggio a valle.
Filtro
Filtra i record in base a condizioni specificate, consentendo il passaggio solo ai record che soddisfano i criteri. Configurazione:- Seleziona il record da filtrare
- Definisci le condizioni e i criteri di filtro
- Configura quali record devono passare ai passaggi successivi
- Output: I nodi filtro non restituiscono dati — agiscono come porte di accesso. Se le condizioni sono soddisfatte, il flusso di lavoro continua. In caso contrario, il flusso di lavoro si interrompe in quel ramo.
- L’operatore
ISpuò essere utilizzato con i campi numerici. Funziona comeEQUAL.
Ritardo
Mette in pausa l’esecuzione del flusso di lavoro per una durata specificata o fino a una data/ora specifica. Tipi di ritardo:| Tipo | Descrizione |
|---|---|
| Durata | Attendi per una quantità di tempo specifica (giorni, ore, minuti, secondi) |
| Data programmata | Attendi fino a una data e un’ora specifiche |
- Imposta giorni, ore, minuti e/o secondi
- Combina più unità (ad es., 2 giorni e 4 ore)
- Seleziona una data e un’ora
- Può fare riferimento a un campo data di un passaggio precedente (ad es., follow-up 3 giorni dopo una riunione)
- Attendi 24 ore prima di inviare un’email di follow-up
- Metti in pausa fino alla data di chiusura di un’opportunità
- Pianifica azioni per l’orario lavorativo
La data programmata non può essere nel passato. Se viene utilizzato un campo data di un passaggio precedente e la data è già passata, il flusso di lavoro non riuscirà.
- Nessun limite massimo di durata — puoi impostare ritardi di minuti, giorni, settimane o oltre
- 1 credito consumato quando il nodo Ritardo viene eseguito, indipendentemente dalla durata
- Nessun credito consumato durante l’attesa — un ritardo di 5 minuti costa come un ritardo di 5 giorni
Azioni di comunicazione
Invia email
Invia un’email dal tuo flusso di lavoro. Ottimo per email di gruppo basate su modelli. Le email avranno l’aspetto di quelle inviate dalla tua casella di posta. Non adatto a newsletter (che richiedono una formattazione più ricca) o a sequenze di email automatizzate. Prerequisiti: Aggiungi un account email in Impostazioni → Account Configurazione:- Seleziona l’account email del mittente
Puoi inviare email solo dalle caselle di posta sincronizzate con il tuo account Twenty. L’invio dalle caselle di posta di altri membri del team (ad es., l’email del proprietario dell’account) è nella roadmap.
- Inserisci l’indirizzo email del destinatario.
Al momento è possibile un solo destinatario.
- Imposta l’oggetto della email.
- Componi il corpo del messaggio. Puoi formattare i link, creare elenchi numerati, elenchi puntati, aggiungere allegati.
Al momento non è possibile aggiungere firme HTML.
Modulo
Visualizza un modulo durante l’esecuzione del flusso di lavoro per raccogliere l’input dell’utente. Le risposte possono quindi essere utilizzate nei passaggi successivi per creare record, inviare email o eseguire qualsiasi altra azione basata sull’input. Configurazione:- Configura i campi che verranno chiesti agli utenti di compilare. Per ogni campo, scegli
- un tipo tra testo, numero, data, un determinato record, un campo di selezione. I campi di selezione di tutti gli oggetti sono disponibili.
- un’etichetta
- un valore predefinito sotto
Placeholder(opzionale)
- Modifica il titolo del modulo
Cmd + K.
Come compilare il modulo:
- Attiva il tuo flusso di lavoro manuale dal menu comandi
Cmd K - Compila il modulo visualizzato nel pannello laterale e fai clic su
Submit.
I campi non possono essere resi obbligatori.
Azioni di integrazione
Codice
Esegue JavaScript personalizzato all’interno del tuo workflow. In background, ogni azione Code è supportata dalla propria logic function, una funzione TypeScript lato server che viene eseguita sulla piattaforma Twenty. Quando aggiungi un’azione Code, Twenty crea una logic function dedicata per quel passaggio e ne espone l’editor inline, in modo che il codice che scrivi rimanga all’interno del flusso di lavoro. Configurazione:- Accedi alle variabili dai passaggi precedenti. Puoi modificare dinamicamente i nomi delle variabili.
- Scrivi il codice JavaScript nell’editor
- Restituisci variabili per l’uso in passaggi successivi
- Verifica il codice direttamente nel passaggio
Se devi utilizzare chiavi API esterne nel tuo codice, devi inserirle direttamente nel corpo della funzione. Non puoi configurare le chiavi API altrove e farvi riferimento nella funzione logica.
Riutilizzare una logic function tra i flussi di lavoro
L’azione Code inline è ideale per la logica “usa e getta”, ma il codice che contiene appartiene a quel singolo passaggio. Quando vuoi condividere la stessa logica tra vari flussi di lavoro o mantenerla come sorgente versionata in un’app, definisci una reusable logic function al posto di copiare e incollare il codice in ogni azione Code. Una logic function è definita una volta in un’app (usando l’SDKdefineLogicFunction) ed esposta al generatore di flussi di lavoro aggiungendo workflowActionTriggerSettings. Una volta installata l’app, quella funzione compare come azione autonoma nel generatore di flussi di lavoro, insieme alle azioni integrate. Selezionandola, vengono mostrati i campi di input che hai dichiarato (con i selettori di variabili, proprio come per le altre azioni) e viene eseguito il tuo codice condiviso, senza bisogno di JavaScript inline.
| Code action | Reusable logic function | |
|---|---|---|
| Dove risiede il codice | Editor inline, legato a un singolo passaggio del flusso di lavoro | Definita in un’app, sottoposta a versionamento nel controllo del codice sorgente |
| Riutilizzo | Copiata e incollata per ogni passaggio | Aggiunta come azione in qualsiasi flusso di lavoro |
| Input | Variabili collegate nell’editor | Campi generati dallo schema di input dichiarato |
| Ideale per | Logica rapida e specifica del flusso di lavoro | Logica condivisa usata in più flussi di lavoro |
Richiesta HTTP
Invia una richiesta a un API esterno come parte del tuo workflow.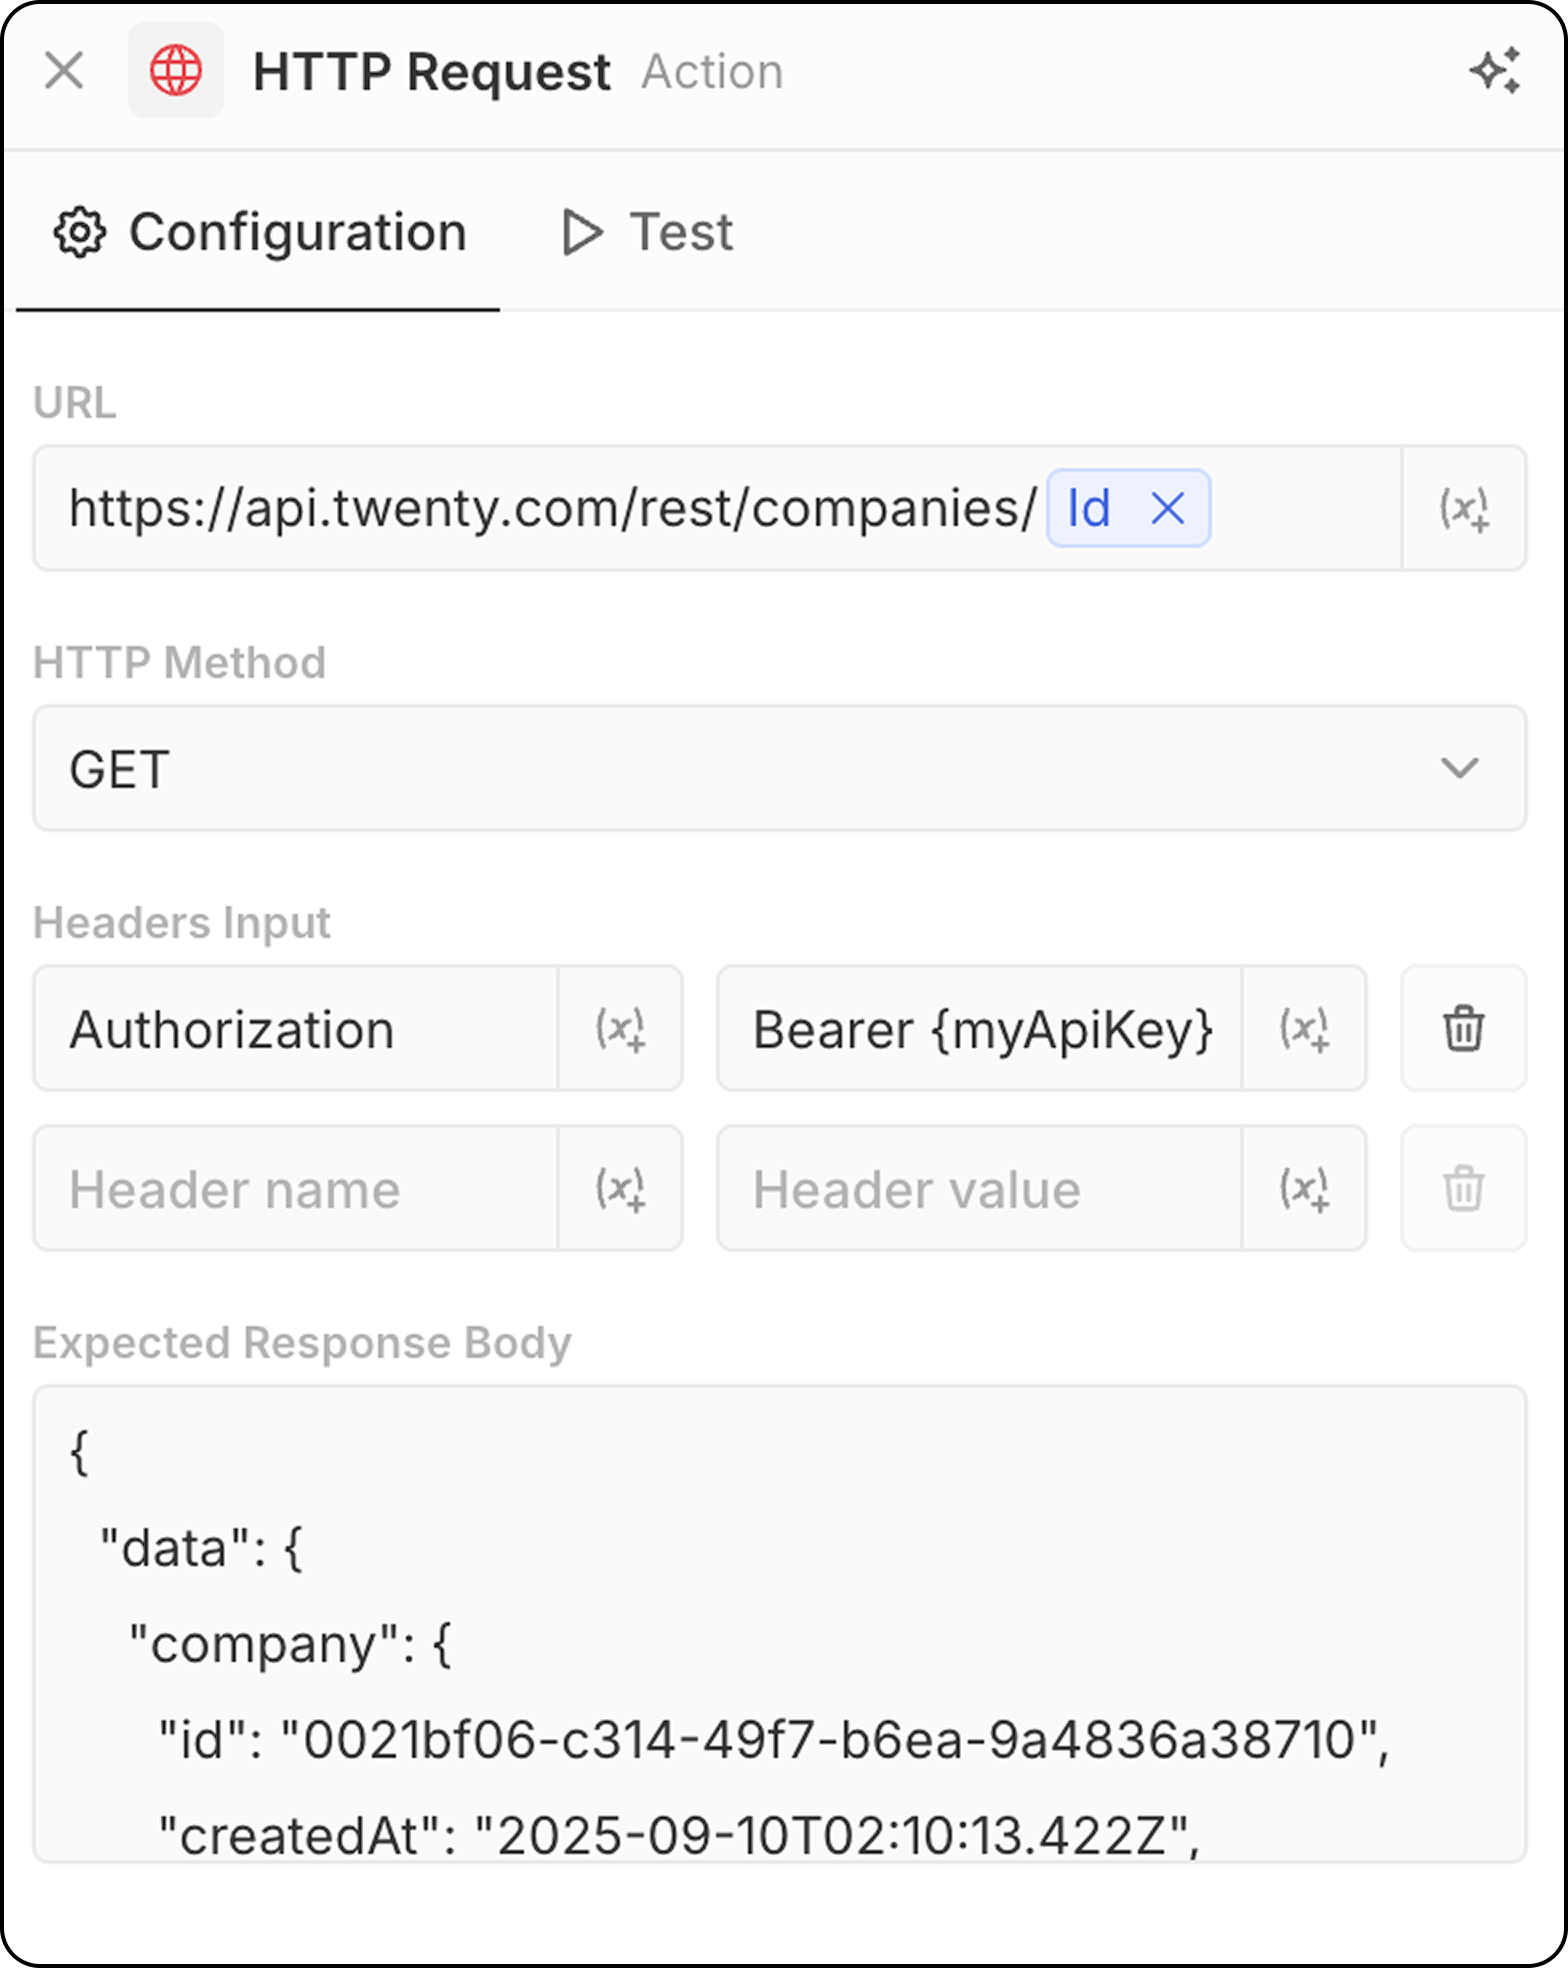
- Inserisci l’URL del punto finale dell’API. È possibile utilizzare parametri dai passaggi precedenti.
- Seleziona metodo HTTP (GET, POST, PUT, PATCH, DELETE)
- Aggiungi intestazioni e valori richiesti
- Fornisci una risposta di esempio per l’anteprima della struttura
Azioni AI
Agente AI - In arrivo
Esegue un agente AI all’interno del tuo flusso di lavoro per svolgere attività intelligenti. Configurazione:- Agente: Seleziona un agente AI esistente o usa l’agente predefinito
- Prompt: Scrivi l’istruzione per l’agente AI
- Fai riferimento a variabili dei passaggi precedenti nel prompt
- Analizzare e riassumere dati
- Classificare o categorizzare i record
- Generare contenuti testuali
- Prendere decisioni basate sui dati
- Interagire con i dati del tuo CRM utilizzando strumenti
Le azioni dell’agente AI consumano crediti del flusso di lavoro in base al modello AI utilizzato. Vedi Crediti del flusso di lavoro per i dettagli.
Gli agenti AI rispettano le autorizzazioni basate sui ruoli. Puoi assegnare ruoli specifici agli agenti in Impostazioni → Membri → Ruoli per controllare a quali dati possono accedere. Vedi Autorizzazioni per i dettagli.