Über Aktionen
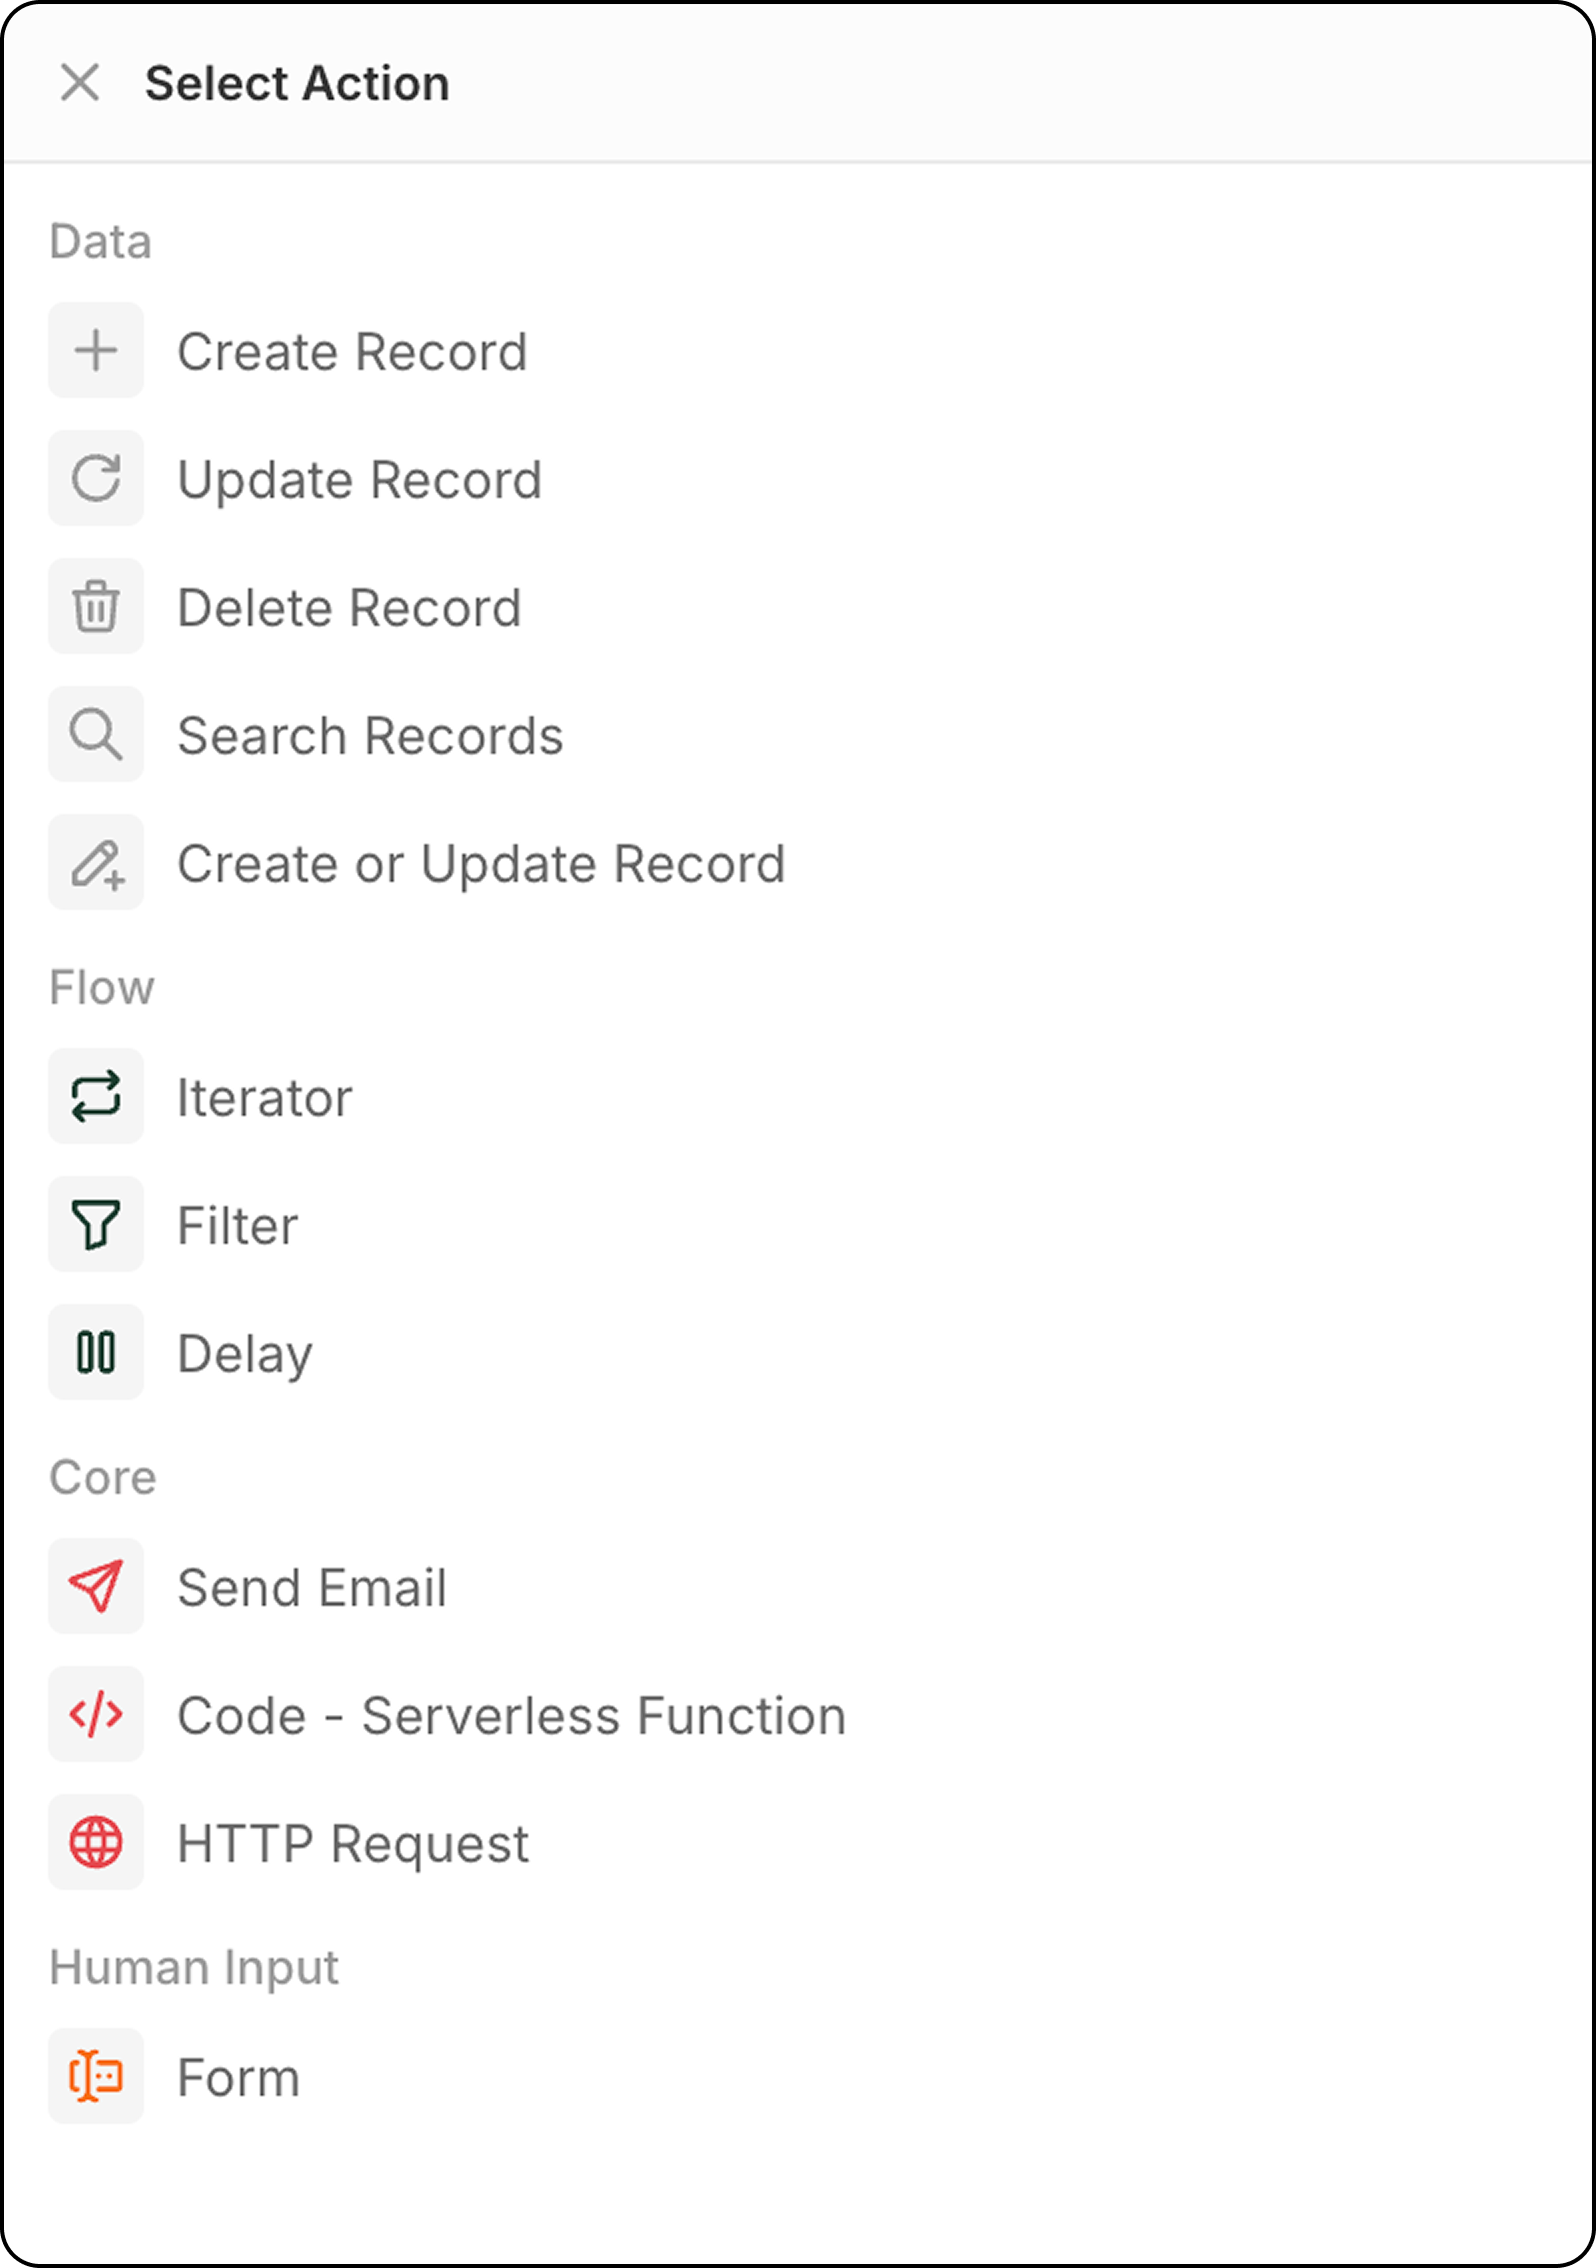
Aktionen definieren, was nach dem Auslösen passiert. Sie können mehrere Aktionen verketten, um komplexe Automatisierungen zu erstellen.Datensatz-Aktionen
Einen Datensatz erstellen
Fügt einem ausgewählten Objekt einen neuen Datensatz hinzu. Konfiguration:- Wählen Sie das Zielobjekt aus
- Füllen Sie die erforderlichen und optionalen Felder aus
- Verwenden Sie Daten aus vorherigen Schritten oder geben Sie Werte manuell ein, um Felder auszufüllen
Datensatz aktualisieren
Ändert einen bestehenden Datensatz in einem ausgewählten Objekt.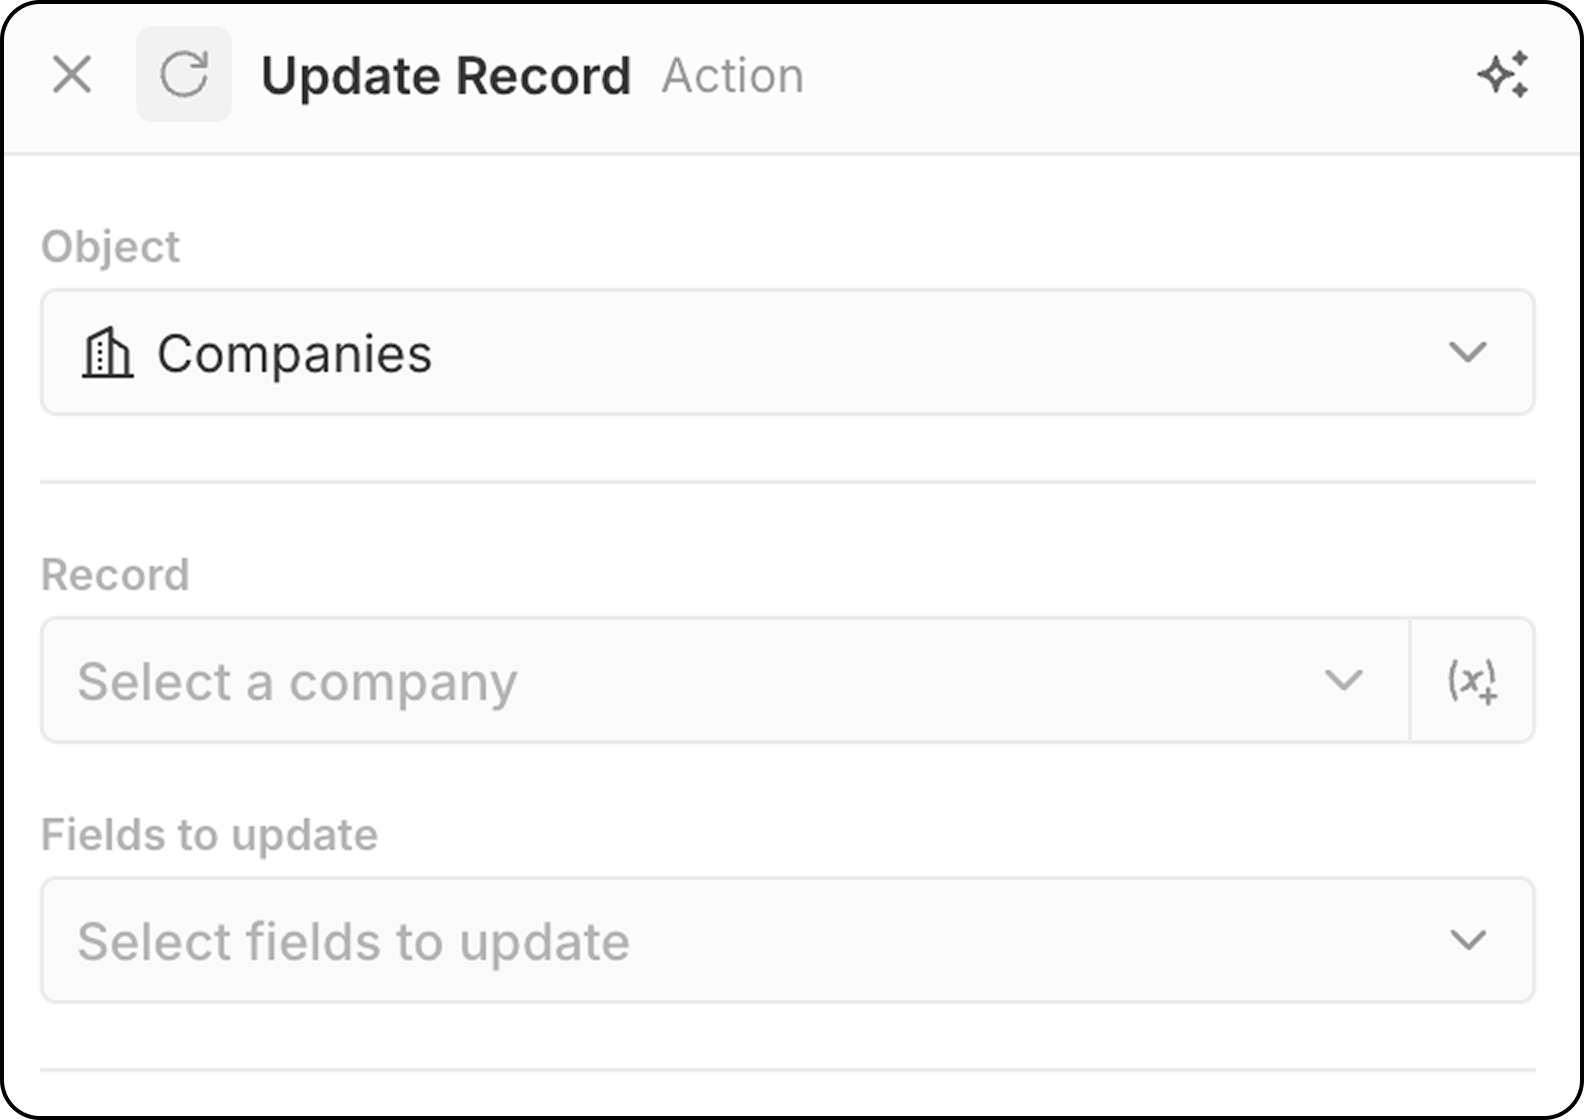
- Wählen Sie das Zielobjekt aus
- Wählen Sie den spezifischen Datensatz zum Aktualisieren aus.
- Sie können entweder einen festen Datensatz auswählen, indem Sie das Dropdown-Menü verwenden, das alle verfügbaren Datensätze anzeigt.
- Oder Sie lassen den Datensatz dynamisch auswählen, indem Sie einen in einem vorherigen Schritt gefundenen Datensatz über
(x+)angeben. In diesem Schritt können Sie den Datensatz nicht anhand verschiedener Kriterien suchen. Wenn Sie den Datensatz noch nicht identifiziert haben, fügen Sie vor diesem SchrittUpdate Recordeinen SchrittSearch Recordhinzu.
- Wählen Sie zu ändernde Felder aus und geben Sie neue Werte ein
Datensatz löschen
Entfernt einen Datensatz aus einem ausgewählten Objekt. Konfiguration:- Wählen Sie das Zielobjekt aus
- Wählen Sie den spezifischen Datensatz zum Löschen aus
Datensätze durchsuchen
Findet Datensätze innerhalb eines ausgewählten Objekts mittels Filterkonditionen. Konfiguration:- Wählen Sie das Objekt aus, das Sie durchsuchen möchten.
- Legen Sie Filterkriterien fest, um Ergebnisse einzugrenzen.
- Konfigurieren Sie Sortierung und Begrenzungen.
Limit: Search Records gibt maximal 200 Datensätze zurück. Wenn Sie mehr verarbeiten müssen, fügen Sie spezifische Filter hinzu, um die Ergebnisse zu reduzieren, oder verwenden Sie geplante Workflows, um stapelweise zu verarbeiten.
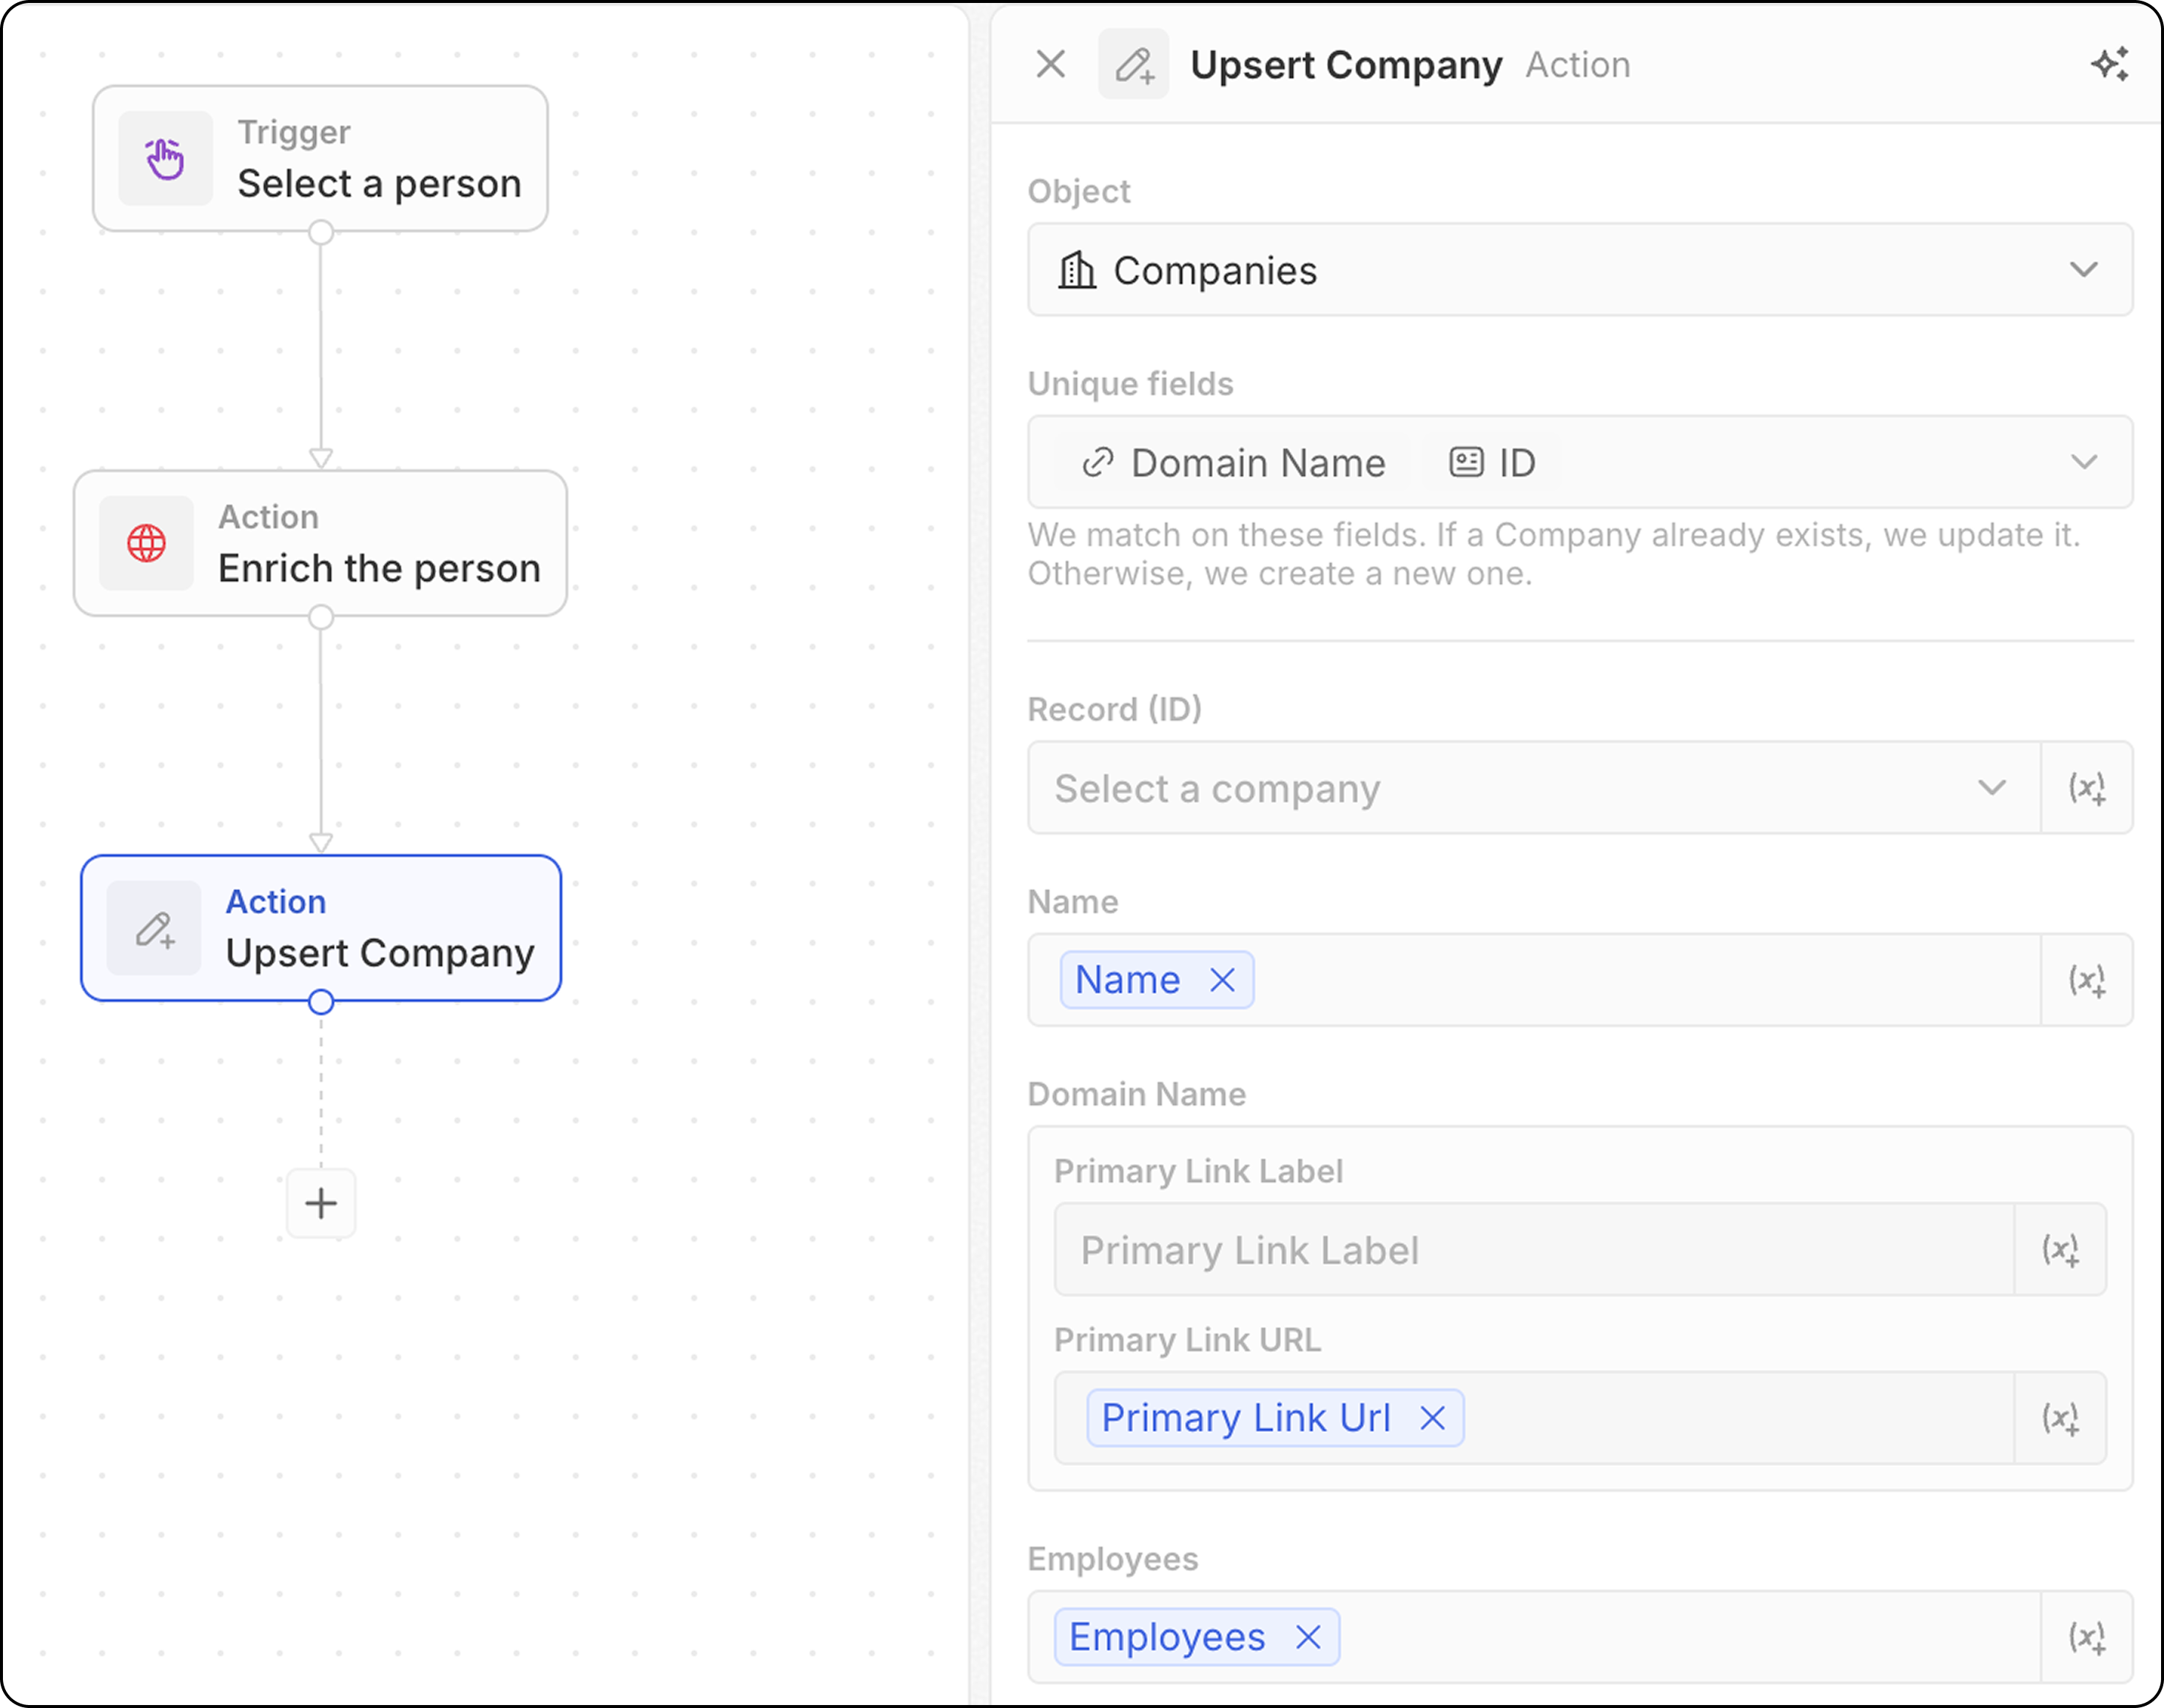
Datensatz einfügen oder aktualisieren
Erstellt einen neuen Datensatz oder aktualisiert einen vorhandenen anhand von Übereinstimmungskriterien. Das ist hilfreich, wenn Sie nicht sicher sind, ob ein Datensatz bereits vorhanden ist.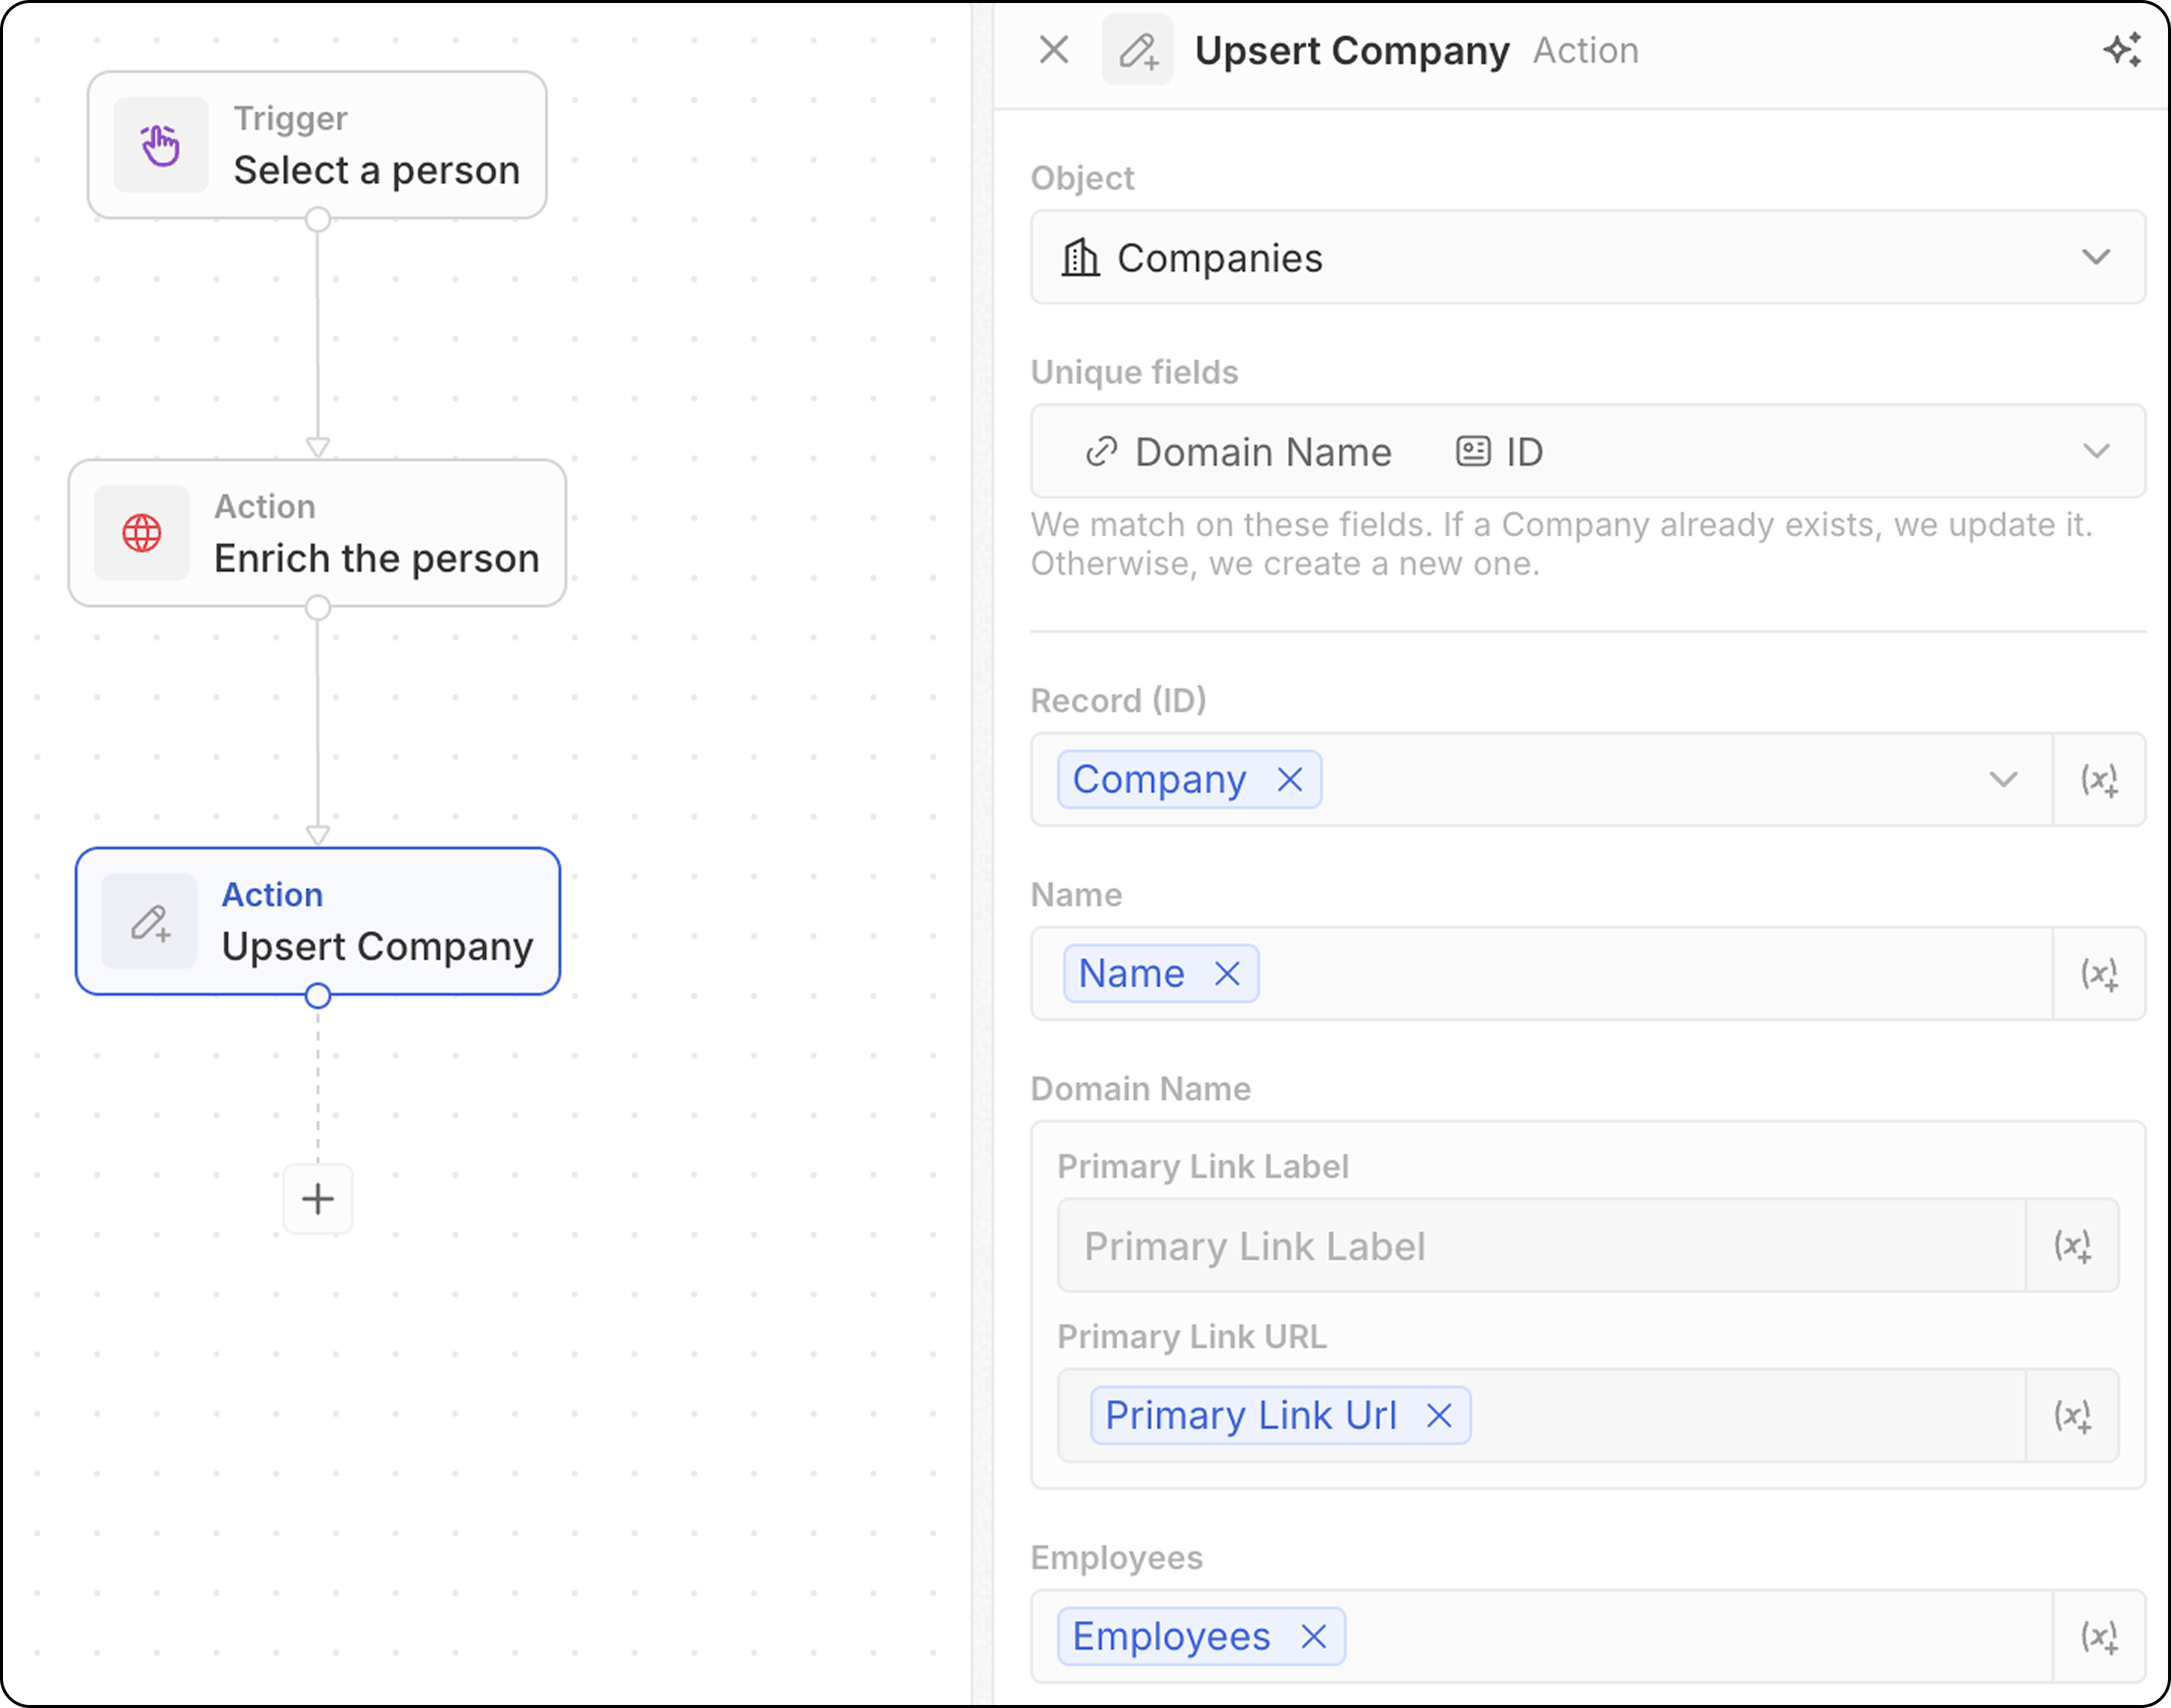
- Wählen Sie das Zielobjekt aus
- Beachten Sie, welche Felder für den Abgleich verwendet werden können: E-Mail für Personen, Domain für Unternehmen, ID für beliebige Objekte oder jedes Feld, das als eindeutig markiert ist. Unten müssen Sie mindestens eines davon ausfüllen.
- Füllen Sie die Feldwerte aus. Vergessen Sie nicht, mindestens einen der eindeutigen Bezeichner auszufüllen.
Der Abgleich funktioniert in der Regel noch besser, wenn Sie nur einen eindeutigen Bezeichner hinzufügen. Beispielsweise werden im untenstehenden Screenshot Unternehmen anhand ihrer Domain abgeglichen. Die ID ist nicht unbedingt erforderlich.
- Verwenden Sie Daten aus vorherigen Schritten, um Felder zu füllen
- Sucht nach einem Datensatz, der Ihren Kriterien entspricht
- Wenn gefunden → Aktualisiere den vorhandenen Eintrag
- Wenn nicht gefunden → Erstelle einen neuen Datensatz
Flow-Aktionen
Iterator
Schleppt sich durch ein Array von Datensätzen aus einem vorherigen Schritt, so dass du Aktionen auf jedem Datensatz einzeln ausführen kannst. Konfiguration:- Wählen Sie das Array von Datensätzen aus einem vorherigen Schritt aus (z. B. Ergebnisse aus Search Records, aus einem manuellen Auslöser mit Bulk-Verfügbarkeit, aus einem Code-Node). Wenn ein Code- oder Logikfunktions-Schritt ein Top-Level-Array zurückgibt, wählen Sie die Option Whole list, um über die gesamte Ausgabe zu iterieren.
- Definieren Sie die Aktionen, die für jeden Datensatz in der Schleife ausgeführt werden sollen.
- Sie können mehrere Aktionen innerhalb eines Iterators hinzufügen.
- Wenn Sie Zweige innerhalb eines Iterators verwenden, stellen Sie sicher, dass sich der letzte Schritt jedes Zweiges mit dem Iterator verbindet, um die Schleife zu schließen.
- Zugriff auf
Aktuelle ItemFelder: Um Felder aus dem aktuell verarbeiteten Datensatz zu verwenden, klicke auf den Iterator Schritt, dann wähle Aktuelles Iterator. Die Liste der verfügbaren Felder aus diesem Datensatz wird angezeigt und kann für die Verwendung in folgenden Aktionen ausgewählt werden. Sie können auch Use the whole item auswählen, um das gesamte aktuelle Element an einen nachgelagerten Schritt zu übergeben.
Filter
Filtert Datensätze basierend auf bestimmten Bedingungen, so dass nur Datensätze, die die Kriterien erfüllen, durchlaufen können. Konfiguration:- Datensatz zum filtern auswählen
- Definieren Sie Filterbedingungen und Kriterien
- Konfigurieren Sie, welche Datensätze in nachfolgende Schritte übergehen sollen
- Ausgabe: Filterknoten geben keine Daten zurück – sie fungieren als Tore. Wenn die Bedingungen erfüllt sind, geht der Workflow weiter. Wenn nicht, stoppt der Workflow an diesem Zweig.
- Der “IS”-Operator kann mit numerischen Feldern verwendet werden. Es spielt als “EQUAL”.
Verzögerung
Behebt Workflow-Ausführung für eine bestimmte Dauer oder bis zu einem bestimmten Datum/Zeitpunkt. Verzögerungstypen:| Typ | Beschreibung |
|---|---|
| Dauer | Warte auf eine bestimmte Zeit (Tage, Stunden, Minuten, Sekunden) |
| Geplantes Datum | Warten Sie bis zu einem bestimmten Datum und Zeit |
- Tage, Stunden, Minuten und/oder Sekunden festlegen
- Mehrere Einheiten kombinieren (z. B. 2 Tage und 4 Stunden)
- Datum und Uhrzeit auswählen
- Kann ein Datumsfeld aus einem vorherigen Schritt referenzieren (z.B. 3 Tage nach einer Besprechung)
- Warten Sie 24 Stunden bevor Sie eine Nachfass-E-Mail senden
- Pause bis zum Enddatum einer Gelegenheit
- Aufgaben für Geschäftszeiten planen
Das geplante Datum kann nicht in der Vergangenheit sein. Wenn ein Datumsfeld aus einem vorherigen Schritt verwendet wird und das Datum bereits abgelaufen ist, wird der Workflow fehlschlagen.
- Kein maximales Zeitlimit - Du kannst Verzögerungen von Minuten, Tage, Wochen oder länger einstellen
- 1 Credits verbraucht wenn der Delay Knoten ausgeführt wird, unabhängig von der Dauer
- Kein Guthaben verbraucht während des Wartens - eine 5-minütige Verzögerung kostet dasselbe wie eine 5-tägige Verzögerung
Kommunikationsaktionen
E-Mail senden
Sendet eine E-Mail aus Ihrem Workflow. Dies ist ideal für vordefinierte Gruppenmails. E-Mails werden so aussehen, wie sie von Ihrem Postfach gesendet werden. Nicht geeignet für Newsletter (die eine umfassendere Formatierung erfordern) oder für automatisierte E-Mail-Sequenzen. Voraussetzungen: Fügen Sie ein E-Mail-Konto unter Einstellungen → Konten hinzu Konfiguration:- Wählen Sie das Absender-E-Mail-Konto
Sie können nur E-Mails aus Postfächern versenden, die mit Ihrem eigenen Konto synchronisiert wurden. Das Versenden von Postfächern anderer Teammitglieder (z. B. die E-Mail des Kontoinhabers) ist auf der Roadmap.
- E-Mail-Adresse des Empfängers eingeben.
Im Moment ist nur ein Empfänger möglich.
- Betreffzeile festlegen.
- Nachrichtentext verfassen. Sie können Links formatieren, nummerierte Liste, Aufzählungspunkte erstellen und Anhänge hinzufügen.
Das Hinzufügen von HTML-Signaturen ist im Moment nicht möglich.
Formular
Fordert während der Workflow-Ausführung ein Formular an, um Benutzereingaben zu sammeln. Die Antworten können dann in folgenden Schritten verwendet werden, um Datensätze zu erstellen, E-Mails zu senden oder jede andere Aktion basierend auf der Eingabe auszuführen. Konfiguration:- Konfigurieren Sie die Felder, die Benutzer ausfüllen sollen. Für jedes Feld wählen
- ein Typ unter Text, Nummer, Datum, gegebener Datensatz, ein Auswahlfeld. Wählen Sie Felder aus allen Objekten verfügbar.
- ein Label
- ein Standardwert unter
Platzhalter(optional)
- Formulartitel bearbeiten
Cmd + K verfügbar sind.
So füllen Sie das Formular aus:
- Löse deinen manuellen Workflow aus dem Kommandomenü
Cmd Kaus - Füllen Sie das Formular aus, das im Seitenfenster angezeigt wird, und klicken Sie auf “Absenden”.
Die Felder können nicht obligatorisch gemacht werden.
Integrationsaktionen
Code
Führt benutzerdefiniertes JavaScript in Ihrem Workflow aus. Im Hintergrund wird jede Code-Aktion von ihrer eigenen Logikfunktion unterstützt – einer serverseitigen TypeScript-Funktion, die auf der Twenty-Plattform ausgeführt wird. Wenn Sie eine Code-Aktion hinzufügen, erstellt Twenty eine dedizierte Logikfunktion für diesen Schritt und stellt deren Editor inline bereit, sodass der von Ihnen geschriebene Code zusammen mit dem Workflow gespeichert wird. Konfiguration:- Greifen Sie auf Variablen aus vorherigen Schritten zu. Sie können die Namen der Variablen dynamisch bearbeiten.
- Schreiben Sie JavaScript-Code im Editor
- Variablen zurückgeben, um sie in nachfolgenden Schritten zu verwenden
- Code direkt im Schritt testen
Wenn Sie externe API-Schlüssel in Ihrem Code verwenden müssen, müssen Sie diese direkt in den Funktionskörper eingeben. Sie können API-Schlüssel nicht an anderer Stelle konfigurieren und sie dann in der Logikfunktion referenzieren.
Eine Logikfunktion in mehreren Workflows wiederverwenden
Die Inline-Code-Aktion ist ideal für einmalige Logik, aber der darin enthaltene Code gehört zu genau diesem einen Schritt. Wenn Sie dieselbe Logik über mehrere Workflows hinweg teilen oder sie als versionierten Quellcode in einer App pflegen möchten, definieren Sie eine wiederverwendbare Logikfunktion, anstatt Code in jede Code-Aktion zu kopieren und einzufügen. Eine Logikfunktion wird einmal in einer App definiert (mithilfe des SDK-BefehlsdefineLogicFunction) und durch Hinzufügen von workflowActionTriggerSettings im Workflow-Builder verfügbar gemacht. Sobald Ihre App installiert ist, erscheint diese Funktion als eigene Aktion im Workflow-Builder, neben den eingebauten Aktionen. Wenn Sie sie auswählen, werden die von Ihnen deklarierten Eingabefelder angezeigt (mit Variablen-Auswahl, genau wie bei anderen Aktionen) und Ihr geteilter Code wird ausgeführt – kein Inline-JavaScript erforderlich.
| Code-Aktion | Wiederverwendbare Logikfunktion | |
|---|---|---|
| Wo der Code liegt | Inline-Editor, an einen einzelnen Workflow-Schritt gebunden | In einer App definiert, im Versionskontrollsystem versioniert |
| Wiederverwendung | Pro Schritt kopiert und eingefügt | Als Aktion in jedem Workflow hinzugefügt |
| Eingaben | Variablen, die im Editor verdrahtet werden | Felder, die aus Ihrem deklarierten Eingabe-Schema gerendert werden |
| Am besten geeignet für | Schnelle, Workflow-spezifische Logik | Gemeinsam genutzte Logik, die in mehreren Workflows verwendet wird |
HTTP-Anfrage
Sendet eine Anfrage an eine externe API als Teil Ihres Workflows.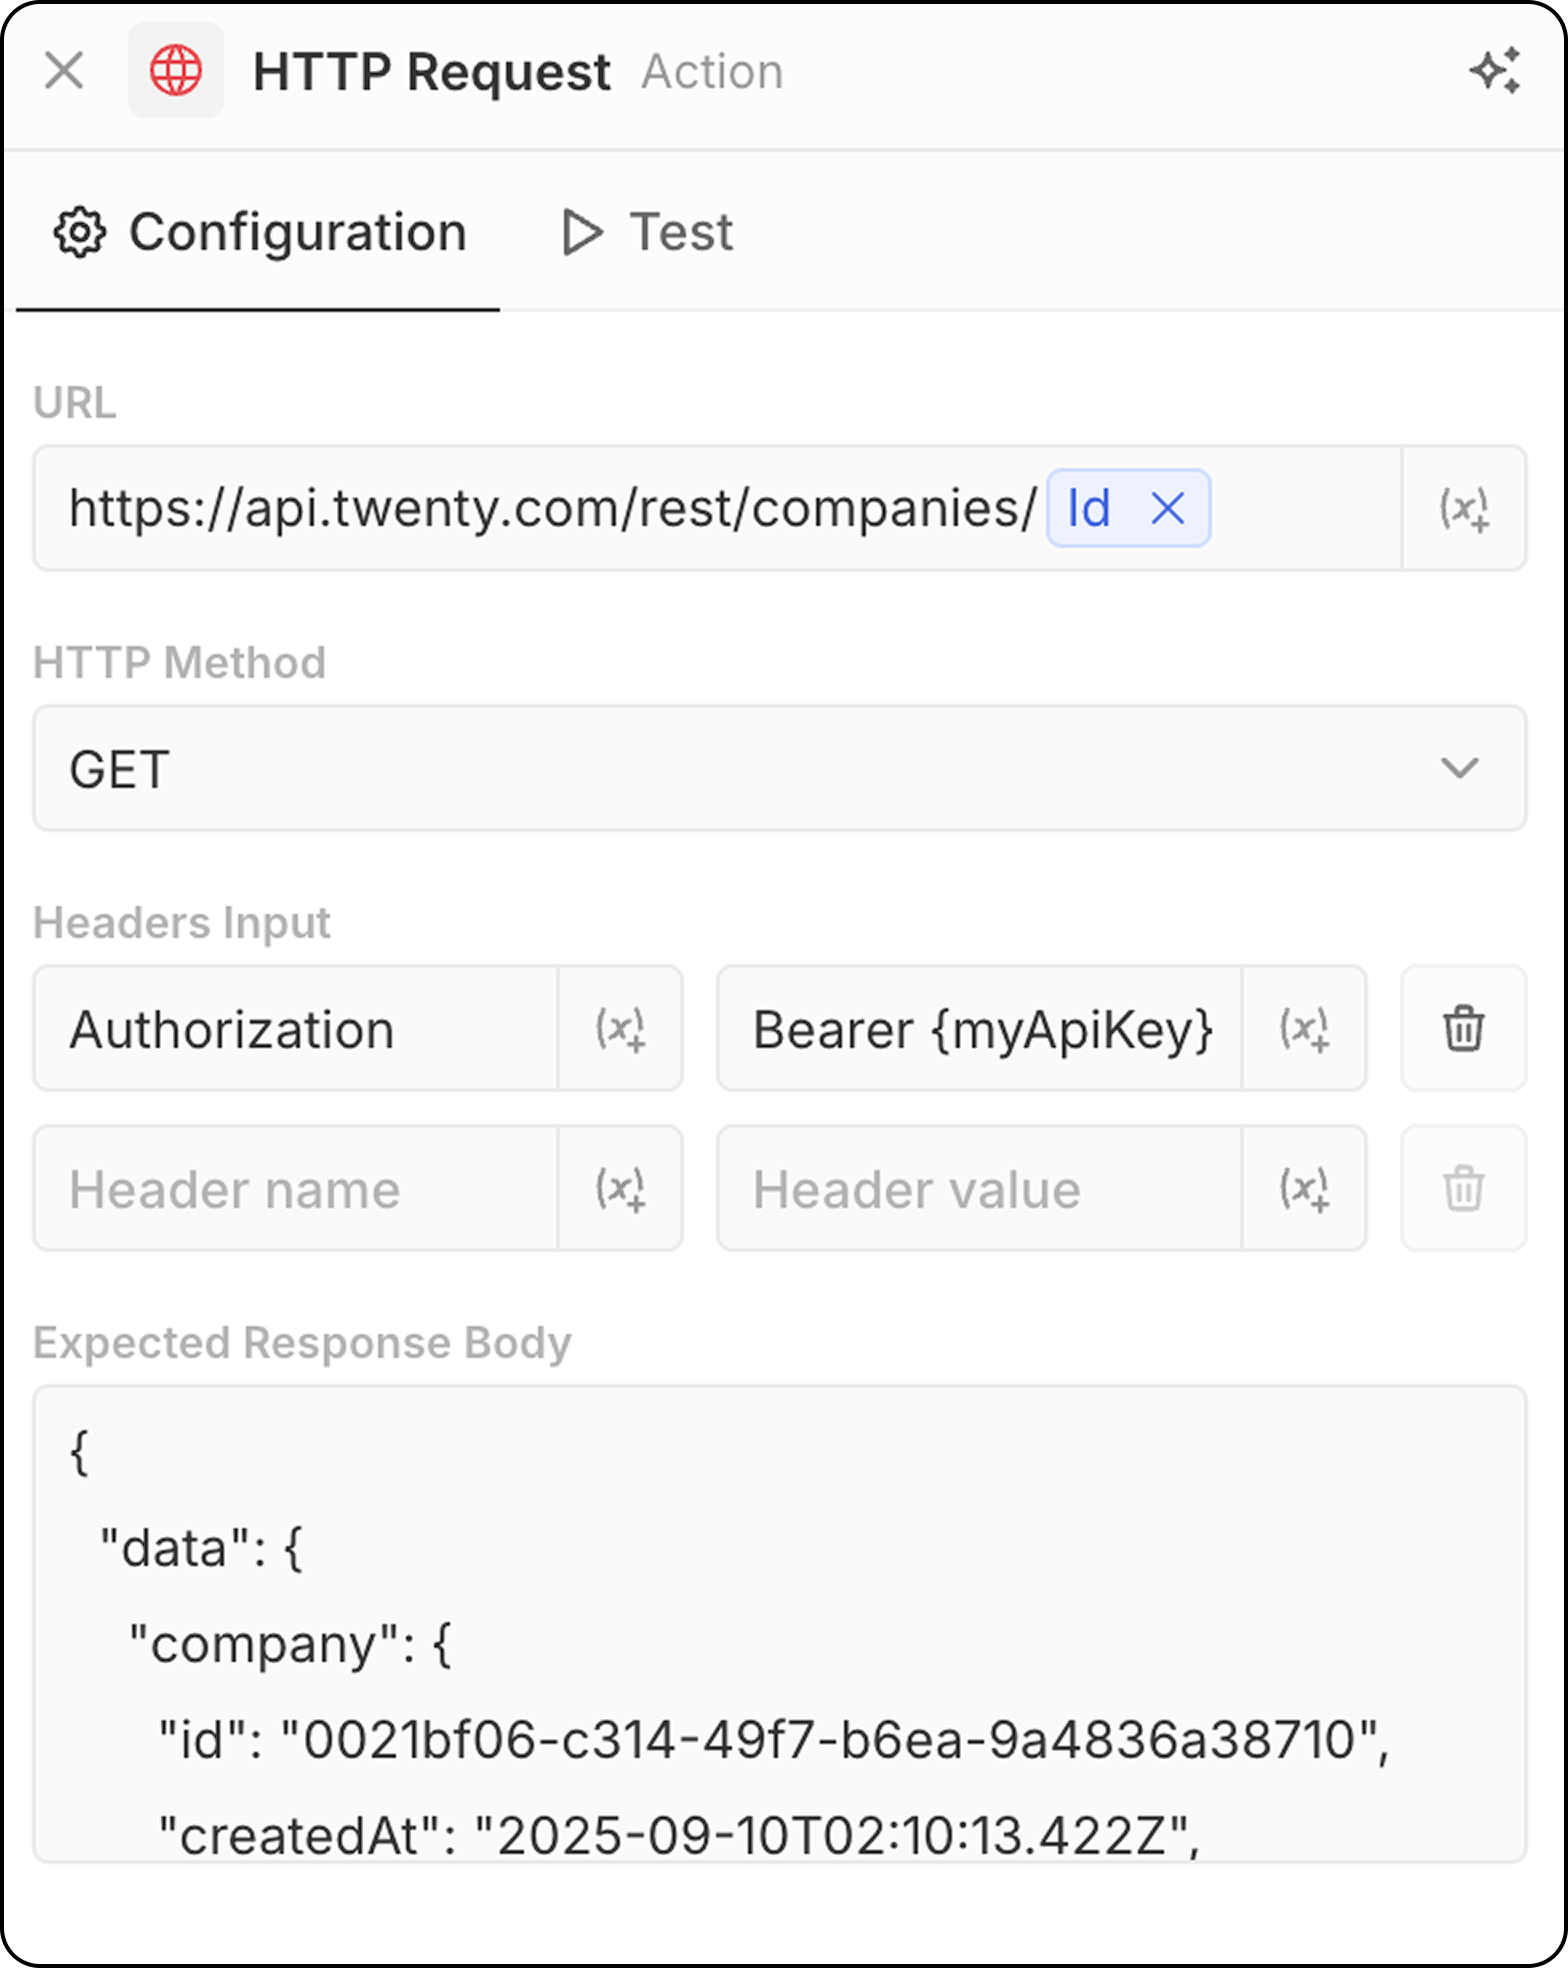
- Geben Sie die API-Endpunkt-URL ein. Die Verwendung von Parametern aus früheren Schritten ist möglich.
- Wählen Sie die HTTP-Methode aus (GET, POST, PUT, PATCH, DELETE)
- Erforderliche Header und Werte hinzufügen
- Beispielantwort zur Strukturvorschau bereitstellen
KI-Aktionen
AI Agent - demnächst
Führt einen KI-Agent innerhalb Ihres Workflows aus, um intelligente Aufgaben auszuführen. Konfiguration:- Agent: Wähle einen vorhandenen KI-Agent oder verwende den Standardmakler
- Anfrage: Schreibe die Anweisung für den KI-Agent
- Referenzvariablen von vorherigen Schritten in der Promption
- Daten analysieren und zusammenfassen
- Einträge klassifizieren oder kategorisieren
- Textinhalt generieren
- Entscheidungen auf Basis von Daten treffen
- Interagiere mit deinen CRM-Daten mithilfe von Tools
AI Agent-Aktionen verbrauchen Workflow-Credits basierend auf dem verwendeten KI-Modell. Siehe Workflow Credits für Details.
Die AI-Agenten respektieren die rollenbasierten Genehmigungen. Sie können Agenten unter Einstellungen → Mitglieder → Rollen bestimmte Rollen zuweisen, um zu steuern, auf welche Daten sie zugreifen können. Siehe Permissions für Details.